Okeydokey...here goes.
When I joined this site, I mentioned in my intro that I was in the slow process of scratch building a full scale P-51D cockpit.
So I thought it was time to give let you know how I'm getting on. Errr....slowly !
It all started with a trip to Oshkosh with my son and my mate Tony (AKA Rocketeer). It's all Tony's fault, he suggested I should build a 'Stang cockpit (Tony has already built a full scale Hurricane cockpit and is doing quite nicely on his spitfire at the moment !) so as I'm easily led astray, I agreed.
I started off with a blank P-51 D panel from Oz via e-bay and then started collecting instruments and 'whathaveyous' as they became available, either from e-bay or from Aerojumbles and Airshows. My parts have mostly come from the States with Canada helping out and a few contributions from Oz (this is truly an International build !). After a while I had a fully 'instrumented' panel for D model and lots of other cockpit fittings (Oxy regulator, radio preselect, cockpit lights etc etc and eventually got a full set of blueprints with a view to actually starting to do the actual build.
The instrument panel is incorrect in that it doesnt have the cut-outs for the Sperry and the A/H. I have still to pluck up enough couragew to cut out the central bits and make new mounts so that I can 'front mount' these two ''clocks'. Its on to-do list !.
First off, I made the bottom Panel surround and then the start panel....then stopped. I haven't done anything build wise since May last year !. Tony kept badgering me to get stuck in and in the end I gave in....and started to help him work on his Spitfire !. Finally, I had a look at my start panel and thought it about time to mark out and cut-out the holes for my Mag switch and a few other bits 'n' bobs. Having drilled out the hole for the Mag switch I then discovered that I'd put the hole in the wrong place !...mental note to ensure that for anything future on this Project, I read the blueprint small print to confirm that its the correct part for the D model and not an earlier version !!!.
At this point...a few weeks ago, I almost gave up on the whole idea when Tony leaps into the rescue and said he would do a new start panel for me. Lo' and behold, Thursday this week, knock on the door and there is Tony with the new panel resplendent in primer !. Blimey !
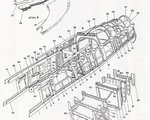
This kind of embarrassed me and so today, I collected the sheet of Ali I had marked out the profile for the lower body panels on (copied from Tony's original skins), brought them home and have started to cut them out. Over the next few evenings I will finish them off, by tidying up the sides where I used a nibbler and jigsaw and centre punch where the rivets will go. Then, next week (Bank holiday week) I will mark out the firewall sections, cut them out and use them as a template for the 'rear' bulkhead. If you look at the pic showing the internal structure, you will see the section I am intending to build and at station 148 there is no bulkhead but I need one to 'close off' the cockpit section. With the firewall and rear bulkhead sections cut and trimmed, I should then be able to assemble the cockpit tub and can then start looking at making the internal ribs and other fittings.
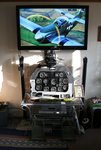
Like Darryl's Spitfire Project , I will be eventually connecting the finished article up to a flight sim, but I am going down a different route to attain this Nirvana. The 'Stang cockpit floor is ideally situated to to my idea s the 'floor' is pretty much covered and the control column has a nice flexible 'boot' at its base. My idea here is to connect via pushrods from the base of the control column, to a conventional PC joystick (take of the pc handle and replace with an upright tube connected at right angles to the pushrod from the main stick) but facing the pilot. This way, pushing forward on the stick...to dive...will 'pull' the pc stick forwards into a dive etc etc. Throttle control will again be via pushrods from the throttle box...yet to get one and at a shade under £900.00 this will have to wait !...to a 'Bowden cable' behind the instrument panel, down to the pc stick's throttle. Rudder control will also be via pushrod from the main set to another PC rudder set behind the firewall.
As for instrumentation, What I hope to do is to collect a further full set of original instruments, in a tatty condition, strip the insides out from them and put in place electronic guts from SimKits, but using the original faces and pointers. These will all be connected via USB and will allow electronic control but using what appears to be fully functioning WW2 era 'clocks'.
Right...enough of the typing and on with pics.
1. The area I intend to build.
2. Panel, gun-sight, stick and pedals.
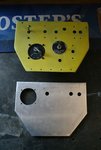
3. My start panel with hole in wrong place and Tony's replacement.
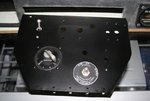
4. The new start panel painted and with some stuff added.
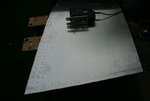
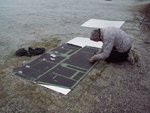
5. Me, marking out the rivet pattern from original skins back in Feb this year..and it was frosty and bl**dy cold !.
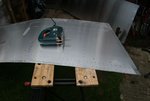
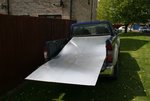
6. The panel skins at home prior to cutting out.
7. Both lower skins cut out but requiring finishing...as at 14:00 hrs today.
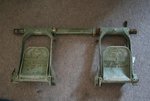
8. My latest arrival, a set of NAA pedals from the States.
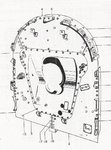
9. NAA plans showing the bits missing from my pedals.
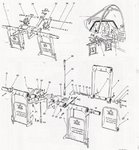
10. NAA print showing the firewall in three section.
11. NAA print shoing some of the internal stuff I have to make from station 148 to 81
I do have a long way to go, but I am now determined to try and do some work, at least every other evening on this long overdue build.
When I joined this site, I mentioned in my intro that I was in the slow process of scratch building a full scale P-51D cockpit.
So I thought it was time to give let you know how I'm getting on. Errr....slowly !
It all started with a trip to Oshkosh with my son and my mate Tony (AKA Rocketeer). It's all Tony's fault, he suggested I should build a 'Stang cockpit (Tony has already built a full scale Hurricane cockpit and is doing quite nicely on his spitfire at the moment !) so as I'm easily led astray, I agreed.
I started off with a blank P-51 D panel from Oz via e-bay and then started collecting instruments and 'whathaveyous' as they became available, either from e-bay or from Aerojumbles and Airshows. My parts have mostly come from the States with Canada helping out and a few contributions from Oz (this is truly an International build !). After a while I had a fully 'instrumented' panel for D model and lots of other cockpit fittings (Oxy regulator, radio preselect, cockpit lights etc etc and eventually got a full set of blueprints with a view to actually starting to do the actual build.
The instrument panel is incorrect in that it doesnt have the cut-outs for the Sperry and the A/H. I have still to pluck up enough couragew to cut out the central bits and make new mounts so that I can 'front mount' these two ''clocks'. Its on to-do list !.
First off, I made the bottom Panel surround and then the start panel....then stopped. I haven't done anything build wise since May last year !. Tony kept badgering me to get stuck in and in the end I gave in....and started to help him work on his Spitfire !. Finally, I had a look at my start panel and thought it about time to mark out and cut-out the holes for my Mag switch and a few other bits 'n' bobs. Having drilled out the hole for the Mag switch I then discovered that I'd put the hole in the wrong place !...mental note to ensure that for anything future on this Project, I read the blueprint small print to confirm that its the correct part for the D model and not an earlier version !!!.
At this point...a few weeks ago, I almost gave up on the whole idea when Tony leaps into the rescue and said he would do a new start panel for me. Lo' and behold, Thursday this week, knock on the door and there is Tony with the new panel resplendent in primer !. Blimey !
This kind of embarrassed me and so today, I collected the sheet of Ali I had marked out the profile for the lower body panels on (copied from Tony's original skins), brought them home and have started to cut them out. Over the next few evenings I will finish them off, by tidying up the sides where I used a nibbler and jigsaw and centre punch where the rivets will go. Then, next week (Bank holiday week) I will mark out the firewall sections, cut them out and use them as a template for the 'rear' bulkhead. If you look at the pic showing the internal structure, you will see the section I am intending to build and at station 148 there is no bulkhead but I need one to 'close off' the cockpit section. With the firewall and rear bulkhead sections cut and trimmed, I should then be able to assemble the cockpit tub and can then start looking at making the internal ribs and other fittings.
Like Darryl's Spitfire Project , I will be eventually connecting the finished article up to a flight sim, but I am going down a different route to attain this Nirvana. The 'Stang cockpit floor is ideally situated to to my idea s the 'floor' is pretty much covered and the control column has a nice flexible 'boot' at its base. My idea here is to connect via pushrods from the base of the control column, to a conventional PC joystick (take of the pc handle and replace with an upright tube connected at right angles to the pushrod from the main stick) but facing the pilot. This way, pushing forward on the stick...to dive...will 'pull' the pc stick forwards into a dive etc etc. Throttle control will again be via pushrods from the throttle box...yet to get one and at a shade under £900.00 this will have to wait !...to a 'Bowden cable' behind the instrument panel, down to the pc stick's throttle. Rudder control will also be via pushrod from the main set to another PC rudder set behind the firewall.
As for instrumentation, What I hope to do is to collect a further full set of original instruments, in a tatty condition, strip the insides out from them and put in place electronic guts from SimKits, but using the original faces and pointers. These will all be connected via USB and will allow electronic control but using what appears to be fully functioning WW2 era 'clocks'.
Right...enough of the typing and on with pics.
1. The area I intend to build.
2. Panel, gun-sight, stick and pedals.
3. My start panel with hole in wrong place and Tony's replacement.
4. The new start panel painted and with some stuff added.
5. Me, marking out the rivet pattern from original skins back in Feb this year..and it was frosty and bl**dy cold !.
6. The panel skins at home prior to cutting out.
7. Both lower skins cut out but requiring finishing...as at 14:00 hrs today.
8. My latest arrival, a set of NAA pedals from the States.
9. NAA plans showing the bits missing from my pedals.
10. NAA print showing the firewall in three section.
11. NAA print shoing some of the internal stuff I have to make from station 148 to 81
I do have a long way to go, but I am now determined to try and do some work, at least every other evening on this long overdue build.
Attachments
-
 m15.jpg41.6 KB · Views: 2,243
 -
 m1.jpg139 KB · Views: 2,243
 -
 m2.jpg101.8 KB · Views: 2,066
 -
 m3.jpg62.8 KB · Views: 1,985
 -
 m6.jpg174.5 KB · Views: 2,083
 -
 m13.jpg118.5 KB · Views: 1,999
 -
 m7.jpg83.5 KB · Views: 1,969
 -
 m10.jpg60.8 KB · Views: 2,000
 -
 m9.jpg78.8 KB · Views: 2,006
 -
 m8.jpg70.7 KB · Views: 1,999
 -
 m12.jpg127 KB · Views: 1,956
 -
 m11.jpg118.7 KB · Views: 1,939