Navigation
Install the app
How to install the app on iOS
Follow along with the video below to see how to install our site as a web app on your home screen.
Note: This feature may not be available in some browsers.
More options
You are using an out of date browser. It may not display this or other websites correctly.
You should upgrade or use an alternative browser.
You should upgrade or use an alternative browser.
P-47 'Bridge Buster', 1/48th scale, 9th Air Force Diorama.
- Thread starter Airframes
- Start date
Ad: This forum contains affiliate links to products on Amazon and eBay. More information in Terms and rules
More options
Who Replied?Aaron Brooks Wolters
Brigadier General
Terry, can you get the Testors Dulcote? It's what I have been using and it is enamel based. I cut it with urethane reducer so it will go through my airbrush with a mix of 1 to 1. And just a light coat does the trick. But if I remember correctly, I think you said before you could not obtain it. Just checking. Oh, and if you can get it, lacquer thinner can be used to cut it.
- Thread starter
- #203
Airframes
Benevolens Magister
Aaron, I can get a couple of brands of enamel matt varnishes, but I stopped using them, as they tend to yellow with age, whereas acrylic varnish or, as I had been using, Future mixed with Tamiya Flat Base, doesn't yellow.
I changed from enamel varnish to Xtracrylic about 20 years ago, because of this, and now I remember I couldn't get a full matt finish then either!
Anyway, I thinned some Tamiya Flat Clear with Isopropyl alcohol, and re-sprayed the model - and it's still satin !
And again, I had to spend a lot of time clearing, and then cleaning, the airbrush, to the point of a complete strip-down, although, being alcohol thinned, the problem wasn't as bad as the water-thinned Xtracrylic.
I'm going to leave it as it is, as some of the decal carrier film is starting to show, and if any more clear coat is applied, the model will look even worse. For the next model, I'll experiment with Tamiya Flat Base mixed with either of the two acrylic varnishes I have, and see if it'll do what the Future/FB mix used to do, before it went t*ts up.
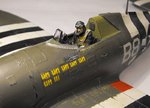
But, I've made a little progress in other areas, with the gun sight finished, the sight mount bracing bars made and fitted, and the armour glass screen in place.
The landing gear legs have also been enhanced, and the gear doors painted on the internal faces.
PIC 1. The gear legs were cleaned up and mould seam marks removed, the torque links and towing eyes drilled out, and the telescope actuating rods and brake lines made and fitted. Not a great pic I'm afraid, as I was tired after five more hours b*gg*ring about, and they are yet to be cleaned and then painted.
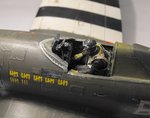
PICS 2 and 3. The completed scratch-built gun sight and the kit armoured glass screen in place, along with the gun sight mount steady brackets. Again, some touch-up and cleaning will be done once everything has fully set.
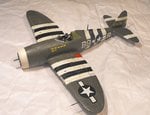
PIC 4. How the model looks to date, with the sheen of the so-called matt clear very evident.
Thanks again for all your kind comments and ongoing interest, and I hope to post some more progress pic soon - if I don't throw a wobbly, the way things are going!
I changed from enamel varnish to Xtracrylic about 20 years ago, because of this, and now I remember I couldn't get a full matt finish then either!
Anyway, I thinned some Tamiya Flat Clear with Isopropyl alcohol, and re-sprayed the model - and it's still satin !
And again, I had to spend a lot of time clearing, and then cleaning, the airbrush, to the point of a complete strip-down, although, being alcohol thinned, the problem wasn't as bad as the water-thinned Xtracrylic.
I'm going to leave it as it is, as some of the decal carrier film is starting to show, and if any more clear coat is applied, the model will look even worse. For the next model, I'll experiment with Tamiya Flat Base mixed with either of the two acrylic varnishes I have, and see if it'll do what the Future/FB mix used to do, before it went t*ts up.
But, I've made a little progress in other areas, with the gun sight finished, the sight mount bracing bars made and fitted, and the armour glass screen in place.
The landing gear legs have also been enhanced, and the gear doors painted on the internal faces.
PIC 1. The gear legs were cleaned up and mould seam marks removed, the torque links and towing eyes drilled out, and the telescope actuating rods and brake lines made and fitted. Not a great pic I'm afraid, as I was tired after five more hours b*gg*ring about, and they are yet to be cleaned and then painted.
PICS 2 and 3. The completed scratch-built gun sight and the kit armoured glass screen in place, along with the gun sight mount steady brackets. Again, some touch-up and cleaning will be done once everything has fully set.
PIC 4. How the model looks to date, with the sheen of the so-called matt clear very evident.
Thanks again for all your kind comments and ongoing interest, and I hope to post some more progress pic soon - if I don't throw a wobbly, the way things are going!
Attachments

Aaron Brooks Wolters
Brigadier General
It's looking very good Terry. I don't know that I wouldn't leave it like that finish wise.
Vic Balshaw
Major General
I don't know who is having the worst time with this build Terry, you, the model or us folks looking on. Reading this is like sucking on a lemon, makes your teeth want to curl and I'm convinced that when you were using acrylic, you were suffering withdrawal symptom due to the lack of enamel fumes………………………………keep smiling though mate, for despite everything, it's looking great.

Lucky13
Forum Mascot
Had it been me, the culprit would probably have been signed off to the spare box!
Agree, still look smashing old chap, carry on!
Snifter?
Agree, still look smashing old chap, carry on!
Snifter?
- Thread starter
- #207
Airframes
Benevolens Magister
Thanks very much for the encouraging comments chaps.
It's annoying that a simple thing like the final clear coat can spoil an otherwise good finish, but what's more annoying is not being able to get a good. matt finish, and the clogging of the airbrush.
I need to look around for both gloss and matt acrylic clear coats which are known to work, and without b*gg*ring up the airbrush. Any suggestions from those with long-term experience of good, reasonably priced varnishes, will be welcome.
I can get Tamiya which, although it's a b*gger regarding hardening time, at least sprays a little easier, but it's only available in tiny 10ml (1/3 oz) bottles, which works out very expensive!
Some others, but by no means all, I have to buy on-line/mail order.
Anyway, all being well I'll have more to show later tonight.
fubar57
General
Sonova Beach, Terry. This one is fighting you tooth and nail but you keep bouncing back nicely.
Geo
Geo
- Thread starter
- #209
Airframes
Benevolens Magister
Thanks George. The model ain't doing the fighting much, but the bl**dy paints and varnishes are at all-out war!
Aaron Brooks Wolters
Brigadier General
You'll get'em whipped. We have faith. And like everyone has said, it looks great.
- Thread starter
- #211
Airframes
Benevolens Magister
Thanks Aaron, it's very much appreciated.
Just doing some more work on the windscreen, adding a rear-view mirror, and painting the gear legs and bombs. Waiting for paint to dry - I'll try to post something later.
Just doing some more work on the windscreen, adding a rear-view mirror, and painting the gear legs and bombs. Waiting for paint to dry - I'll try to post something later.
Angels one-five
Airman 1st Class
Despite the tribulations, you look like you're winning Terry!
Catch22
Major
Sorry to see that you've had so many issues, and that you haven't been well, but it looks darn good. I know what you feel about not feeling up to working on things, I've had a lot of fatigue, which you'd think would be a decent time to build a model but I haven't felt like doing much of anything for the better part of 7 months! Just have to keep cracking!
- Thread starter
- #214
Airframes
Benevolens Magister
Thank guys. Didn't get any photos, as it got late and my eyes were spinning! Should have something to show tonight, I hope.
I know what you mean Cory. Sometimes I've had the enthusiasm but not the energy, and sometimes the other way around !
I know what you mean Cory. Sometimes I've had the enthusiasm but not the energy, and sometimes the other way around !
Aaron Brooks Wolters
Brigadier General
We all suffer from that at times Terry. Nothing unusual.
- Thread starter
- #216
Airframes
Benevolens Magister
Yeah, but irritating. I was all set to get 'stuck in' yesterday and today, but intermittent power cuts prevented this. Apparently some high winds brought a tree down on some power lines not far from me, so it's taken some time to repair things. I've spent half of today mopping up water, where the fridge/freezer defrosted!
Totalize
Tech Sergeant
Look forward to seeing you reach the finish line on this one Terry.
Tony Hill
Tech Sergeant
Nice stuff Terry.
I haven't built a real model since about the time acrylics started to be generally available over here......but I hated them instantly and loved my old Humbrols. Of course my WIFE likes acrylic because some idiot ALWAYS seems to manage to make me spill enamels on my $$$ work shirts when I am using them for the various little things I still paint here and there. And even though she NEVER changes, the first thing she always says to me is "Why didn't you change before you did that???"
Funny little creatures....
- Thread starter
- #219
Airframes
Benevolens Magister
Yep, strange creatures. Don't know why they worry about such things - it's not their shirt, and the washing machine does the hard work anyway!
So after almost four weeks, I've managed to bully my hands into working just enough to make a mediocre job of adding a few bits, and enhancing others, although I'll admit, the work could be (and should be!) better. Pity my LHS doesn't sell new hands - and arms, legs etc!!
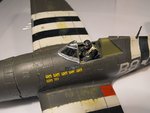
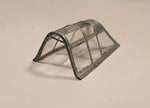
PICS 1 and 2. The windscreen has been fitted and sort of blended in, after making and fitting a rear view mirror, cut from the end of a Spitfire clipped wing tip! The canopy frames have been repainted, using Xtracolour 'RLM 01 Silber', and the internal handle added, from stretched sprue. I'm not that happy with the joint of the windscreen to fuselage - after removing a tiny piece of clear plastic flash I'd missed earlier, the 'screen still wouldn't bed-down properly, and no amount of joint-filling, using both PVA and then, in desperation, a mix of varnish and talc, would get the joint line to disappear. Still, it doesn't look too bad in 'real life', and like the far from matt clear coat, I'll have to live with it.
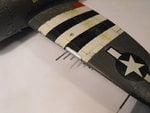
PIC 3. After a bit of fiddling to ensure the lengths and 'stagger' were correctly set, the stainless steel, 'glue tube' guns have been fitted. Actually, the port inner gun is a touch under 1 mm too long, but I didn't want to risk spoiling things, with my knackered hands, trying to correct it!
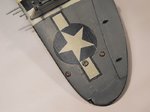
PICS 4 and 5. Navigation lights, I.D. and landing lamps have been coloured and glazed with 'Clear Fix, and the black 'sealing trim' surrounds have yet to be tidied up, and some re-touching done.
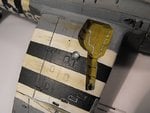
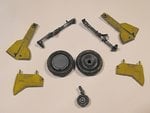
PIC 6. Undercarriage legs, wheels and doors have been painted and weathered, with the gear leg 'data plates' hand-painted.
Next step , before turning to the final details and then painting and fitting the prop, will be to paint, detail and fit the bombs and fuselage drop tank.
Then it'll be time to start on the figures and diorama base .....
So after almost four weeks, I've managed to bully my hands into working just enough to make a mediocre job of adding a few bits, and enhancing others, although I'll admit, the work could be (and should be!) better. Pity my LHS doesn't sell new hands - and arms, legs etc!!
PICS 1 and 2. The windscreen has been fitted and sort of blended in, after making and fitting a rear view mirror, cut from the end of a Spitfire clipped wing tip! The canopy frames have been repainted, using Xtracolour 'RLM 01 Silber', and the internal handle added, from stretched sprue. I'm not that happy with the joint of the windscreen to fuselage - after removing a tiny piece of clear plastic flash I'd missed earlier, the 'screen still wouldn't bed-down properly, and no amount of joint-filling, using both PVA and then, in desperation, a mix of varnish and talc, would get the joint line to disappear. Still, it doesn't look too bad in 'real life', and like the far from matt clear coat, I'll have to live with it.
PIC 3. After a bit of fiddling to ensure the lengths and 'stagger' were correctly set, the stainless steel, 'glue tube' guns have been fitted. Actually, the port inner gun is a touch under 1 mm too long, but I didn't want to risk spoiling things, with my knackered hands, trying to correct it!
PICS 4 and 5. Navigation lights, I.D. and landing lamps have been coloured and glazed with 'Clear Fix, and the black 'sealing trim' surrounds have yet to be tidied up, and some re-touching done.
PIC 6. Undercarriage legs, wheels and doors have been painted and weathered, with the gear leg 'data plates' hand-painted.
Next step , before turning to the final details and then painting and fitting the prop, will be to paint, detail and fit the bombs and fuselage drop tank.
Then it'll be time to start on the figures and diorama base .....
Attachments
vikingBerserker
Lieutenant General
The landing gear parts look fantastic!
Users who are viewing this thread
Total: 1 (members: 0, guests: 1)