P-47 'Bridge Buster', 1/48th scale, 9th Air Force Diorama.

Ad: This forum contains affiliate links to products on Amazon and eBay. More information in Terms and rules

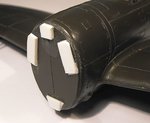
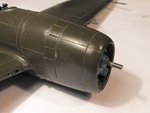
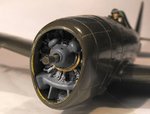
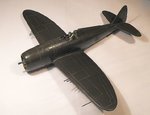
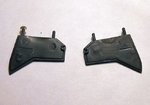
You're crackin on on this bird.....
I see you have a chisle that I've seen, how do you like using it?
 
Thanks chaps.
Bill, the little chisel is a great bit of kit, and extremely sharp. It makes a heck of a difference when shaving small areas, and when tackling things like ejector pins. I used to do almost all work with just the scalpel, and maybe a razor saw and/or file, but with the arthritis getting worse, and articulation and grip limited, and especially with the rigid fingers getting in the way, I'm having to find different ways of doing things, and therefore different tools. I think I've bought more modelling tools in the last couple of years, than I have in the last fifty years!
Anyway, the engine is painted, fitted into the cowling, and this assembly is now stuck onto the front of the fuselage, and the tail planes are on. The pics show what had to be done.
PIC 1. As mentioned in George's GB thread, the fit of the cowl to the fuselage was very nebulous, with very little in the way of mating surfaces, so some extra support was provided, by gluing scrap plastic around the front of the fuselage, and filing this roughly to shape, to provide something to glue the cowling rim to.
PIC 2. The moulding of the engine was somewhat 'soft', an indication of the age of this kit, so I didn't even try to add any further detail, apart from a piece of 'Sylon' mesh in the opening for the intercooler intake. Even painting was a bit haphazard, due to the uneven moulding of the once sharp details, but, bearing in mind the degree of magnification shown in the pic, it looks acceptable to the naked eye, with the impression of the ignition harness, push rods, and the data plates and maker's badge giving it a bit of 'life'.
PIC 3. The cowling assembly has been firmly fitted to the fuselage, after first making saw cuts in the cowl flaps, and painting the interior in 'dirty' yellow zinc chromate, followed by a light, 'oily' wash, to tone things down a bit.
PIC 4. Once the prop is on, a lot of the engine will be masked from view, and hopefully it should look convincing enough.
PIC 5. There are very slight gaps at the tail plane joints, even though the mating surfaces were sanded to remove the moudling seams. But these should be easy to fill, probably with PVA, once the model has been primed.
PIC 6. How the model looks to date, and with those moulded guns already showing signs of going on holiday! I'm fairly sure that I'll remove these, and replace with stainless steel tube, cut from Revell cement bottles, if the cutting discs on my motor tool thingy can handle the job, otherwise it'll be either brass micro tube, or hypodermic needles.
There's a few little areas to clean up, then it'll be time to mask, and spray a light grey primer overall. All being well, I'll have another up-date in the next day or so.
 

Attachments

  • P-47 Build 098.jpg
    P-47 Build 098.jpg
    81.1 KB · Views: 178
  • P-47 Build 102.jpg
    P-47 Build 102.jpg
    39.5 KB · Views: 195
  • P-47 Build 107.jpg
    P-47 Build 107.jpg
    54.5 KB · Views: 205
  • P-47 Build 113.jpg
    P-47 Build 113.jpg
    51.2 KB · Views: 182
  • P-47 Build 099.jpg
    P-47 Build 099.jpg
    54.2 KB · Views: 190
  • P-47 Build 111.jpg
    P-47 Build 111.jpg
    77 KB · Views: 178
Thanks for that on the shisle......
you did address this. My IPMS, or PMS as Annie refers to it, is doing an OOB build and I was told "if it ain't in the box, you can't use it"! Although scratch building is okay but you would have to use the sprue.
 
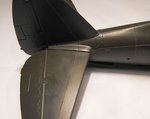
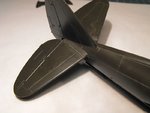
Coming along now Terry. It's odd, I got a good fit on top-side of the elevator and what looks like yours on the bottom.

Geo

When I test-fitted the tail planes, they seemed to fit snugly, with the elevator hinge post slotting neatly into the hole, and the wing tabs aligning and locking together inside the fuselage. But there was a tiny bit of interference from ejector pin 'lumps' on the tabs, so I filed these off - then the fit wasn't as good!
I think I might try to see if the starboard tail plane will work loose, and then re-fit it. If not, then it only needs a smidgin of filler, either PVA or a very thin thread of stretched sprue.
BTW George, I've just noticed there's a trim tab on the starboard aileron which shouldn't be there - in case you don't see this, I'll mention it in your GB thread.

Bill, Jerry and Vic, thanks guys. Hoping to get the grey primer sprayed sometime today.
 
Thanks mate.
That tail plane joint has been taken care of, as has the unwanted trim tab, and the first primer coat has been applied.
PIC 1. The tail plane joint was filled with superglue, and then sanded once set. Looking at it under the primer, it may need a small bead of PVA, but I'll have to wait and see.
PIC 2. The first primer coat, basically the underside colour, has been lightly applied in order to cover the dark green plastic, check for any flaws, and provide a good base and 'key' for the camouflage colours. This was mixed from relatively new Humbrol matt white and matt black, with the white being like partly melted ice cream before thinning - a real waste of rations!
I had to thin the mix more than I would have liked, in order to get it to spray properly, which lead to a rather thin, 'runny' first coat, and it may need some light sanding and re-touching in parts. Sorry about the 'grainy' photo, but it was a 'quick snap', without first checking the camera settings!
PIC 3. I forgot to photograph the trim tab before spraying the model, but the engraving was filled with superglue, then sanded once dry, and a feint outline can be seen here, outboard of the fixed tab. This should disappear once the Olive Drab is sprayed.
PIC 4. Whilst the model is drying, the wheel well doors are being improved. On the left is an untouched door, showing the ejector pin marks, and just a hint of the semi-circular depression, between the hinges, designed to accommodate the wheel edge when the door is closed. At the right is the other door, in the process of having the ejector marks removed, and the depression improved.
Given that the primer/underside colour dries OK, next step will be to lay down the white for the AEAF stripes, and the nose, fin, and tail plane I.D. bands.
Hopefully, I'll get this done tomorrow, given that the Humbrol behaves itself.
 

Attachments

  • P-47 Build 120.jpg
    P-47 Build 120.jpg
    59.2 KB · Views: 184
  • P-47 Build 121.jpg
    P-47 Build 121.jpg
    94.6 KB · Views: 187
  • P-47 Build 122.jpg
    P-47 Build 122.jpg
    93.4 KB · Views: 186
  • P-47 Build 115.jpg
    P-47 Build 115.jpg
    52.4 KB · Views: 175
I agree and nice references there Brooks. Wish I had those 2 months ago!

You will have to forgive me Andy, I haven't been keeping up with the builds like I should and have missed quite a few. I am sorry.:oops: Just send me a PM, if I have photos, they are yours. I don't have many aircraft though. But ASK!:lol:
 
No worries Brooks. I ws not intending to chastise you so hope yiu did not take it the wrong way. I did have a few wheel well pics and decided I was not going to detail the area anyway. I was a bit confused by the brake lines and linkages on the gear struts and your excellent pics confirm what I picked up from a few other references.
 
Thanks chaps. Didn't get any more done today, as I've been a been a bit drowsy. Went back to bed after getting the Mail this morning, and din't wake up until 23.30!! Hopefully I'll get more painting done Wednesday and Thursday.
 

Users who are viewing this thread

Back