Navigation
Install the app
How to install the app on iOS
Follow along with the video below to see how to install our site as a web app on your home screen.
Note: This feature may not be available in some browsers.
More options
You are using an out of date browser. It may not display this or other websites correctly.
You should upgrade or use an alternative browser.
You should upgrade or use an alternative browser.
RCAF CF-104 'Starfighter', 1/48th scale.
Ad: This forum contains affiliate links to products on Amazon and eBay. More information in Terms and rules
More options
Who Replied?- Thread starter
- #22
Airframes
Benevolens Magister
Thanks my friend !
yep some good progress Dogsbody, good to see you wielding the plastic again.
- Thread starter
- #24
Airframes
Benevolens Magister
Cheers mate. BTW, I didn't bid on that Eurofighter - it went for 17 quid, and they're only £12 at KK !!
Was just going to tell you that !Cheers mate. BTW, I didn't bid on that Eurofighter - it went for 17 quid, and they're only £12 at KK !!
Looking good though Terry but for a NM finish got to be almost perfect like 95% and better.I am fighting the same on my build of the Br20(old kit) on the nose and after sanding 3X times and repainting am hoping camo blends it the rest of the way.
Last edited:
Crimea_River
Marshal
Tough sledding Terry but at least it ain't a Buccaneer.
- Thread starter
- #28
Airframes
Benevolens Magister
Don't mention that ****ing thing !
Crimea_River
Marshal
BuccaneerBuccaneerBuccaneerBuccaneerBuccaneerBuccaneerBuccaneerBuccaneerBuccaneerBuccaneerBuccaneerBuccaneerBuccaneerBuccaneerBuccaneerBuccaneerBuccaneerBuccaneerBuccaneerBuccaneerBuccaneerBuccaneerBuccaneerBuccaneer
- Thread starter
- #30
Airframes
Benevolens Magister
Bl**dy Lumberjacks !!
Crimea_River
Marshal
I'll get me buttered scone....
- Thread starter
- #32
Airframes
Benevolens Magister
As long as you're not hanging around in bars ................
Catch22
Major
Well I lack the beard and the plaid to be a lumberjack personally, but I do see a few around, although they're mostly hipsters!
Great work so far Terry, nice to see you back at it.
- Thread starter
- #34
Airframes
Benevolens Magister
Thanks Cory. I got quite a lot of the tedious sanding done, between bouts of trying to do the GB scores, but there's still lots to do, even after over three hours of laborious filing, more filler, filing and sanding and polishing.
I might have more to show later, but to anyone who may be considering doing a bare metal F-104, do yourself a favour, and use a different kit !
The Revell kit would be fine for a camouflage or single-colour scheme, but the fit of joints takes too much work to obtain the smooth, blemish-free surface needed for a metal finish.
- Thread starter
- #35
Airframes
Benevolens Magister
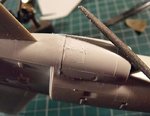
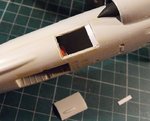
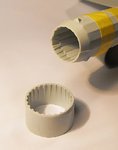
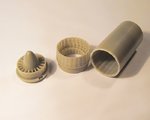
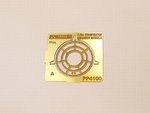
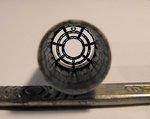
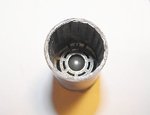
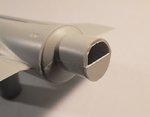
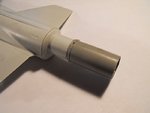
A few pics to show some of the work involved to eliminate, as best as possible, the joints in the intakes, gun hatch and radome, as well as fitting the resin jet pipe, and the rear fuselage / fin assembly.
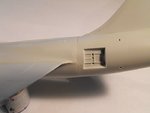
PICS 1 to 3. The intakes being attacked with a jeweler's file, and after initial sanding, the gaps filled with 'Milliput', blended up to the area of the boundary layer separation. When fully cured, further sanding and polishing will be done.
PIC 4. The joint between fuselage and radome has been sanded, and awaits polishing.
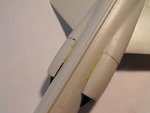
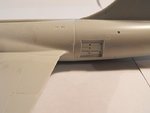
PICS 5 and 6. The gun hatch cover was a very poor fit, sinking into the aperture, and with a gap all around the edges. A piece of thin plastic strip was used a a shim and then the hatch cemented in place, filled, and roughly sanded. Again, final sanding and polishing has yet to be done.
PICS 7 to 10. The kit jet pipe was cut off earlier, and this is what it looked like, along with the kit part for the after-burner nozzle. The resin and P.E. parts are a huge improvement., shown here before, and after assembly and painting.
PIC 11. The truncated kit pipe had a rebate set in to the lower half, and a disc of plastic card added, to provide a better mating surface for the resin part. Once the plastic disc had set, the rough edges were sanded flush, before attaching the resin pipe.
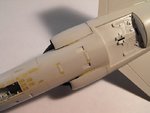
PIC 12. The resin jet pipe in place. This was designed for use with the Hasegawa kit, hence the mods to the Revell kit parts, and doesn't quite align properly within the rear fuselage, but once the after-burner can is fitted (after the model has been painted) this won't be noticeable.
PIC 13. The rear fuselage assembly was fitted, after counter-sinking holes on each side for the position lights, which will be painted and glazed after painting the model. As can be seen, the joint is once again quite rough, and a lot of work was needed to correct this, and thin-out the wing root fillet.
PIC 14. The joint has been atacked with the file again, then filled with 'superglue' and sanded, and awaits polishing. It's actually a lot smoother than it looks here and, when the paint is applied, I'm hoping that the variation in metal shades at the joint line will help to conceal any remaining rough areas. Once the model is polished with aluminium finger-print powder, before painting, any imperfections will be immediately obvious !
PIC 15. How it looks to date.
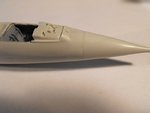
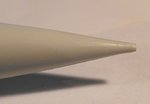
PIC 16. Next step is to correct the nose profile, which should be a continuous taper, in order to match the brass pitot tube.
Thanks again for your interest, and I'll post more soon.
PICS 1 to 3. The intakes being attacked with a jeweler's file, and after initial sanding, the gaps filled with 'Milliput', blended up to the area of the boundary layer separation. When fully cured, further sanding and polishing will be done.
PIC 4. The joint between fuselage and radome has been sanded, and awaits polishing.
PICS 5 and 6. The gun hatch cover was a very poor fit, sinking into the aperture, and with a gap all around the edges. A piece of thin plastic strip was used a a shim and then the hatch cemented in place, filled, and roughly sanded. Again, final sanding and polishing has yet to be done.
PICS 7 to 10. The kit jet pipe was cut off earlier, and this is what it looked like, along with the kit part for the after-burner nozzle. The resin and P.E. parts are a huge improvement., shown here before, and after assembly and painting.
PIC 11. The truncated kit pipe had a rebate set in to the lower half, and a disc of plastic card added, to provide a better mating surface for the resin part. Once the plastic disc had set, the rough edges were sanded flush, before attaching the resin pipe.
PIC 12. The resin jet pipe in place. This was designed for use with the Hasegawa kit, hence the mods to the Revell kit parts, and doesn't quite align properly within the rear fuselage, but once the after-burner can is fitted (after the model has been painted) this won't be noticeable.
PIC 13. The rear fuselage assembly was fitted, after counter-sinking holes on each side for the position lights, which will be painted and glazed after painting the model. As can be seen, the joint is once again quite rough, and a lot of work was needed to correct this, and thin-out the wing root fillet.
PIC 14. The joint has been atacked with the file again, then filled with 'superglue' and sanded, and awaits polishing. It's actually a lot smoother than it looks here and, when the paint is applied, I'm hoping that the variation in metal shades at the joint line will help to conceal any remaining rough areas. Once the model is polished with aluminium finger-print powder, before painting, any imperfections will be immediately obvious !
PIC 15. How it looks to date.
PIC 16. Next step is to correct the nose profile, which should be a continuous taper, in order to match the brass pitot tube.
Thanks again for your interest, and I'll post more soon.
Attachments
-
 DSCF0005 (3).JPG74.4 KB · Views: 118
 -
 DSCF0001 (7).JPG41.8 KB · Views: 117
 -
 DSCF0002 (6).JPG47.9 KB · Views: 117
 -
 DSCF0006 (4).JPG42 KB · Views: 113
 -
 DSCF0001 (6).JPG76 KB · Views: 118
 -
 DSCF0007 (4).JPG94.9 KB · Views: 120
 -
 DSCF0013.JPG32 KB · Views: 123
 -
 DSCF0004.JPG41.8 KB · Views: 123
 -
 DSCF0011 (2).JPG45.9 KB · Views: 126
 -
 DSCF0010 (4).JPG70.1 KB · Views: 123
 -
 DSCF0014.JPG37.3 KB · Views: 132
 -
 DSCF0017.JPG50.3 KB · Views: 120
 -
 DSCF0019.JPG41.5 KB · Views: 117
 -
 DSCF0031.JPG39 KB · Views: 121
 -
 DSCF0004 (4).JPG37.7 KB · Views: 112
 -
 DSCF0002 (7).JPG37.2 KB · Views: 125
 -
 DSCF0007 (5).JPG33.9 KB · Views: 121
Nice job Terry.
- Thread starter
- #37
Airframes
Benevolens Magister
Cheers mate.
fubar57
General
You're making it work Terry. Might just use the Hasegawa version for the metal scheme and this model for the checkerboard scheme.
Geo
Geo
- Thread starter
- #40
Airframes
Benevolens Magister
Thanks Wojtek and Geo.
Yes, definitely use the Hasegawa kit for a bare metal scheme Geo. The Revell kit will be OK in a painted finish, especially any of the two checkerboard schemes, as the joints won't show up as much as they will under a 'silver' coat. Even tiny sanding scratches look like trenches under silver paint.
Yes, definitely use the Hasegawa kit for a bare metal scheme Geo. The Revell kit will be OK in a painted finish, especially any of the two checkerboard schemes, as the joints won't show up as much as they will under a 'silver' coat. Even tiny sanding scratches look like trenches under silver paint.
Users who are viewing this thread
Total: 1 (members: 0, guests: 1)