RCAF CF-104 'Starfighter', 1/48th scale.

Ad: This forum contains affiliate links to products on Amazon and eBay. More information in Terms and rules

Cheers. The shoulder and neck are still a little uncomfortable, and painful when doing some work, but nowhere near as bad as it was. I have the feeling that surgery may be required at some stage though, as there is definite damage and some loss of muscle.
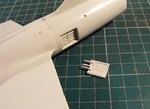
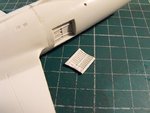
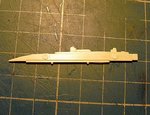
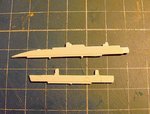
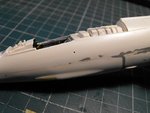
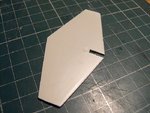
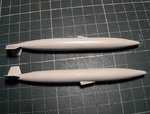
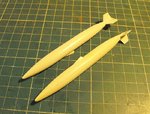
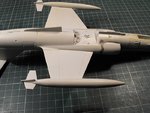
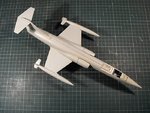
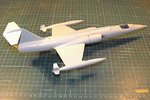
Just finishing off the main areas of airframe preparation, and I'll post some pics very soon, before starting on the tricky masking, ready for the initial painting stage.
 
I've eventually managed to make some visible progress, in between dashing around trying to get all the domestic chores done, send off stuff to my daughters, replying to e-mails, forgetting to send Christmas cards, shopping for groceries and so on. This weekend has just vanished in a blur, and I was supposed to be going out for a late lunch this afternoon, but just didn't have the energy !
The sooner this mad holiday period is over, the better !

Anyway, after getting the fuselage and joints smoother than one of Jan's chat-up lines, and further polishing to remove tiny abrasions that would show-up under silver paint, attention could be directed towards fitting the bits and pieces up to the point to be ready for paint preparation.

PICS 1 to 3. The air brakes are rarely, if ever, in the open position on parked Starfighters, so the kit parts had to be modified, as they are designed to be in the open position only. The 'hinges' were removed, and the inner faces filed down to allow the brakes to fit into the fuselage recess, before cementing in place. Fit isn't perfect, but with careful painting of the brake surface and the various metal tones of the surrounding area, they should look acceptable.
PICS 4 and 5. A center line stores pylon was required, so one of the kit's 'Sidewinder' pylons was adapted, after first removing yet more, rather large, ejector pin marks. The pylon was cut, trimmed and sanded to shape, retaining part of the original locating pins, which would be fitted into holes drilled in the under side of the fuselage. The second shot shows the finished pylon, with a little added surface detail, in comparison to the kit part. It's not 100% accurate but, partly hidden under the fuselage, it'll be good enough for me.
PICS 6 and 7. A slot has been cut under the nose, ready to fit a blade antenna later, and a small hole drilled in the port fuselage side, where a Angle of Attack probe will be made and fitted after painting the model.
PIC 8. Yet another large ejector pin had to be removed from the tail plane, before this was cemented in place. Checking and maintaining alignment was a bit tricky, due to the minimal mating surfaces.
PICS 9 and 10. A lot of attention was given to the joints in the wing-tip tanks, as these will also be 'bare metal', and hardly hidden from view, stuck out on the ends of the short wings. The joints were first carefully scraped and 'shaved' with the scalpel, and then gently filed with a fine jeweler's file, then wet-sanded with worn, very fine grit wet ' dry, before long and vigorous polishing with the 'T-Cut' car body colour restorer.
The first pic shows the tanks in stages of preparation, whilst the second pic shows the final result.
I anticipated big problems in fitting these to the wing tips, after attaching the remaining fins, as the jointing surfaces are minimal, they had a tendency to 'sag', and the angle, in relation to the wing, had to be precisely aligned. But, they went on without a hitch, with the aid of a small spot of CA to prevent 'sag', and will only require a tiny amount of PVA to seal around the aperture at the wing joint itself.
PIC 11. The ventral fin and modified stores pylon in place, and again, a small amount of PVA should fill the tiny gaps between the fin and the fuselage.
PICS 12 and 13 show how the model looks to date, at last starting to look like the 'Missile with a Man in It'.

Next step is to check and clean all joints as required, before a general rub down with a damp cloth, in preparation for masking for the first stage of painting. This will entail painting the dielectric panels, the grey panel on the fin, the radome and anti-dazzle panel, and priming the wings and tail plane, ready for the application of the gloss white and light grey. I might have to fit the turned-brass pitot before commencing, in order to ensure a clean joint, and blend it into the sharp profile of the nose, although I'd prefer to fit this later if possible.
The 'bare metal' finish, and the various contrasting metal areas, will be done once I've completed some comparison tests with five different metallic paints, some of which will also be altered with small additions of gloss black or white. Given I find some spare time, I might get the initial painting done tomorrow.

Thanks again for your interest and kind comments, and I hope to have another up-date soon - there's sod-all else to do over Christmas !
 

Attachments

  • DSCF0003 (6).JPG
    DSCF0003 (6).JPG
    70.4 KB · Views: 61
  • DSCF0008 (6).JPG
    DSCF0008 (6).JPG
    69.5 KB · Views: 62
  • DSCF0011 (4).JPG
    DSCF0011 (4).JPG
    54.8 KB · Views: 59
  • DSCF0001 (9).JPG
    DSCF0001 (9).JPG
    128.3 KB · Views: 57
  • DSCF0006 (7).JPG
    DSCF0006 (7).JPG
    138.6 KB · Views: 57
  • DSCF0003 (7).JPG
    DSCF0003 (7).JPG
    60.4 KB · Views: 71
  • DSCF0004 (5).JPG
    DSCF0004 (5).JPG
    59.9 KB · Views: 59
  • DSCF0001 (8).JPG
    DSCF0001 (8).JPG
    98.6 KB · Views: 67
  • DSCF0002 (9).JPG
    DSCF0002 (9).JPG
    91.4 KB · Views: 72
  • DSCF0007 (6).JPG
    DSCF0007 (6).JPG
    101.6 KB · Views: 60
  • DSCF0016.JPG
    DSCF0016.JPG
    79.8 KB · Views: 63
  • DSCF0011 (5).JPG
    DSCF0011 (5).JPG
    98.9 KB · Views: 64
  • DSCF0015.JPG
    DSCF0015.JPG
    110.3 KB · Views: 58
You take very well Terry. =D>
I'll keep an eye on the progress of your bird.

A big hug and best wishes to you and yours in this season and next year. :x-mas:

Feliz Navidad y próspero 2015.

Luis Carlos
SANCER
 
Thanks Cory and Andy.
Just finished a little panel engraving, as the more prominent panel lines, such as the auxiliary intake doors, were either non-existent, or very feint raised detail. The radome, under sides of the wings, and the small grey panels on the tail fin and ventral fin have been painted. Wing tops, tail plane, anti-dazzle panel and intake de-icers are next, before figuring out the paint mixes, and spraying sequence, for the metal finish, which I'm hoping I can get started sometime tomorrow.
 
Another masterpiece underway, Terry. I hope your airframe issues get better soon. Nothing like a bit of therapeutic modelling to ease the pain! :)
 
Thanks Grant and Geo.
If my body was an airframe, it would have been retired to a museum - or the scrap yard - due to stress caused by 'g' overload, and with the powerplant beyond economical hours !
Just off to get some more white paint and other bits n' bobs, and I'll try not to depart from the LHS laden down with other goodies !!
Might have some pics of painted areas later tonight.
 
Well she is starting to look like a StarFighter Terry and it by the looks of it you overcame hopefully the seams for the NM finish.:thumbright:
 
Thanks Kevin.The next step (after painting the 'solid' colours first) will certainly show any surface imperfections, as polishing with the aluminium finger-print powder very quickly reveals even the thought of a wrinkle, gap or tiny scratch !
 
Thanks Karl. Our friends at KK have this kit, and other versions of the Revell/Monogram kit in stock, at reasonable prices. No BundesLuftwaffe as far as I could see, but there's decal sheets available, and I could probably find some spare crosses and numbers etc which would suit. I wouldn't mind doing another of '771' in the overall green Danish scheme she wore when first transferred to the RDanAF, and a Luftwaffe version too. Got to stop somewhere though!

Kevin, I've been using the powder for many years, having 'adapted' the original method of use, as suggested from SNJ Products, to obtain a good metal finish. See my 'Bare Metal Made Easy' guide, elsewhere on the forum.
Since the demise of SNJ, I hunted around and found a UK forensic supplies company who supply the finger-print powder (same stuff as bottled by SNJ) in various size tubs, and bought a couple of 30 gramme tubs for a fraction of the cost of the original, small SNJ bottle I last bought over 20 years ago.
 
Wow Terry! Great work on a tough kit. You must have a high pain tolerance wanting to turn this Zipper into a NMF one. And while going through you physical pain too.
 
Nah, I'm just stupid ! But thanks for the compliment !

Things have stalled slightly, once again due to wonderful Humbrol paint!
I bought a new tin of Humbrol Satin Black today, to use on the anti-dazzle panel, intake shock cones and de-icer boots, as the Matt Black I have (again Humbrol) is far too matt, giving a 'dusty' finish which would a great duplicate for early WW2 Bomber Command 'lamp black' finish.
The required areas were masked, the paint stirred thoroughly, a touch of thinner mixed in, and then brushed on. It looks like horrible, rubbery tar, with a sticky, gloss finish !
Consequently, I can't handle the model, continue with further masking, or anything else, until this rubbish fully dries - if it dries !
If it does, then it can be corrected with the addition of a matt clear coat later, otherwise, I'll have to strip it and start over again, using the Matt Black, and clear-coating that too. What a pain, as I had hoped to get the white on the wings and tail-plane, and possibly mask, ready to apply the polishing powder, before commencing the first stage of the metal finish tomorrow.
Ah, well. I'll mess around with the various metallic paints instead, to determine the best shades for the various areas - or go to the pub !
I'll post more once things are sorted and, if anyone hears a large explosion emanating from the Kent area - it wasn't me Officer, honest !
 

Users who are viewing this thread

Back