Terry I am glad I have never run into your troubles w/Humbrol.The LHS has tins that go way back and they had to be relabeled with the Humbrol logo/address for the new company and that's how I buy it relabeled with the ole label still visible somewhat.
Navigation
Install the app
How to install the app on iOS
Follow along with the video below to see how to install our site as a web app on your home screen.
Note: This feature may not be available in some browsers.
More options
You are using an out of date browser. It may not display this or other websites correctly.
You should upgrade or use an alternative browser.
You should upgrade or use an alternative browser.
RCAF CF-104 'Starfighter', 1/48th scale.
Ad: This forum contains affiliate links to products on Amazon and eBay. More information in Terms and rules
More options
Who Replied?- Thread starter
- #82
Airframes
Benevolens Magister
If it's the old stuff with the old Hull address, then it'll be good stuff Kevin. It used to be the best in the World, until Humbrol closed after one of the various company take-overs. Regrettably, it's now second-rate tat, with only the Humbrol name retained.
Fortunately, the black has dried, although it's a smooth gloss. But at least I can do something with it and, looking at the anti-dazzle panel after removing the masking tape, the shape needs to be adjusted anyway, plus there's a small area where the I.R. sight was removed which needs further attention. That's tomorrow's job!
Meanwhile, some of the smaller 'solid' colour areas have been painted, and I've tested various paint shades, to help decide which colours, or mixes, will be used for the main fuselage, and the various metal shades on the rear fuselage, gear doors, and wing-tip tanks.
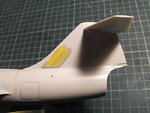
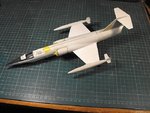
PIC 1 shows that anti-dazzle panel, as well as the radome in light grey, the pale, buff-coloured dielectric antenna panel aft of the avionics bay, and the intakes. The required corrections will be done tomorrow, before masking these areas, and spraying the white on the wing tops, and both surfaces of the tail plane.
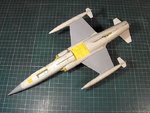
PIC 2. This is one of the light grey panels on either side of the fin, masked in preparation for adding the two metallic shades. Another panel, the same colour, has been added to the rear of the ventral fin.
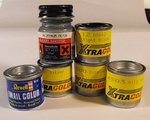
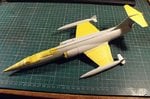
PIC 3. Five metallic colours, plus gloss black, have been tested to discover which will provide the best appearance for the various metals used on the fuselage. After one overall, main colour, the rear fuselage will require three different shades to simulate the stainless steel, and various alloys, used in this area. Notice that Humbrol did not get an invitation to this party!
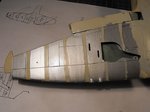
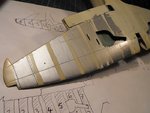
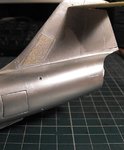
PICS 4 and 5. A strip of each colour was brush-painted onto a 'scrap' model, which has the same colour plastic as the F-104 kit, in order to compare each against the other, and assess the 'brightness' and tone of each colour. When applied to the model, the chosen paints will be airbrushed, after first polishing the plastic with the aluminium powder. The paint then forms a smooth, metallized 'skin', bonding with the coating of aluminium, and provides an even, deep metallic finish.
Although difficult to appreciate fully in these shots, the different angles, against the light, just about show the variations. Once fully hardened, these 'swatches' will be polished with the aluminium powder, to judge its effect on each paint shade, and the same process will be employed after spraying the model.
Following this simple exercise, I've decided to use the paint second from the left for the overall colour, this being Revell No.90 Silver, which surprised me slightly, as I don't normally choose Revell paints. But, it shines out above the others, literally, with a good, deep lustre, and, considering it was brushed on quickly, a nice, smooth finish.
Further to the right, at strip No.4, is Xtracolor 'Duralumin', whilst the 5th shade is Xtracolor 'Oily Steel', and at 6 and 7, the same Oily Steel with varying amounts of gloss black added. A combination of these two colours and mixes will be used for the rear fuselage and fin, with other areas, such as the tip tanks and gear doors, and a few selected panels, employing some of the other paints shown.
So, given I can find some time for a clear run tomorrow, I hope to get the white sprayed, and then settle down to a few hours of careful masking, ensuring that every single opening is totally sealed, as the aluminium powder can get to where even smoke can't reach!
Thanks once again for your continued interest and, with luck, I'll have more to show sometime tomorrow.
Fortunately, the black has dried, although it's a smooth gloss. But at least I can do something with it and, looking at the anti-dazzle panel after removing the masking tape, the shape needs to be adjusted anyway, plus there's a small area where the I.R. sight was removed which needs further attention. That's tomorrow's job!
Meanwhile, some of the smaller 'solid' colour areas have been painted, and I've tested various paint shades, to help decide which colours, or mixes, will be used for the main fuselage, and the various metal shades on the rear fuselage, gear doors, and wing-tip tanks.
PIC 1 shows that anti-dazzle panel, as well as the radome in light grey, the pale, buff-coloured dielectric antenna panel aft of the avionics bay, and the intakes. The required corrections will be done tomorrow, before masking these areas, and spraying the white on the wing tops, and both surfaces of the tail plane.
PIC 2. This is one of the light grey panels on either side of the fin, masked in preparation for adding the two metallic shades. Another panel, the same colour, has been added to the rear of the ventral fin.
PIC 3. Five metallic colours, plus gloss black, have been tested to discover which will provide the best appearance for the various metals used on the fuselage. After one overall, main colour, the rear fuselage will require three different shades to simulate the stainless steel, and various alloys, used in this area. Notice that Humbrol did not get an invitation to this party!
PICS 4 and 5. A strip of each colour was brush-painted onto a 'scrap' model, which has the same colour plastic as the F-104 kit, in order to compare each against the other, and assess the 'brightness' and tone of each colour. When applied to the model, the chosen paints will be airbrushed, after first polishing the plastic with the aluminium powder. The paint then forms a smooth, metallized 'skin', bonding with the coating of aluminium, and provides an even, deep metallic finish.
Although difficult to appreciate fully in these shots, the different angles, against the light, just about show the variations. Once fully hardened, these 'swatches' will be polished with the aluminium powder, to judge its effect on each paint shade, and the same process will be employed after spraying the model.
Following this simple exercise, I've decided to use the paint second from the left for the overall colour, this being Revell No.90 Silver, which surprised me slightly, as I don't normally choose Revell paints. But, it shines out above the others, literally, with a good, deep lustre, and, considering it was brushed on quickly, a nice, smooth finish.
Further to the right, at strip No.4, is Xtracolor 'Duralumin', whilst the 5th shade is Xtracolor 'Oily Steel', and at 6 and 7, the same Oily Steel with varying amounts of gloss black added. A combination of these two colours and mixes will be used for the rear fuselage and fin, with other areas, such as the tip tanks and gear doors, and a few selected panels, employing some of the other paints shown.
So, given I can find some time for a clear run tomorrow, I hope to get the white sprayed, and then settle down to a few hours of careful masking, ensuring that every single opening is totally sealed, as the aluminium powder can get to where even smoke can't reach!
Thanks once again for your continued interest and, with luck, I'll have more to show sometime tomorrow.
Attachments

Crimea_River
Marshal
Great preparatory work Terry. Hope all goes well tomorrow.
- Thread starter
- #84
Airframes
Benevolens Magister
Thanks Andy. If they weren't bent and stiff, I'd be keeping my fingers crossed !
- Thread starter
- #86
Airframes
Benevolens Magister
The small blemish in front of the windscreen rim has been repaired, and the anti-dazzle panel re-painted. This will receive a clear coat later, to improve the finish of the rather 'rough' and patchy matt paint.
The initial painting has been done, with the tops of the main wings, and top and bottom surfaces of the tail plane sprayed white, and the under side of the main wing sprayed light grey. Matt paint was used for these areas, although I was going to use gloss white, but didn't like the look of the very viscous Humbrol gloss.
A gloss clear coat will be applied later, once the metallic paints have been applied and polished. The new compressor and airbrush were used for this, and the wider spray pattern on the new brush, together with being able to adjust the pressure, proved very useful.
The wings and tail plane will be masked, leaving a narrow strip along the leading edges, which were bare metal, and also the radome and anti-dazzle panel will be covered, along with the cockpit and any opening not yet sealed, ready for polishing the remainder of the airframe with the finger-print powder.
Once this is done, and cleaned-up, the first metal shades will be sprayed around the tail area, this time using my fine airbrush, to ensure tighter control.
I'm hoping to find time to do the first stage some time tomorrow, but I'm going to be fairly busy, and I'm out on the raz tomorrow night, so there's a chance it won't get done until Christmas day - depending how I feel after Christmas Eve !
Here's how it looks so far, and in case I end up 'Missing, presumed p*ssed', I'll wish you all a Merry Christmas with your families and, just in case, Happy Easter too !
Attachments
Crimea_River
Marshal
Looking very good Terry! A Happy Christmas to you as well.
- Thread starter
- #89
Airframes
Benevolens Magister
Thanks Andy. Funny how Christmas is weeks away, and then suddenly creeps up on you and shouts 'Boo !'
Not that I 'do' Christmas, but ensuing anything important needed over the holidays is purchased before the World closes down takes time. Such important things as paint, wet 'n dry, cement, thinners and so on, and maybe the odd bottle of Scottish White Wine, 12 year old, at least!
Anyway, I've spent a couple of hours doing some masking, ready for polishing and the first coats of metal paint, followed by lots more masking, and then some more masking.
Nothing much to show yet, apart from masking tape. Oh, and did I mention I'm doing lots of masking ............. someone save me, the masking is controlling my life !!!
- Thread starter
- #90
Airframes
Benevolens Magister
The first paint has been applied, after somewhere in the region of four hours of careful masking.
The rear fuselage and fin have been tackled first, as there are three different metal shades to replicate here, plus the painted grey panels. Doing this first, along with a couple of under-side panels which will be the same shade, allows all the masking required to be done at the same time, thereby simplifying, to some extent, the remainder of the painting.
The model was first cleaned to remove grease from handling, and reduce, if not fully remove, any light over-spray on the tail area, from where the white was sprayed, and this was done by a light 'wipe-over' with cotton wool, dampened with enamel thinners, followed by a rub with paper kitchen towel.
I missed a bit on the center of the fin, which immediately showed up once the aluminium finger-print powder was applied, but as this area will eventually be sprayed in a darker metallic colour, I'm not too concerned.
PIC 1. The masking took some time, as there are some complex curved shapes around the wing root fillets, which will be bare metal, as well as the leading edges of the tail-plane and wings, which, on the real aircraft, were left in bare metal, the exposed are being 1 inch deep !
All openings on the model were fully masked, ensuring that the areas were properly sealed, as the aluminium powder can find its way inside the tiniest gap, and drift around, leaving tiny speckles of silver where they're not wanted.
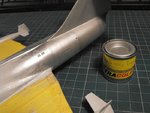
PIC 2. The first, light application of the aluminium powder concentrated only on the rear fuselage and fin, and was applied with a small wad of cotton wool, before 'blowing' off the excess powder, then polishing with a soft cloth. To avoid finger prints, and prevent the powder transferring to anything it touched, the remainder of the fuselage was left as bare plastic for now, and will have the powder applied, and the area polished, when it's time to spray the main colour.
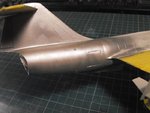
PICS 3 and 4. Xtracolor 'Oily Steel' was used for the base colour for the rear fuselage and fin, and was sprayed on at a low pressure, around 12 p.s.i., to ensure an even surface, avoiding a 'grainy' appearance. Once this has fully dried, the area will be polished with a small amount of the aluminium powder, which will lighten the shade slightly, and give a lustre to the paint. The various panels around the fuselage, and on the leading and trailing edges of the fin, will then be masked, and a darker shade applied, using a mix of the 'Oily Steel' with some gloss black added.
Again, when dry, the masks will be removed, and new masks applied, ready for spraying the remainder of the fuselage in an overall 'bright' silver, using the Revell No.90.
It all looks a little messy, and somewhat 'dull' at the moment, but once all the painting and polishing is complete, before adding details and some light panel lines, it should start to look more like the real thing.
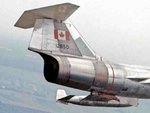
The final pic, cropped from an excellent original by Gary Watson at Starfighters.de, shows the effect being aimed for. The various panel joints, and variated metal 'stripes' etc, will be done once the entire model has been painted and polished, with those areas requiring it, having a gloss clear coat. The remainder will be left in 'bare', polished paint.
That's it for now, but I hope to get some more done tomorrow, when I'll post a further up-date.
The rear fuselage and fin have been tackled first, as there are three different metal shades to replicate here, plus the painted grey panels. Doing this first, along with a couple of under-side panels which will be the same shade, allows all the masking required to be done at the same time, thereby simplifying, to some extent, the remainder of the painting.
The model was first cleaned to remove grease from handling, and reduce, if not fully remove, any light over-spray on the tail area, from where the white was sprayed, and this was done by a light 'wipe-over' with cotton wool, dampened with enamel thinners, followed by a rub with paper kitchen towel.
I missed a bit on the center of the fin, which immediately showed up once the aluminium finger-print powder was applied, but as this area will eventually be sprayed in a darker metallic colour, I'm not too concerned.
PIC 1. The masking took some time, as there are some complex curved shapes around the wing root fillets, which will be bare metal, as well as the leading edges of the tail-plane and wings, which, on the real aircraft, were left in bare metal, the exposed are being 1 inch deep !
All openings on the model were fully masked, ensuring that the areas were properly sealed, as the aluminium powder can find its way inside the tiniest gap, and drift around, leaving tiny speckles of silver where they're not wanted.
PIC 2. The first, light application of the aluminium powder concentrated only on the rear fuselage and fin, and was applied with a small wad of cotton wool, before 'blowing' off the excess powder, then polishing with a soft cloth. To avoid finger prints, and prevent the powder transferring to anything it touched, the remainder of the fuselage was left as bare plastic for now, and will have the powder applied, and the area polished, when it's time to spray the main colour.
PICS 3 and 4. Xtracolor 'Oily Steel' was used for the base colour for the rear fuselage and fin, and was sprayed on at a low pressure, around 12 p.s.i., to ensure an even surface, avoiding a 'grainy' appearance. Once this has fully dried, the area will be polished with a small amount of the aluminium powder, which will lighten the shade slightly, and give a lustre to the paint. The various panels around the fuselage, and on the leading and trailing edges of the fin, will then be masked, and a darker shade applied, using a mix of the 'Oily Steel' with some gloss black added.
Again, when dry, the masks will be removed, and new masks applied, ready for spraying the remainder of the fuselage in an overall 'bright' silver, using the Revell No.90.
It all looks a little messy, and somewhat 'dull' at the moment, but once all the painting and polishing is complete, before adding details and some light panel lines, it should start to look more like the real thing.
The final pic, cropped from an excellent original by Gary Watson at Starfighters.de, shows the effect being aimed for. The various panel joints, and variated metal 'stripes' etc, will be done once the entire model has been painted and polished, with those areas requiring it, having a gloss clear coat. The remainder will be left in 'bare', polished paint.
That's it for now, but I hope to get some more done tomorrow, when I'll post a further up-date.
Attachments
Last edited:
Catch22
Major
Looking good Terry!
- Thread starter
- #92
Airframes
Benevolens Magister
Thanks Cory. I've been itching to 'bash on' with the next metal shade, but I need to ensure the first coats are completely hard, before masking for the next stage, to avoid any 'lifting' of small patches of paint.
The tail area will take some time to complete, again due to the waiting time, but also because of the various masks, colours and the sequence of spraying. Once the base colours are applied, further work will be needed to add the various panel joints, the 'striations' on certain areas of the metals, and some of the smaller, individual panels and access hatches. Once that's all done, the main airframe is basically one shade, with the odd, contrasting small panel here and there, and should (I hope!) be fairly straightforward.
The tail area will take some time to complete, again due to the waiting time, but also because of the various masks, colours and the sequence of spraying. Once the base colours are applied, further work will be needed to add the various panel joints, the 'striations' on certain areas of the metals, and some of the smaller, individual panels and access hatches. Once that's all done, the main airframe is basically one shade, with the odd, contrasting small panel here and there, and should (I hope!) be fairly straightforward.
Lucky13
Forum Mascot
Inspiring work as always old boy, dogs sphericals, cats miaow and all that rot!
Treat yourself to a large snifter what!
Treat yourself to a large snifter what!
- Thread starter
- #95
Airframes
Benevolens Magister
Thanks chaps. I'm just about to start on the next stage - might have some pics later.
A4K
Brigadier General
Looking great so far Terry! 50 out of 10 for effort and patience given current airframe fatigue! ") (hope you're doing better now mate)
(hope you're doing better now mate)
(hope you're doing better now mate)- Thread starter
- #97
Airframes
Benevolens Magister
Thanks Evan. Just having a break, after another 3 hours of masking, as my hands and wrists are hurting. It's a bl**dy awkward area to mask, around that fin and tail plane, especially as the model is difficult to hold securely.
I think I might have a slight problem with some areas already sprayed, and expect some of the paint to lift, as I've already noticed a small patch rubbing thin. I think I either thinned the paint a little too much, or maybe it's just a small patch that only got a light dusting. Either way, it's probably going to need a bit of re-spray, once the masking is removed.
Oh well, no rush, and once this area has had the basics done, the rest is at least just one large area, all the same shade.
And now, back to work, ready to spray the next shade ......
Crimea_River
Marshal
Really taking shape Terry. You're creating an itch for me to have a go at one myself.
- Thread starter
- #99
Airframes
Benevolens Magister
Thanks Andy. I've got a sort of 'bug' about bare-metal finishes, and I'm aiming to have a small collection, mainly jets.
Done so far are a F-86 Sabre, F-84 Thunderstreak, and a MiG-21, although that's got the Soviet 'Aluminium' lacquer finish. There's a Mirage IIIC and a Polish MiG-17 yet to do, plus the Fennec, when I eventually get back to that one, and, of course, the E.E. Lightning, which will be part of my '56 Squadron Collection'. I might do a RCAF CT-33 'Silver Star' some day ... whenever 'some day' is!
As for Starfighters, I've bid on an old 'Esci' kit (even though I've said 'No More Kits'!), which, if I win it, will be done as the same '771' when in service with the Royal Danish Air Force, in the earlier, overall green colour scheme. Oh, and I have a 1/32nd scale Hasegawa example to do too, as a camouflaged, Dutch aircraft.
Anyway, I've got the contrasting panels done on the fin and rear fuselage, and I'm just waiting for the paint to dry before re-masking, and spraying the overall bright 'silver' on the rest of the fuselage - can't move the model to take pics yet, so I'll try to post some later, if possible. Meanwhile, I'll set about preparing and painting the undercarriage doors and the avionics bay cover, and maybe start work on the landing gear itself.
Still a long way to go with construction, as the ejection seat needs to be improved, and detail added to the front of the cockpit and HUD, plus some additions to the avionics bay, canopy, windscreen and other areas.
More to come just as soon as I'm able to get some pics.
Great work so far Terry!
Users who are viewing this thread
Total: 1 (members: 0, guests: 1)