RCAF CF-104 'Starfighter', 1/48th scale. (1 Viewer)

Ad: This forum contains affiliate links to products on Amazon and eBay. More information in Terms and rules

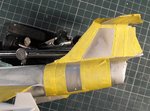
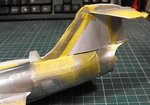
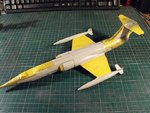
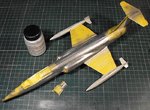
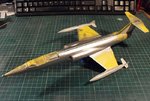
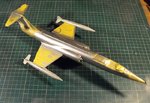
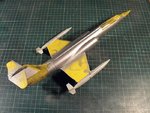
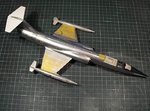
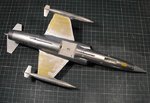
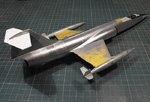
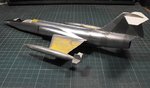
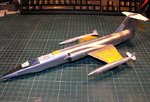
Been busy lately Terry so completely missed this thread but have caught up on it tonight. You've done a wonderful job with that kit. Looks like it's the same as the old Monogram Centaury series release I have in the stash. I had planed to do it in NMF, but after seeing the fit problems you've had to deal with I might be rethinking that.
 
Thanks Hugh and Glenn.
I'm not sure if it's the original, 'old' Monogram kit, or a later release. It had the usual 'MM Inc' moulding on the underside of one wing, which had to be shaved off, and on the inside of the fuselage it had the 'Copyright Revell' stamp, but no date, and a transparent label with just 'Poland' printed on it !
From what I've seen, there are some slight differences between the Revell and Monogram kits, depending on which issue, and I'm not quite sure which one came first, but this particular issue looks like it's possibly the original, old, old Revell kit, from the late 1960's or early 70's, with some up-dated parts.
For example, the moulding of the wheels and gear legs is far superior to the rest of the kit, and there are two ejection seats, the Lockheed C-2, and the later Martin Baker seat. Strangely, the instructions call for the MB seat - which wasn't fitted to RCAF Starfighters, or to USAF birds of the era!
A kit listing I have in a magazine from 1981, shows a different parts count between the Revell and Monogram kits of the period and, from memory, the Monogram kit scored higher. The kit I have appears to be identical (apart from decals) to other versions under the Revell label, such as the 'Tiger Meet' version.
Anyone wanting to build a F-104 in a bare metal finish would be far better off using a better kit - either the expensive Hasegawa, or Italeri, or even the old ESCI kits. If a camouflaged or 'solid' colour is to be the choice, then this kit isn't too bad, and the poor fit of parts, once filled and sanded, will not be anywhere near as noticeable under 'normal' paint, compared to the all-revealing silver finish.
Funnily enough, I've just 'won' an old ESCI kit, for a daft, low price, intending to build it (sometime!) as the same aircraft, when in Danish service. But, I hadn't really noticed that it's a F-104C !
If ESCI used the same basic kit for all their versions of the Starfighter, just changing decals, then I might be in luck - if not, then I'll have a kit with the smaller tail unit - but in overall green finish, and with the tail pointing away from the viewer, I might just get away with it !!

Anyway, I've now got the basic painting done and, given that everything is OK when the masks are removed, and after polishing, I can then move on to the detail painting, before continuing with construction, and the decals.
I'm afraid I forgot to take a pic of the various metal shades on the rear fuselage, before re-masking, ready for the main paint work, but I'll be removing the masks sometime later today anyway, after polishing the fuselage, so all will be revealed then - hopefully without any paint lifting !
Here's what was involved getting the various metal tones replicated on the rear fuselage and fin, and the process to try to obtain a smooth, shiny 'bare metal' fuselage, as seen on the RCAF Starfighters during this period.

PIC 1. After painting the basic metal shade on the rear fuselage and fin, which is a different tone compared to the main fuselage, the relevant areas of the fin and tail unit were masked, ready to spray the darker, 'greyish' metal tone. A mix of Xtracolor 'Oily Steel', and gloss black was used to create the right 'look'. The finer details will be done, with a brush, towards the end of the build.
PIC 2. Once that was done, and completely dry, the rear end was masked again, covering the various metal shades, ready for spraying the bright 'silver' after the fuselage was polished . Apologies for forgetting to take the photo before masking !
PIC 3. The model masked, ready for polishing.
PICS 4 and 5. With the model masked, and every opening sealed, the model was cleaned with a damp cloth, to remove grease from handling, and then the aluminium finger-print powder was applied, with a soft brush, spreading it evenly across the whole area, and then polished with a soft cloth, ensuring all the powder was polished off evenly, with any excess being blown off. This was followed by a gentle buffing, to create an ultra-smooth, shiny surface. A final check, using soft tissue, ensured that no powder was left in place, and that the surface was as smooth and shiny as it was possible to get it, without leaving any finger prints in the .. er ... finger print powder!
The polished powder immediately shows up any imperfections or blemishes on the surface, and fortunately these were few, and relatively minor, and should either disappear, or at least be hardly noticeable, once the model has been polished. On a more positive note, the powder also emphasises the very light re-engraving which was done on some missing or lost panel lines, individual panels, and the auxiliary intake doors.
PICS 6 to 8. The main colour was then sprayed on, applying a quick overall coat, with the paint being thinned at about a 50/50 ratio initially, and spraying at a relatively low pressure of around 12 to 15 p.s.i.
This was followed by two more coats, with the paint now thinned to around 60/40, thinners to paint, building-up 'depth' to the colour, and concentrating on covering the areas of joints and seams.
Spraying silver paint onto a shiny, silver surface is slightly tricky, as it's extremely difficult to see where the paint is going, and if it's covering as required, without risking possible 'pooling' or sags. However, once the second coat had gone on, things became easier, and I quickly learned to ignore what appeared to be 'bloom' forming, not having experience with this particular paint before, as the paint settled quickly, being almost touch-dry within a minute or so, and gave a smooth, even surface, making follow-up coats much easier to apply, and to see. The paint chosen following the previously mentioned trials, was Revell (enamel) No.90, 'Silver', which certainly gives a nice, deep metallic shine, something which my old favourite, Humbrol No.11 Silver no longer provides, as it is now a dirty, dull, metallic grey !
The first coats were left to settle for a few minutes - just enough time to make a mug of coffee - and then two further, thin coats were sprayed, without pause, again building-up the colour, and paint thickness, around the troublesome joints and seams. Some of the imperfections still show, particularly around parts of the horizontal fuselage joint on the starboard side, as there is a definite 'bow' here, due to the way the parts join, even though the joint itself was virtually eliminated. However, once the model has been polished, most of this will not be noticed, and the large 'RCAF' decals, and the roundels and serial number, cover most of this area anyway.
The model will now be left for at least 12 hours, to give the paint time to fully harden, before polishing the fuselage with the finger-print powder again, just enough to bring out a shine, without cutting through the paint. Once that's been done, and all excess powder removed, gentle buffing with a soft cloth should create a deep lustre which, hopefully, should look at least something like polished alloy, in relation to the other metal tones, and the white of the wings and tail plane. Incidentally, although it's difficult to see in the photos, the leading edges of the main wings and the tail planes, have also been sprayed in the bright silver, and I've tried to get as close as possible, in scale, to the one inch width of the real aircraft!
The multi-toned area of the rear fuselage and fin will be assessed once the masks have been removed, and, if required, at least parts of this area will also receive the powder polish treatment, although a coat or two of clear gloss, or satin acrylic varnish, may do the trick if a shine is needed.
Apart from the wings and tail planes, the remainder of the model will not be clear-coated, as this will affect the 'bare metal' finish, when the clear coat creates a diffusion effect, magnifying the 'grain' in the metallic paints. The decals will, however, receive a clear coat in order to seal them, and prevent, or at least minimise, yellowing with age, often a problem with clear carrier film over a metallic surface.

I'll try to post some more progress pics later today, if I have time, but as I'll be 'out and about' part of today, and I'm going to the 'Drink the pub dry before it closes' party tonight, to 'see off' the retiring Landlord, I may not get any more work done on the model. But, if that's the case, then I'll post some more pics on Sunday - given I can still see on Sunday!
Thanks again for your interest, encouragement and well wishes, and apologies for this somewhat lengthy post.
 

Attachments

  • DSCF0001 (12).JPG
    DSCF0001 (12).JPG
    88.4 KB · Views: 74
  • DSCF0009 (3).JPG
    DSCF0009 (3).JPG
    80.3 KB · Views: 69
  • DSCF0002 (13).JPG
    DSCF0002 (13).JPG
    109.4 KB · Views: 75
  • DSCF0004 (7).JPG
    DSCF0004 (7).JPG
    111.6 KB · Views: 70
  • DSCF0011 (6).JPG
    DSCF0011 (6).JPG
    109.2 KB · Views: 77
  • DSCF0012 (3).JPG
    DSCF0012 (3).JPG
    97.4 KB · Views: 80
  • DSCF0015 (2).JPG
    DSCF0015 (2).JPG
    101.2 KB · Views: 80
  • DSCF0016 (2).JPG
    DSCF0016 (2).JPG
    110.5 KB · Views: 68
Looks like that fingerprint power is really working great.
I had a peek at my Monogram F-104 comparing the parts to yours and it's defiantly the same kit. The date on the box is 1979 but the moldings could very well be much older than that.
 
Thanks very much chaps. So far, I'm fairly pleased with the result, although there's not much I can do about the surface imperfections. With luck though, once the details and decals are on, this should detract from the small blemishes which, to be honest, can hardly be seen unless looking for them.
I haven't got any more done today, so it'll be tomorrow before any further work can be done.
Glenn, I'd suggest any colour scheme apart from NMF is using this kit, although, as can be seen, a reasonable result can be had - but at the cost of a lot of work. The Hasegawa kit is probably the best option, although at a silly price, and there's still Italeri, Heller and ESCI kits around - forget the Lindbergh, Hawk and Testors kits, all much the same mouldings as, apart from being inaccurate, they are very basic, and much worse than the Revell/Monogram examples.
The main problem with this kit is the age of the moulds, which have resulted in some 'soft' detail, as well as poorly defined joint surfaces, and sprue attachments which intrude onto the surface of the parts, plus, of course, the ejector pin marks.
However, if your kit is an earlier example, especially if it was made in 1979, then there's a good chance the parts may be crisper, and without the above-mentioned problem areas, in which case fit could be quite good.
Try a test fit, and inspect the edges of the parts, and the sprue attachments, which should give some idea of what construction should be like.

Thanks again, and I'll post another up-date sometime tomoorow.
 
Thank Cory, and yes Andy, that's basically correct.
The latest boxings have been the 'Tiger Meet' version, and the so-called 'RCAF/CAF' example I've used. The latter is obviously the old kit, re-released, with, I'll admit, a rather nice decal sheet, covering two CAF versions, and a USAF machine. The same with the 'Tiger Meet' version - same old kit, new decals and box art.
I've seen the CAF version advertised with the box art as in my example, and also, emphasising the Canadian connection, with a photo box art, possibly of the assembled model, or maybe a pic of the real thing, in a bare metal' CAF scheme - I haven't looked that closely, and it's possible that the box art may be 'country specific'.
 
Andy, if you get one without RCAF/CAF decals, and want to do a NMF scheme, then I'll probably have the main decals from my kit going spare, if you want them.

I've now polished the main fuselage, and also gave the multi-toned tail area and fin a lighter application of the powder, and a light polish with a soft cloth.
The masks have been removed and, as I expected, there are a couple of small areas which will need retouching. These are around the rear fuselage, which will also receive some detail painting around panel joints, and some more striation from the effects of heat. The black areas of the intake de-icers and the shock cones also need some retouching, and the addition of a semi-circular panel, in a slightly different metal tone, around the cones.
I've also noticed a tiny bit of 'creep', where some powder got under the tape covering the anti-dazzle panel beneath the cockpit sill on one side, and on one tiny area of the forward section of this panel.
Once these corrections have been made, the panel joints on the tip-tanks will be painted in a slightly darker metal shade, then masked with very narrow strips of Tamiya tape, before spraying the tanks either in Model Master 'Aluminum Plate', or Xtracolor 'Duralumin', to give a slightly duller, contrasting tone, compared to the shiny fuselage.
Then the masking on the main wings can be removed, and a gloss clear coat applied to these, and the tail planes, ready for the decal stage.
The pics show how the model looks so far - not perfect by any means, but with a little extra work, and with the decals and detail parts in place, I think it should look acceptable enough for display in my cabinets.
 

Attachments

  • DSCF0004 (8).JPG
    DSCF0004 (8).JPG
    104.6 KB · Views: 63
  • DSCF0005 (6).JPG
    DSCF0005 (6).JPG
    89.2 KB · Views: 55
  • DSCF0006 (10).JPG
    DSCF0006 (10).JPG
    81 KB · Views: 62
  • DSCF0009 (4).JPG
    DSCF0009 (4).JPG
    69.6 KB · Views: 64
  • DSCF0010 (7).JPG
    DSCF0010 (7).JPG
    104.1 KB · Views: 58
Thanks Geo. That shine will now be a slight problem as, until it's really settled down for a few days, it's quite easy to get finger prints or scratches on the surface, so care has to be taken from now on, especially when applying the decals.
 

Users who are viewing this thread

Back