Navigation
Install the app
How to install the app on iOS
Follow along with the video below to see how to install our site as a web app on your home screen.
Note: This feature may not be available in some browsers.
More options
You are using an out of date browser. It may not display this or other websites correctly.
You should upgrade or use an alternative browser.
You should upgrade or use an alternative browser.
Revell 1/32 Spitfire MK1 #4555
- Thread starter prem895
- Start date
Ad: This forum contains affiliate links to products on Amazon and eBay. More information in Terms and rules
More options
Who Replied?- Thread starter
- #62
prem895
Staff Sergeant
Wurger,you are definatly a master builder. I will try my best to do this and post my success or crash landing. Keep your fingers crossed.
Thank you for kind words. Another note here ( I have almost forgotten. ) You should also remember about the another side of the fuselage.Usually you can put a fuselage half on a flat surface ( e.g. wooden board.) If the bar you want to attach , has one edge running stright you can use the feature. Put the fuselage half on the wooden board flat and pin it down to the board with rubber bands. Then you can stick the plastic bar into the aperture. The main adventage of the way is that you will obtain the bar edge running parallely to the fuselage seam. For the fus half with these setting pins you have to drill holes in the board for them. Do you grasp?
If you don't I repeat a sequence of shots of my Fw190A-6 model being still under construction. I used the way described above for making her fuselage longer. I cut the fuselage and spred apart a little bit making gaps. Then I inserted plastic plates ( of thickness I needed ) into these gaps. Please notice the fuselage half laying flat on a wooden board. These plastic plates went into holes untill their front edges hit the central line of the fuselage while those bottom reached the top surface of the wooden board only. ALso please notice that these plastic plates are jutting a few milimetres beyond out of the fuselage top end bottom edges ( the effect you need to achieve for the hinges ) . Later I sanded down tops of these plates fitting them to the fuselage curvature. The same way you can make these broken hinges. It will let you to keep the correct geommetry of the model.


Last edited:
meatloaf109
1st Lieutenant
Good fix!
Lucky13
Forum Mascot
*faints* *thump*
Surgical precision!
dirkpitt289
Master Sergeant
Now that's what I call plastic surgery. 
- Thread starter
- #70
prem895
Staff Sergeant
Well I think I have done a descent job on my repair. I will post some pics when I get home tonight. I was a little worried that I would screw this up,so I was dragging my feet on starting,but I think I have jumped over that hurdle and I hope it will be smooth sailing for a while. Pretty decient little model though,a lot of flash on the small bits mind you.Revell has re-issued this kit as #80-0021 in 2010 with better instuction sheet as far as painting is concerned. I downloaded it from the Revell site.
- Thread starter
- #72
prem895
Staff Sergeant
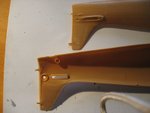
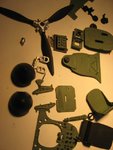
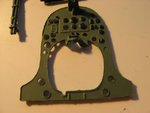
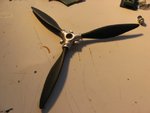
Here is what I came up with to fix the rudder problem. I know some of you are thinking"what the hell is that" but it is the best I can do with the skills I have now.Give me some time. I belive I can make this look good in the end .BTW,what is the right Humbrol colour #for this? I was thinking 226
Attachments

Airframes
Benevolens Magister
If you mean the underside colour, 'Sky', then the nearest Humbrol colour is 90. It's not exactly 'spot on', but close enough, and closer than the suggested Revell mix.
- Thread starter
- #74
prem895
Staff Sergeant
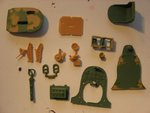
I was a little confused that when you see the interior painting guild for #80-0021 they tell you to paint parts H. I belive this is wrong and it should be C Hu68. Am I correct at this conclusion.
Crimea_River
Marshal
Your fix looks pretty good. Not sure what you mean by your question but if you're asking about the interior cockpit colour, it should be a grayish green like this:

- Thread starter
- #76
prem895
Staff Sergeant
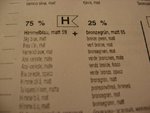
What I meant to say was will Revell 68 or Humbrol78 work not what the instuctions call for75% Re59 25% Re65
meatloaf109
1st Lieutenant
Do a little experimenting with mixing, put it on a part of the fuselage or inside the wing where it won't be seen to check the color against the plastic.
I usually do a custom mix, British interior green is an unusual shade, but once you figure it out, it is easy to replicate.
I usually do a custom mix, British interior green is an unusual shade, but once you figure it out, it is easy to replicate.
- Thread starter
- #79
prem895
Staff Sergeant
- Thread starter
- #80
prem895
Staff Sergeant
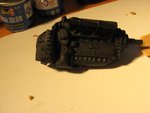
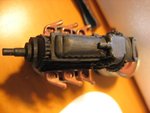
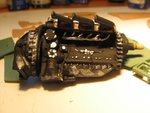
This is what I came up with. As far as the engine goes,since you wont see it I thought now is a good time for some engine paint practice,ah what the hell. I know its not pro but I am happy with the results for a newbee. Give me a year and watch out The lighting is getting bad
Attachments
Users who are viewing this thread
Total: 1 (members: 0, guests: 1)