After going to the antique market with Mother Superior early this morning I made my way to the LHS to pick up some green and some grey paint. I washed the inside of the rudders and the top and bottom of the tailplane before giving them a spray of the appropriate colours.
After letting them dry I glued parts together and then dry fit the rudders to the tailplane.
Once that was done I gave them all a light coat of Future. I found yellow numbers in another model that is waiting in the stash and they are close enough for the inboard serial numbers. Once the Future was dry I applied the serial numbers on the inside of the rudders. I have made the assumption that this is where they would have been basing this on photos dug up by others that show other ships from the same group having their ser #s located here.
This pretty much finishes the tail area of the build and it will be allowed to dry/cure overnight and it will then be wrapped and stored away safely until it is needed for attachment to the fuselage.
Once again, many thanks to those who have contributed with photos and info to this point. I think the cockpit will be next and I have to await the arrival of IP decals that, with any luck, will be here mid week.
I have never used them before so I am curious as well. I am searching for the layout of the IP and have come up with this stuff so far. I am sure it will help.
Shut it, Muppet. Just cos yous in Sweden Land, doesn't mean you can get upitty.
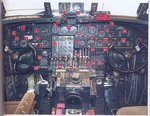
Here you go Jeff. The photo, by Graeme Douglas, is from Page 73 of the 'Haynes' B-24 Liberator Manual, a book well worth getting if you want detail info.
This is the cockpit of 'Witchcraft', operated by the Collings Foundation, and our very own Gary (Geedee) is currently acting as Flight engineer, again (!), on the present tour - lucky bar steward !!
Looking great!
I'm not an expert on the B-24, but I "think" that "Koster Aero Enterprises" did vacu sheet of the B-24 windows, turrets, etc... in the 1/48th scale.
Not sure if this set is still available though.
Koster did a conversion set for the Privateer as well I think.
I think Koster is no longer in Buisiness, but some of his conversion sets are still availble through Great Wall Hobbies? (I think)
Some progress has been made as I await the arrival of some parts and IP decals.
The cowl rings were a nightmare in terms of fit and lots of putty considering their relative small size was required. I also found it easier to remove the alignment tabs when joining the wing halves together.
Looking good so far Jeff. The part that you've painted red in the bomb bay, represents the hydraulic reservoir, which was a large cylinder. In the colour photos of 'Witchcraft' in the book I mentioned, it appears to be a grey colour. That said, the interior colour appears to be Bronze Green in most of the photos, including those posted some time ago by both Glen and Gary, whereas the bomb bay seems to be Interior Green, although looking quite light due to the back-lighting, so the cylinder might also be green. I'll be painting mine grey.