Spitfire Mk IX Tamiya - w.i.p.

Ad: This forum contains affiliate links to products on Amazon and eBay. More information in Terms and rules

al49

Tech Sergeant
1,551
336
Dec 16, 2009
Milan, Italy
Hi everybody,
now that the forum is "malware free", I can start the work-in-progress of the above model.
First I must say that latest Tamiya kit i did was aprox 20 years ago and was this one
F14d-vi.jpg

F14e-vi.jpg

impressive, may be, but done exactly "out of the box" without even knowing about weathering etc.
Then, a little later, I changed subjects and I moved on to figurines like these
Lanciererossob-vi.jpg

DSCN0284-vi.jpg

RamesseII-vi.jpg

Exactly two years ago I retired from business and i decided to started again building aircraft models.
I posted already a couple of my builds, so now let's go with the Spit.

First of all my latest projects concerned Italian subject, only available 1:32 scale from Pacific Coast Models.
I like very much PCM kits, but there is no comparison with Tamiya: the value is really worth the money.

For curiosity I decided to start from step 43, the very well detailed Merlin engine.
Here following are some pictures:
DSCN0759-vi.jpg

DSCN0760-vi.jpg

DSCN0764-vi.jpg

DSCN0761-vi.jpg

Two little comments on the above.
The only addition were some wires and pipes (may be not as much as in the real engine)
The lines across the exhaust stacks could be a minor mould defect, but I checked picture of the real thin and some of them shows that there were welding seems exactly in the same position ...so I need to recheck and decide if I have to clean them or not.

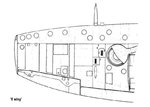
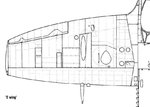
Then I went back to step One, the cockpit and here are the pictures
DSCN0766-vi.jpg

DSCN0767-vi.jpg

DSCN0769-vi.jpg

DSCN0771-vi.jpg

Here again my is represented by contribution pieces of copper wire of different diameter to simulate copper pipes etc. Black tinted lead wires represent pneumatic hoses on the control stick and the oxygen hose.
The instrument panel is "out of the box"
Some more will be added when port wall will be attached.
I will post more pictures soon.
Any comment and/or suggestion is more then welcome.
Cheers
Alberto
 
Last edited by a moderator:
Al everyone who is building the new Tamiya Spit are getting beautiful results and you are in there with them.I would get my hands into one of these but the price is out there for now maybe in 3-6 months or if I relinguished some of the stash :shock:.I will be watching with interest Sir.Cheers Kevin
 
You do very nice work. I like those figurines. I tried to do some myself but found it hard to find figures. Did you use oil paint or regular model paint on them? The detail on the plane is excellent! You might want to look at some of the other post as I believe there is someone currently doing a 1:1 scale job of a Spitfire cockpit. Will you be doing any weathering or some representation of wear on your model?
 
Very nice work Alberto, and yes, the seams should be there on that style of exhaust stub. I'm not sure about the signal flare rack on the front of the pilot's seat for a MkIX though. If it should be there, the holes should be drilled out. This was a folded aluminium 'box' section, with the holes designed to hold the 2 inch (50mm) Verey cartridges.
I would love this kt, to go alongside a MkIX I converted from the Hasegawa MkV years ago, but I can't justify (to myself)the £100 price tag here in the UK. That's a lot of money to duplicate something I have (especially as I prefer to have the cowlings in place normally), no matter how good it is, and it's obviously very, very good!
Looking forward to the next stages.
 
You do very nice work. I like those figurines. I tried to do some myself but found it hard to find figures. Did you use oil paint or regular model paint on them? The detail on the plane is excellent! You might want to look at some of the other post as I believe there is someone currently doing a 1:1 scale job of a Spitfire cockpit. Will you be doing any weathering or some representation of wear on your model?

Hi,
there is a wide variety of opinion on how a figurine should be painted; I saw some of them fully done with airbrush!
For mine I did as follows:
First a coat of white acrylic primer then, when dray larger areas, including face, are covered with relevant enamels.
Once the enamels are fully dry I start with oils going inside out.
For golden/silver items I often used powders bond together with good quality boat flatting.

About the Spitfire, I will surely be doing some weathering but not much.
Alberto
 
Very nice work Alberto, and yes, the seams should be there on that style of exhaust stub. I'm not sure about the signal flare rack on the front of the pilot's seat for a MkIX though. If it should be there, the holes should be drilled out. This was a folded aluminium 'box' section, with the holes designed to hold the 2 inch (50mm) Verey cartridges.
I would love this kt, to go alongside a MkIX I converted from the Hasegawa MkV years ago, but I can't justify (to myself)the £100 price tag here in the UK. That's a lot of money to duplicate something I have (especially as I prefer to have the cowlings in place normally), no matter how good it is, and it's obviously very, very good!
Looking forward to the next stages.

Hello,
I got my Tamiya Spit from UK, exactly form
Model Hobbies Plastic model kits and diecast models for the enthusiast
£ 89,99 is a bit less then 100 but still a lot of money.
I bought it as Christmas present for myself and I know it will keep me busy for many months.

About the signal flare rack, in reality they are spare light bulbs for the reflector gunsight.
They are quite evident in this picture concerning a Mk V
02es09_020-vi.jpg
but I saw them also in a Mk IX cockpit photo as well.
Cheers
Alberto
 
Yes Alberto, the spare bulbs for the relector sight are in a rack on the starboard cockpit wall, above the undercarriage selector. These were fitted to most Spitfire Marks, apart from those fitted with the MkII Gyro Sight. The holes I meant are those along the front edge of the pilot's seat pan, moulded on the kit parts. This was a signal flare rack, and fitted to the early metal seat on Mk1's. They may have been fitted to the MkIX, but I have never seen one on this Mark. It's possible/probable, that Tamiya have based their model on a current restoration, and / or other references, where the flare rack has been present. The papier mache-resin bond 'plastic' seat shown in the kit did not normally have the rack.
I use Model Hobbies quite frequently, and their prices are good, but at only £10 less than 'normal' price, I still can't justify the cost to myself - shame though!! Maybe I might get a Hobbycraft Spit IX or XVI when they are released, whcih will probably be re-boxed Pacific Coast Models kits, but slightly cheaper.
 
...The holes I meant are those along the front edge of the pilot's seat pan, moulded on the kit parts. This was a signal flare rack, and fitted to the early metal seat on Mk1's. They may have been fitted to the MkIX, but I have never seen one on this Mark. It's possible/probable, that Tamiya have based their model on a current restoration, and / or other references, where the flare rack has been present. The papier mache-resin bond 'plastic' seat shown in the kit did not normally have the rack.

Yes, I got you now!
Honestly I didn't even consider to check if it was correct to install this item or not: Tamiya supplied it and it was clearly visible on all Mk V pictures I found. Now I checked Mk IX pictures as well (the few I have found) and NONE is showing this flare rack.
Unfortunately the cockpit is now complete and I don't know if I will mange to strip this piece away without damaging the cockpit itself.
Many thanks for your advise, in any case.
BR
Alberto
 
Y
...
Unfortunately the cockpit is now complete and I don't know if I will mange to strip this piece away without damaging the cockpit itself.
...
This just to add that I managed to remove this piece without damaging the seat or other parts.
So we can say that this is one little defect on the Tamiya kit that, very likely, was designed having in mind to issue an Mk V quite soon.
The other little negative point to be mentioned so far are wing lights on standard wings. In such an expensive kit I would have expected something better that just instruction to paint them red and green. So I did them myself with stretch clear sprue, following the very good instructions given somewhere else in this forum.
I post pictures soon.

A question for Airframes.
Some time ago you posted in this forum the following picture
76643.jpg

and, if I got it right, mentioned that you have drawings of these blisters.
The point is that I'm considering the option of making one of the Spitfires that were delivered to Italy after WW2 and this particular subject had "e" wings.
Tamiya kit includes two options for blisters: one with large blister and one with the narrow blister towards the centreline but for an "e" wing it should be on the other side.
So, if you still have these drawings, they will help me to decide.
Many thanks in advance
Alberto
 
Glad to hear you were able to correct the seat Alberto. I think you're right, the part may be for a future MkV, or even Mk1. The first MkV's were built from MkI/II airframes, and possibly had the flare rack, although later MkV's didn't. I've worked with MkII, MkV, MkXVI and MkXIV Spits, and never saw the rack, and they all had original seats.
I think I might have a plan, other than thr drawing posted, of the 'e' wing blister. You should be able to reposition the blister cover outboard without much problem. Leave it with me and I'll see what I can find.
Terry.
 
Here E wing for LF variant. The standard one looked the same .The wing tips were longer only making the Spitfire wing look so charakteristic.
 

Attachments

  • Spitfire_SAM_007a.jpg
    Spitfire_SAM_007a.jpg
    70.5 KB · Views: 467
  • Spitfire_SAM_007.jpg
    Spitfire_SAM_007.jpg
    86.3 KB · Views: 459
Here E wing for LF variant. The standard one looked the same .The wing tips were longer only making the Spitfire wing look so charakteristic.
Many thanks Wurger, if I decide to go this way, I need to find out how to do new covers with the blister in the right place.
May be I should start making good resin copies of those supplied etc.
BR
Alberto
 
Thanks Wojtek, you've saved me a job, as I'm very busy with sorting out stuff for people at the moment !
Alberto,you should be able to adapt the kit parts, or make resin ones, or even carve a balsa master and heat-mould some. I'm fairly sure there are also after-market resin replacements available, introduced for the PCM kits.
 

Users who are viewing this thread

Back