Super Detailing S.E.5 Guillow's model

Ad: This forum contains affiliate links to products on Amazon and eBay. More information in Terms and rules

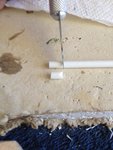
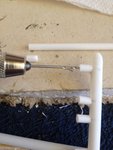
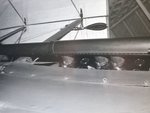
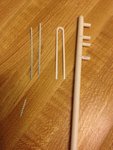
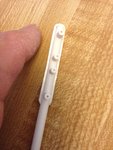
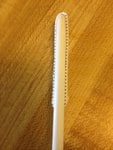
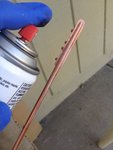
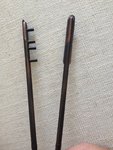
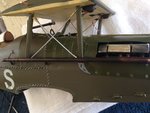
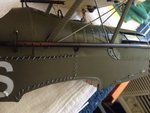
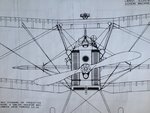
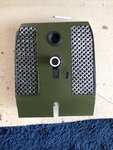
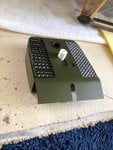
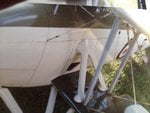
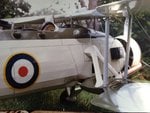
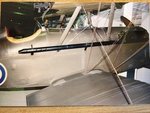
In keeping with my own philosophy of working from the inside to the outside, next comes the exhaust manifold. I would hazard a guess that it would be rather difficult to fabricate, adjust, and install an exhaust manifold while both the top and bottom wings are installed with all that rigging in the way.

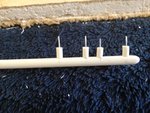
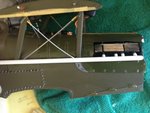
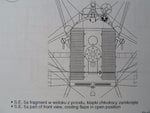
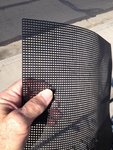
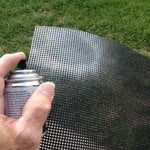
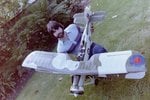
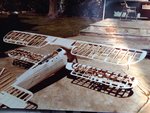
The last two pictures show "before" and "after" of the exhaust manifolds. In the next few posts I will show how I approached this detail. I believe you will be quite surprised.
 

Attachments

  • SE5 266.jpg
    SE5 266.jpg
    155.4 KB · Views: 195
  • SE5 259.jpg
    SE5 259.jpg
    37.2 KB · Views: 202
  • SE5 265.jpg
    SE5 265.jpg
    230 KB · Views: 210
  • SE5 273.jpg
    SE5 273.jpg
    205 KB · Views: 211
This is a laborious job :crazyeyes: ... and what you have done so far is fantastic.
I'm not a big fan of biplanes, but you're inviting me to try.
Congratulations.

Saludos :thumbup:
Luis Carlos
SANCER
 
The great work continues and the detailed explanations are most welcome.

Crimea,
Thank you very much. May I call to your attention that the S.E.5 model is only 1/12th scale? This translates to 27" wingspan. The Guillow's kit biplane was originally designed for rubber band powered flight. I just simply turned it into another level.

Airframes,

Thank you for your appraisal. It's very much appreciated. I'm honored.

Sincerely,
Skye

"Only" 1/12 scale! I work exclusively in 1/48 and like to add lots of scratch built detail to my models. My point, maybe not well made, was that your scale offers more options to super-detail a subject than one that is 1/48. However, the larger scale also means that more things are visible to the eye and therefore these details need to be addressed. In 1/48, I can get away with ignoring the smaller stuff.

I hope that I'm not implying that your work is easier as that certainly wasn't the intent. I really like what I'm seeing in this thread.
 
Sancer,
Thank you for that marvelous compliment. Biplane models are really very easy to build & (to me) offer far more "personality & character " than a warbird. This not to express anything negative on the warbird community; in fact, as I write this, I'm modeling (super detailing of course) a Guillow's P-51D Mustang for my daughter. It's when you see a biplane, there's so much more details & " eye candy." Biplanes represents an era of colors, new advancements in aviation, different configurations, lots of rigging and personality that really catches one's attention. As mentioned in my preface, the biplanes are really easy to build. They only require a little bit more patience and a different approach or a different technique to adding the top wing, and of course, the rigging that goes with it. Oddly enough, I get great pleasure from rigging. Almost like needle point on a 3-dimensional scale. Thank you, Mucha grancias'

Finally, I'd like to respond to the scales of models. whether it's 1/48th or larger say 1/32nd or 1/12th, 1/9th or more, in my humble opinion, it's the level of attention to each detail itself, not the amount of details, that counts. It's how the details are first fabricated and done with care that count. One can add a detail that was made from scrap and simply tack it to the model. But if that detail isn't done properly or with care, it can actually detract from the overall quality of the model itself. The S.E.5 is a good example.

I could've added the small beads to each hole drilled for the stitches along the fuselage. The beads would have acted as "eyelets" just like the real plane. But when I tried it on my practice fuselage, it was just too much "bling" and it was too distracting. Sometimes, "Less is More."

In summary: the model is only a composite of all the details put together and how they relate and compliment to each other. I hope this helps and serves as an inspiration to try each detail as its own special project to be added to the larger model.

Sincerely,

Skye
 
Last edited:
Crimea,

I fully understood what you meant and I'm very grateful that you appreciated all the details that went into the S.E.5, and your efforts to convey your appraisals in writing in this forum. Many people simply view the posts, either enjoy them or just watch, but say nothing. But to hear your thoughts, gives me great honor to know I've got someone's attention enough to write. That in itself is very rewarding. But to have someone who also builds models, regardless of the scales or medium used, to appraise my efforts, is even more gratifying, because the modeler knows what to look for, knows how much efforts have gone into each detail, knows the thoughts in trying to figure out the best way to approach fabricating each detail, then taking the time and efforts in making the details, as well as the trials and errors and so much more, can relate to my own work.

I used to build 1/48 scale models for many years and have always appreciated their value in the modeling world. I'm amazed at the advancements of the kits as well as many of the aftermarket items in the form of P.E. (Photo-Etched), resins, more options for the airplanes to build and so much more. In fact, I still subscribe to FineScale Modeler and purchase several British scale model magazines of both plastic as well as those made from balsa at the local bookstore. It's from the plastic model magazines that have given me many ideas and how much attention to be given to each detail that adds up to the mosaic of the model itself.

Crimea, thank you!!
 
Last edited:
The S.E.5 is one of those planes that each detail must be carefully considered and crafted in detail in order that the model itself can be fully appreciated. The exhaust, that can so easily be overlooked or even hidden in many warbirds, is prominently featured on this biplane and so, it has to be defined as something to fabricate with attention to its overall appearance. The first picture shows the full sized article that I personally photographed at the RAF really illustrates the level of attention the exhaust manifold seems to acquire.

The next picture shows how I carefully cut each plastic rod (the difference between "rod" and "tube" is the tube is hollow, whereas the rod is solid), by carefully cutting each piece next to the one that was already cut. I could've used a more accurate method of cutting, but this way seemed to work for me.

Afterward, each piece was compared to the hole of the engine block and then glued in place.

I knew that the length of the exhaust manifold needed reinforcement at the engine block. In this case, I drilled out the short pieces using a pin vise. Then inserted a short wire into each piece. These wires will go into the engine block to help hold the remaining length of the exhaust manifold.
 

Attachments

  • SE5 259.jpg
    SE5 259.jpg
    37.2 KB · Views: 191
  • SE% 263.JPG
    SE% 263.JPG
    242.2 KB · Views: 186
  • SE5 262.JPG
    SE5 262.JPG
    313.2 KB · Views: 174
  • SE5 263.JPG
    SE5 263.JPG
    221.1 KB · Views: 194
  • SE5 264.JPG
    SE5 264.JPG
    288.9 KB · Views: 177
From there, I trial-fitted the exhaust manifold to the engine block and made sure that each wire was correctly fitted into their respective openings as well as ensuring that the remaining length of the exhaust would be correctly lined up.

A close up b+w photo revealed some extra details that goes with the exhaust manifold such as a flange and rivets.

In this case, I cut up some glossy paper using both a pair of scissors and an X-Acto blade for the tight curves. I have to admit that I cut several of them before getting it just the right fit.

I then used rivets decals from MicroMark. They really work.
 

Attachments

  • SE5 265.jpg
    SE5 265.jpg
    230 KB · Views: 173
  • SE5 266.jpg
    SE5 266.jpg
    155.4 KB · Views: 183
  • SE5 269.JPG
    SE5 269.JPG
    309.9 KB · Views: 176
  • SE5 267.JPG
    SE5 267.JPG
    280.5 KB · Views: 170
  • SE5 268.JPG
    SE5 268.JPG
    236.3 KB · Views: 182
After the rivet decals dried, I gave the exhaust manifolds a quick spray of copper followed by a light overspray of flat black. This was an idea that I got from one of many plastic model magazines. In the end, as can easily be seen from the last two pictures, the two separate colored coats have given the exhaust manifolds a burnished look as well as some added depth of color as well.
 

Attachments

  • SE5 270.JPG
    SE5 270.JPG
    207.8 KB · Views: 183
  • SE5 271.JPG
    SE5 271.JPG
    357.1 KB · Views: 165
  • SE5 273.jpg
    SE5 273.jpg
    205 KB · Views: 186
  • SE5 272.JPG
    SE5 272.JPG
    237.4 KB · Views: 182
The next item on the agenda will be the prominent radiator. Just like the exhaust manifold, the Vickers machine gun, the extensive cockpit interior and the various paneling, the radiator is another one of those details that demand attention from both the modeler's building efforts and to the eye of the viewer. I've enclosed my first photo for this post by comparing the plastic radiator that was provided by the kit manufacturer and my finished customized radiator. At first glance, the customized radiator appears much more detailed. This is exactly what I wanted to achieve. However, it is also slightly larger than the plastic one solely because I enlarged the front nose of the fuselage at the very beginning of the build (and the beginning of this postings) to help give the model a more close resemblance of a "boxy" squared off nose in profile to the real aircraft.

Obviously, the customized radiator pictured here has a little bit more detailing to go before it is finished. Not the least will be the vanes. This was one of those details that I turned over in my mind many times at night, wondering how I would tackle the vanes and the possible amount of monotonous work involved. Turned out it wasn't really that difficult at all.
 

Attachments

  • SE5 240.JPG
    SE5 240.JPG
    276.6 KB · Views: 175
The radiator is one of those items that I took a lot of pictures as I proceeded through each stage of the build and for some reason, the photo themselves walked off the face of the earth. Sorry about that. However, I will do my best to describe in detail my approach and then proceed to use what pictures I have left to help with the fabrication of the radiator.

I did a little bit of research and discovered that the S.E.5 had many different radiators. I picked out the one that appeared to be the easiest to fabricate. I decided to use a 1/4' thick balsa block and cut it into a rough outline of the radiator. From there, I only had to lightly sand the surfaces and then paint it black. Why black? Because as with the machine gun and various panels. I intended to use glossy paper as cover over the radiator on all three sides (the back will be glued to the fuselage). The paper will help me in providing a ready-made finish that is already smooth and ready for painting. I was also aware that the edges along the front and sides will not be perfect and some of the balsa block will be seen. By painting it black, the paint will help hide this slight separation between the sides and front. I made sure that the fittings between the sides were extremely tight, but I still did not wish to take any chances.
 
It is a very good progress, a splendid and creative work, ... and a very clear and detailed explanation of the process. :salute:
Bien hecho Skye, lo estoy disfrutando realmente :thumbup:
 
Sancer and Crimea, thank you gentlemen. It's greatly appreciated. I was still trying to find any remaining pictures of the beginning stages of the radiator build and they're still "out there" somewhere. Hopefully, my previous description was adequate. I've decided to enclose the drawings of the radiator I chose. As you can see, it's really not all that complicated. Just a lot of tedious work on the vanes or louvers.

I started out by cutting a long thin strip out of glossy magazine paper for the framework that surrounds each radiator side and holds the louvers in place. The strips were folded along the appropriate corners of the radiator and then cut at the ends where they met at the last corner. No complicated mathematics, Just a lot of eyeballing. I also used this same method when cutting up the louvers themselves.
 

Attachments

  • S.E.5 # 3.JPG
    S.E.5 # 3.JPG
    99.4 KB · Views: 170
  • S.E.5 # 4.JPG
    S.E.5 # 4.JPG
    291.2 KB · Views: 212
  • SE5 243.JPG
    SE5 243.JPG
    256.6 KB · Views: 185
  • SE5 242.JPG
    SE5 242.JPG
    287.2 KB · Views: 187
  • SE5 244.JPG
    SE5 244.JPG
    260.6 KB · Views: 183
The next step was to add the louvers. How to glue them into place and make it all evenly spaced? I did not wish to have them all evenly spaced out until the end where there would either be too much space or too crowded. This was solved by simply starting out with one louver glued into the middle of the radiator frame. From this middle, I simply added another louver to either side, but also in their middle' as well (one "middle" on the top" and the other "middle" on the bottom). In another words, I just glued the louvers into smaller and smaller "middles" until it was all complete. Again, no complex mathematics. Just eyeballing and guessing what "looks right."

Looking at the partially finished radiator head-on, the louvers seem to disappear. But when viewed off to the side, that's when they reappear.

For those who have wondered why the extra length of "flap" at the bottom, as you can see from the last photo, it was simply folded up and glued to the underside of the fuselage to make the radiator complete.
 

Attachments

  • SE5 290.JPG
    SE5 290.JPG
    290.7 KB · Views: 180
  • SE5 291.JPG
    SE5 291.JPG
    308.8 KB · Views: 185
  • SE5 292.JPG
    SE5 292.JPG
    320.7 KB · Views: 170
  • SE5 293.JPG
    SE5 293.JPG
    296.8 KB · Views: 167
  • SE5 306.JPG
    SE5 306.JPG
    281.9 KB · Views: 193
I managed to locate a sample of my "grill" that was used for the radiator. It was obtained from a local sewing shop. This material is available in a wide variety of webs and patterns. I simply chose the black one and painted it silver to help bring out the radiator core that would otherwise be hidden behind the louvers. It has been my intention all along to "bling" as much detail as possible without overdoing it. This "grill" was glued in place at a diagonal rather than vertically upright. I compared the two differences and I rather liked the dynamics that the diagonal version seemed to suggest than the staid vertical. This was just a matter of personal choice.
 

Attachments

  • SE5 310.JPG
    SE5 310.JPG
    466.5 KB · Views: 176
  • SE5 309.JPG
    SE5 309.JPG
    405 KB · Views: 180
Wurger and Crimea, I sincerely thank you both. Crimea, thank you for the comments on the colors of the exhaust. I believe it to be correct when you said the colors are "bang on." I enjoyed that. Must be starting to get cold up in Calgary right now. I mentioned awhile back that I'm partial to many aircraft of British origin. Especially those of either rarity or the unusual. I was intrigued by the Fairey Swordfish about 40 years ago and decided right then and there to start scratching out a 5-foot wingspan of the model. I purchased the plans from Bob Holman Plans Service and basically everything excerpt the cowl and wheels were scratched out. I think that's where I got into wooden aircraft, because at the time, there were no decent plastic kits of the Swordfish. There's a long story about me and the Swordfish that I would like to relate to both you and Mr. Wurger someday.

I hope not to detract from my S.E.5 build thread, but I'd like to post a few old photographs of the model I managed to save all those years. The model itself was destroyed by rats when my family first moved from L. A. California to Reno, Nevada. That's a very young me in those pictures.
 

Attachments

  • Swordfish # 2.JPG
    Swordfish # 2.JPG
    1.5 MB · Views: 175
  • Swordfish # 3.JPG
    Swordfish # 3.JPG
    1.4 MB · Views: 187
  • Swordfish model # 9.jpg
    Swordfish model # 9.jpg
    295.7 KB · Views: 169
  • Swordfish model 11.jpg
    Swordfish model 11.jpg
    49.8 KB · Views: 160
  • Swordfish model 9.jpg
    Swordfish model 9.jpg
    46 KB · Views: 169
  • Swordfish resized.jpg
    Swordfish resized.jpg
    52.4 KB · Views: 181

Users who are viewing this thread

Back