Navigation
Install the app
How to install the app on iOS
Follow along with the video below to see how to install our site as a web app on your home screen.
Note: This feature may not be available in some browsers.
More options
You are using an out of date browser. It may not display this or other websites correctly.
You should upgrade or use an alternative browser.
You should upgrade or use an alternative browser.
1/32nd scale Mosquito FBVI conversion.
- Thread starter Airframes
- Start date
Ad: This forum contains affiliate links to products on Amazon and eBay. More information in Terms and rules
More options
Who Replied?")
- Thread starter
- #22
Airframes
Benevolens Magister
Thanks Andy and Wojtek. Long time yet until any probiscus appears !
woljags
Staff Sergeant
nice one Terry, will be following with interest
- Thread starter
- #24
Airframes
Benevolens Magister
Thanks Bob. I'm currently working on carving the 'male' mould for the canopy - sod of a job to get right !
- Thread starter
- #25
Airframes
Benevolens Magister
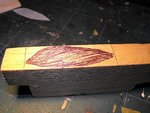
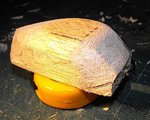
To make the canopy, essential to do now as this 'controls' the whole build, a 'male' master mould first has to be made. The first step is to draw the outline of the plan and side elevations onto a block of balsa, then cut this out and shape it.
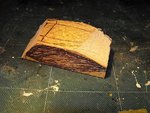
PICS 1 and 2. The profile drawn onto the balsa block, traced from the scale plans.
PIC 3. The raw 'blank' after cutting from the block.
This will now be sanded to shape, checking continuously against the scale plans, to achieve the desired shape. The 'male' mould needs to be slightly less in its all round dimensions, to allow for the thickness of the clear plastic sheet which will be used for the moulding itself, and any thinning of this sheet, due to stretch when heat-moulding, has to be taken into account.
Once the required shape is 'spot on', the 'male' mould will be sealed with a number of coats of polyurethane clear gloss varnish mixed with talcum powder. A final coat of clear gloss will then be applied, and, when fully hardened, this will be highly polished.
This is the part that can often go wrong, as it's easy to make a cut too deep, or sand-off too much, so I won't be surprised if I have to start all over again !
When this stage is complete, I'll then make the 'female' mould, and mould the canopy, and post explanatory pics at that time - I hope !
Thanks again for your interest, more in due course.
Attachments

- Thread starter
- #27
Airframes
Benevolens Magister
Thank you my friend !
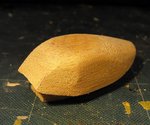
The initial carving and sanding is under way and, after around three hours work, the 'male' mould is starting to take on the canopy shape.
First one side is carved and sanded to the approximate shape, and the bottom edge rebated, then the other side will be carved and sanded to match. When this is done, the final shape will be sanded, checking the profile with templates cut from card, allowing for the thickness of the clear sheet to be used for moulding.
Still a long way to go yet !
Attachments
Tony Hill
Tech Sergeant
Looks like hard work Terry! Taking shape nicely though!
D
D
- Thread starter
- #29
Airframes
Benevolens Magister
Thanks Daryl. It's hard in as much as balsa is bl**dy tough stuff, but easy to mess up if worked too hard !
woljags
Staff Sergeant
i'm taking notes as i still have to do the canopy for the vampire but keep putting it off
- Thread starter
- #32
Airframes
Benevolens Magister
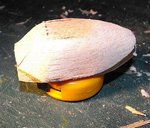
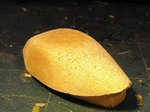
Third stage completed, with the 'male' mould now carved and sanded to the required shape, and the 'female' mould cut.
PICS 1 and 2. The 'male' mould, ready for fine sanding. When this is done, the varnish and talcum powder mix will be applied, to seal the grain and build up a smooth surface. It is essential to have a completely smooth, glass-like finish, as any imperfections will be transferred to the moulded part.
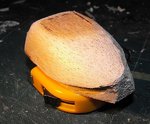
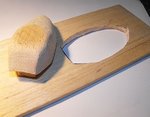
PIC 3. The 'male' and 'female' moulds, awaiting sealing (male) and varnish (female), the latter just to make the frame stronger.
I haven't yet decided whether to incorporate strips of masking tape, sealed with varnish, to create the external frames on the canopy.
Once the varnish and talc has been applied, it will be allowed to harden for a couple of days, before fine sanding and polishing.
Thanks again for your continued interest, and I'll post the next stage when it's done.
PICS 1 and 2. The 'male' mould, ready for fine sanding. When this is done, the varnish and talcum powder mix will be applied, to seal the grain and build up a smooth surface. It is essential to have a completely smooth, glass-like finish, as any imperfections will be transferred to the moulded part.
PIC 3. The 'male' and 'female' moulds, awaiting sealing (male) and varnish (female), the latter just to make the frame stronger.
I haven't yet decided whether to incorporate strips of masking tape, sealed with varnish, to create the external frames on the canopy.
Once the varnish and talc has been applied, it will be allowed to harden for a couple of days, before fine sanding and polishing.
Thanks again for your continued interest, and I'll post the next stage when it's done.
Attachments
- Thread starter
- #34
Airframes
Benevolens Magister
Thanks Wayne. The first coat of 'goop' has been applied to the mould - just waiting for it to harden before doing another coat.
vikingBerserker
Lieutenant General
I am totally amazed at the voodoo you can do with projects like this! Also, that painting you did rocks!!!!!
al49
Tech Sergeant
Impressive project! I Look forward to see next steps.
Alberto
Alberto
- Thread starter
- #37
Airframes
Benevolens Magister
Thanks very much David and Alberto, it's very much appreciated.
David, thanks very much once again for providing this kit - bet you didn't realise what I was actually going to (attempt!) to do with it !!
Anyway, it's going to be a very long job before any proper construction starts - and that will be a totally scratch-built cockpit - I hope !
David, thanks very much once again for providing this kit - bet you didn't realise what I was actually going to (attempt!) to do with it !!
Anyway, it's going to be a very long job before any proper construction starts - and that will be a totally scratch-built cockpit - I hope !
Crimea_River
Marshal
Great stuff Terry. I'm looking forward to seeing the process.
fubar57
General
I don't always comment on somebodies post but when I do I say "well done sir, bloody well done"
Geo
Geo
Users who are viewing this thread
Total: 1 (members: 0, guests: 1)