- Thread starter
- #61
Airframes
Benevolens Magister
Now that Lucky's gone back to work (Work? Ha Ha!), I'll get back to the thread!
For those of you who haven't seen the rest of this thread, or are new to the forum, I'll briefly explain what this is all about!
I first started to attempt 'serious' modelling at the age of ten or so, back in 1962, when I decided to try to 'convert' a trio of Airfix Spitfire IX's to look like MkI's from the Battle of Britain! Why? Because, at the time, there wasn't a kit available of the MkI, and I wanted a 'section' representing 72 Squadron!
So now, some 46 and a bit years later, I'm still 'seriously attempting', with varied and sometimes dubious success. Unfortunately, most of my models have either been given away, donated to museums, or lost (i.e. destroyed!) in house moves over the years, with the exception of those shown in this thread, the oldest surviving one dating from 1978. Many of the models have been built to act as 'models', subjects for my aviation paintings and, in recent years, the quality and presentation has started to fall short, due to the ever worsening effects of Rheumatoid Arthritis, a ba*st**d of a disease!
Anyway, enough of the flannel!
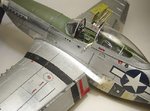
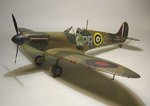
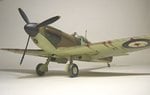
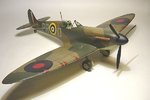
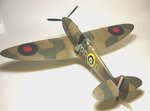
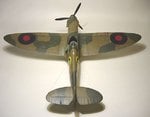
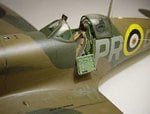
The next pair are both 1/32nd scale, the first built in 1991, a Spitfire MkIa of 609 (West Riding) Squadron, Aux. Air Force, based at Middle Wallop, in September 1940. The original aircraft survived, and is on display in the Imperial War Museum, London. The model is a conversion from the Hasegawa MkVb kit, which was fairly straightforward, entailing the removal of the upper and lower cannon blisters, re-shaping of the oil cooler, and re-scribing the gun access hatches and so on. There were a couple of things to do in the cockpit, including scrapping the undercart selector box, and fabricating the original hand-pump lever. This particulat model suffered the effects of 'dust flak', and needed a 'jolly good clean', plus replacement of broken bits, such as the radio mast, antenna and IFF wires and so on. I have still got to improve the cockpit entrance flap, and mould a correct, flat-sided canopy. The model was brush-painted, including the code letters, and the serial number was made with 'Letraset' rub-down letters. The roundels etc are from the kit decal sheet. Sorry, but I couldn't get any better shots, as I'm using a digital compact camera at the moment, which doesn't allow much in the way of depth of field.
The second model is more recent, being built for a magazine article, in 2007, and only finished about last May, when I made the diorama base for it! Due to the number of photographs, I've split this one between here and the following post.
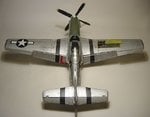
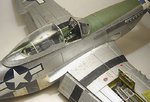
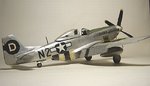
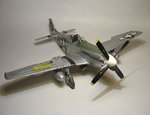
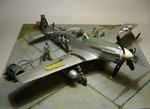
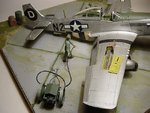
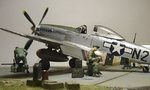
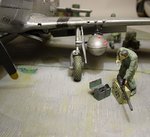
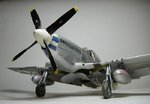
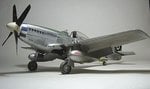
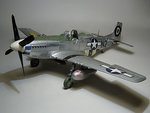
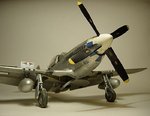
The kit is the rather controversial 1/32nd scale Dragon P51D Mustang, finished as the mount of Maj. George Cueleers, of the 364th Fighter Group, Honington, Suffolk, in August 1944.
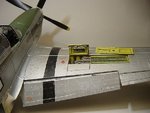
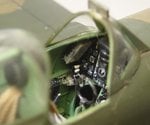
There are a number of scratch-built items in the cockpit area, most of which can't be seen due to K14 gun sight, plus other items that weren't included in the kit, the pitot head being an example, and the upper feed door of the gun bay being another. (The kit had this moulded as part of the wing, without internal detail.) The model was finished with various mixes of Humbrol metalic enamels, which were both brushed on and airbrushed, using the technique described in my 'Bare Metal...' thread elsewhere in these 'pages', and the code letters, tail disc, nose stripes and I.D. bands were hand-painted.
For those of you who haven't seen the rest of this thread, or are new to the forum, I'll briefly explain what this is all about!
I first started to attempt 'serious' modelling at the age of ten or so, back in 1962, when I decided to try to 'convert' a trio of Airfix Spitfire IX's to look like MkI's from the Battle of Britain! Why? Because, at the time, there wasn't a kit available of the MkI, and I wanted a 'section' representing 72 Squadron!
So now, some 46 and a bit years later, I'm still 'seriously attempting', with varied and sometimes dubious success. Unfortunately, most of my models have either been given away, donated to museums, or lost (i.e. destroyed!) in house moves over the years, with the exception of those shown in this thread, the oldest surviving one dating from 1978. Many of the models have been built to act as 'models', subjects for my aviation paintings and, in recent years, the quality and presentation has started to fall short, due to the ever worsening effects of Rheumatoid Arthritis, a ba*st**d of a disease!
Anyway, enough of the flannel!
The next pair are both 1/32nd scale, the first built in 1991, a Spitfire MkIa of 609 (West Riding) Squadron, Aux. Air Force, based at Middle Wallop, in September 1940. The original aircraft survived, and is on display in the Imperial War Museum, London. The model is a conversion from the Hasegawa MkVb kit, which was fairly straightforward, entailing the removal of the upper and lower cannon blisters, re-shaping of the oil cooler, and re-scribing the gun access hatches and so on. There were a couple of things to do in the cockpit, including scrapping the undercart selector box, and fabricating the original hand-pump lever. This particulat model suffered the effects of 'dust flak', and needed a 'jolly good clean', plus replacement of broken bits, such as the radio mast, antenna and IFF wires and so on. I have still got to improve the cockpit entrance flap, and mould a correct, flat-sided canopy. The model was brush-painted, including the code letters, and the serial number was made with 'Letraset' rub-down letters. The roundels etc are from the kit decal sheet. Sorry, but I couldn't get any better shots, as I'm using a digital compact camera at the moment, which doesn't allow much in the way of depth of field.
The second model is more recent, being built for a magazine article, in 2007, and only finished about last May, when I made the diorama base for it! Due to the number of photographs, I've split this one between here and the following post.
The kit is the rather controversial 1/32nd scale Dragon P51D Mustang, finished as the mount of Maj. George Cueleers, of the 364th Fighter Group, Honington, Suffolk, in August 1944.
There are a number of scratch-built items in the cockpit area, most of which can't be seen due to K14 gun sight, plus other items that weren't included in the kit, the pitot head being an example, and the upper feed door of the gun bay being another. (The kit had this moulded as part of the wing, without internal detail.) The model was finished with various mixes of Humbrol metalic enamels, which were both brushed on and airbrushed, using the technique described in my 'Bare Metal...' thread elsewhere in these 'pages', and the code letters, tail disc, nose stripes and I.D. bands were hand-painted.
Attachments
-
 Gallery models 109.jpg27.7 KB · Views: 49
 -
 Gallery models 111.jpg23.4 KB · Views: 49
 -
 Gallery models 114.jpg27.6 KB · Views: 61
 -
 Gallery models 116.jpg26 KB · Views: 54
 -
 Gallery models 133.jpg28.4 KB · Views: 48
 -
 Gallery models 136.jpg39.4 KB · Views: 43
 -
 Gallery models 134.jpg53 KB · Views: 67
 -
 Gallery models 135.jpg64.6 KB · Views: 48
 -
 Gallery models 126.jpg38.1 KB · Views: 49
 -
 Gallery models 132.jpg37.2 KB · Views: 57
 -
 Gallery models 138.jpg51.8 KB · Views: 49