747-300 to rephis time. Am I in the business or what?

Ad: This forum contains affiliate links to products on Amazon and eBay. More information in Terms and rules

N4521U

Colonel
13,434
5,664
Nov 1, 2009
Miranda, NSW
Well...... out of the last repair I did on a 747 came this one from NZ. It's a bit more work than the other, not to mention twice the size!y postings on a collectors website. Works for me. Some hobby eh?

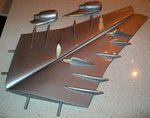
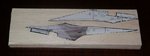
Starting with the wings.
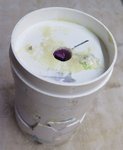
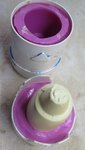
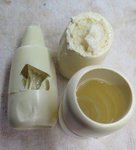
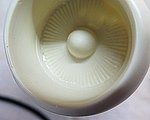
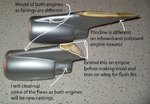
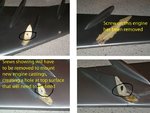
Two engines missing, one inboard, one outboard on the Port side. Difficulty is the starboard side had been broken off and remounted with two part epoxy, heavy! So the joins are kinda built up and a little off center. The short break on the inboard engine will have to be built up outwards a bit so I can cut the globs off the wings and get the engines to sit correctly. So I have to mold and cast each engine and fairing. The fairings are different.

Some cracks in and thru the wings, front to back, and along the length will have to be repaired. Broken off tips of some of the pointy things and some chips and crascks in the paint.

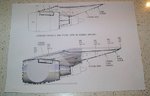
No horiz stabs on the tail, I will get fusey when wings are finished. I'll have to find a top scale view of the 747-300 and pattern the tail parts and make them from scratch.

Good news is, he haas a painter in NZ who can do the finish painting. This thing, like most is super glossy.

Work begins. Maybe I can get a new airbrush, if Wayne will give me the paticulars on the one he has. Hint hint.
 

Attachments

  • 747NZ-1 wings.jpg
    747NZ-1 wings.jpg
    70.5 KB · Views: 264
  • En 1-146 mods.jpg
    En 1-146 mods.jpg
    94.4 KB · Views: 289
  • wings.jpg
    wings.jpg
    82 KB · Views: 247
Last edited:
It's a bit of a puzzlement Mike............ I is still cojitating.
Goe, I may do that very thing. I need engine detail shots as well.

This is 1/48th scale. Each wing is 575mm fusey to wing tip in the plan view.
 
I think I have come up with a final plan on this one. BTW, ever tried looking for a 1/48th 747-300? Haven't found one yet!

So my plan is to make a master of one engine, all cleaned up, nothing attached and I'll have four good engine castings all alike.
Clean everything off both wings, nice and smooth.
Then, if I can find an inboard and outboard pylon profile, I'll fabricate a more realistic pylon for each as a seperate part and assemble.
Quicker, and easier.
 
So here's waht I have found and put together.
From a repair manual for the 747, all models for the pylon engine mount covers.
The manual shows a GE, the display model has Rolls engines. So I found a good side view of an early Qantas 747-300 with RR engines. Layed the photo over the dwgs at scale and Bob's your uncle. SO now I can mfr an accurate profile for the pylon. Have to find a way to Turn a wood engine tho as these will be pretty well toasted.

I can pick at it while I finish GB22!
 

Attachments

  • pylons illus..jpg
    pylons illus..jpg
    59.3 KB · Views: 174
Sounds like a good plan Bill, but before you start the pylons I would confirm that the curve at the top of the pylon where it meets the wing matches the wing of your model. Even if the pylon drawing has the right curve the lower surface of the models wing might not.
 
Yep, my plan would be to fit each pylon individually......

I've jumped in and cut off and shaped the engine with the really buggered up pylon. Sprayed on a bit of primer. The core of the engine, and the wing for that matter seems to be foam. A sealer and paint overall. I was just a little nervous going in to the hacking part, but all came out okay.

I will get some balsa for the ruffing of the pylons. The attachment point will be finished as ready to attach at the engines. I'll make a pocket in the engine to recieve the pylon. The surface to match the wing will be ready to custom fit each station of the four engines.

Next will be smooting the wing attachment points after removing all the broken bits. I'll try and get some of the stuff automotive guys use to "cake frost" bodywork for ultra smoothing. I think it is different than bondo, softer and finishes very smooth. I think it's yellow. Will have to make a few calls.
 

Attachments

  • 747NZ-2 wings.jpg
    747NZ-2 wings.jpg
    71.3 KB · Views: 182
So yesterday I went out to the local hardware store and got a strip of balsa, cut it into three bite size pieces, glued them together with some plane old white glue. I weighted them down with a chopping block to set flat. Cut up my scaled size dwgs of the pylons and glued them down with the POWG as above. I just have to cut them with a little coping saw, file theem down to fit the wing and engines, seal the balsa, paint with some glossy enamel and make molds. Yeah, right.

I sailor on, bit by bit.
 

Attachments

  • 747NZ-3b.jpg
    747NZ-3b.jpg
    32.1 KB · Views: 183
  • 747NZ-3a.jpg
    747NZ-3a.jpg
    47.3 KB · Views: 189
Well, nearly 4 years since i posted the above!!!! Bloody long time, a lot has crossed under the bridge. Moved into my wifes family home, remodeling, landscaping, cataract surgery, arrrrrrgh.
But I have done some big work onner. First shows my engine mold and castings. It was a bugger to do. mold was made from PVC pipe and caps. Had tabs running up the sides, one triangle that sat in a pocket to allign the halves. second shows the cast still in the bottom half. Third shows the mod open with the plug that forms the cowling. Fourth some of the screwups. The weight was so heavy I had to pour in about half full then tumble the mold so the casting was hollow. Fifth one you can just see the fan blades which were on the original part is why I had to make a vertical mold.

Next I'll show the pylons.
 

Attachments

  • 747 eng 1.JPG
    747 eng 1.JPG
    62.9 KB · Views: 180
  • 747 eng 2.JPG
    747 eng 2.JPG
    106.6 KB · Views: 184
  • 747 eng 3.JPG
    747 eng 3.JPG
    52.3 KB · Views: 174
  • 747 eng 4.JPG
    747 eng 4.JPG
    11.3 KB · Views: 167
  • 747 eng 5.JPG
    747 eng 5.JPG
    24.3 KB · Views: 169
It was a little pause, it's good to see you in action again Bill.
It seems that engine looks fine, ... pending to what follows.

Saludos :thumbup:
 

Users who are viewing this thread

Back