Navigation
Install the app
How to install the app on iOS
Follow along with the video below to see how to install our site as a web app on your home screen.
Note: This feature may not be available in some browsers.
More options
You are using an out of date browser. It may not display this or other websites correctly.
You should upgrade or use an alternative browser.
You should upgrade or use an alternative browser.
A Dewoitine D.520 under Italian flag - From the Azur kit in 1:32
- Thread starter al49
- Start date
Ad: This forum contains affiliate links to products on Amazon and eBay. More information in Terms and rules
More options
Who Replied?- Thread starter
- #42
al49
Tech Sergeant
Hello,
the dihedral is 3,5° measuring on the longeron topside, or 13,6% 7degrees75 measuring at the underside of the front longeron.
Sand the detail 4, it is a door, no a air outlet.

If you use a tape to maintain the dihedral during the sticking, when you will remove the tape, the elasticity of plastic will change the dihedral.
You can made a jig to obtain the good dihedral, and fix a strip of plastic sheet, thickness 1 or 1,5 on the underside of top wing.
I make as this on the H75 with a strip 3x3mm. thereby the wings have the good dihedral.
On the pictures below you can see the strip (white) between the wings.

Many thanks for your info: the dihedral angle it's exactly what I needed to know. I think I will make a jig.
In this moment in time I'm fighting with badly warped wings; as I mentioned above I intend to understand where the wing problem is before I do anything else on this model.
Alberto
fubar57
General
Some good stuff going on here and great assistance from Waroff and Wojtek.
Geo
Geo
I spent a lot of money to purchase the Contact Resine upgrade kit and it will be very bad if I will not be able to sort out the gap issue so this is now my first priority.
I will stop working on the cockpit and I will start soon on wheels bays in order to get wings done and solid and then deal with the gaps.
Alberto
In this moment in time I'm fighting with badly warped wings; as I mentioned above I intend to understand where the wing problem is before I do anything else on this model.
The width section of cowling is 28,8mm measured just under the airduct, it's possible that CR is too large?
the wheel well is too thick on the top, sand it
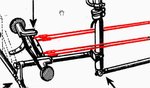
Between cowling and leading edge there was the air outlet of oïl cooler. On the late version there was an "Y" duct masked by A10.
On the early version there was a single straight duct, so cut the A10 to obtain a single strip (3mm at the 1/32) who stop at the leading edge.
- Thread starter
- #45
al49
Tech Sergeant
The width section of cowling is 28,8mm measured just under the airduct, it's possible that CR is too large?
the wheel well is too thick on the top, sand it
Between cowling and leading edge there was the air outlet of oïl cooler. On the late version there was an "Y" duct masked by A10.
On the early version there was a single straight duct, so cut the A10 to obtain a single strip (3mm at the 1/32) who stop at the leading edge.
OK, I sanded already the extended CR cowling down to 29.4 mm but there is resin enough and can be sanded again to reach 28.8 mm, no problem.
About the wheel wells, I approached the issue differently, I cut the bottom and I will replace it with plasticard disk with added details, have you got any good picture of this area?
As per the A10 pcs, I glued it already to check if it works, and it works well! After a little bit of sanding wings are meeting the fuselage almost fine, but I still have to deal with the dihedral; I shall make a jig today.
Again, many, many thanks for your support!
Alberto
Airframes
Benevolens Magister
Nice work Alberto, and great assistance from Waroff and Wojtek.
- Thread starter
- #47
al49
Tech Sergeant
I eventually put my hands again on this build, so here are some pictures of the cockpit almost complete:


Still to be assembled the very unusual gun-sight and I still have to decide how to build seat straps, I will probably use buckles only from the p.e. fret with belts made with tin foil.
Some lore to follow soon.
Happy New Year !!!
Alberto
Still to be assembled the very unusual gun-sight and I still have to decide how to build seat straps, I will probably use buckles only from the p.e. fret with belts made with tin foil.
Some lore to follow soon.
Happy New Year !!!
Alberto
fubar57
General
Very nice looking pit Alberto and Happy New Year to you.
Geo
Geo
looking real good Alberto!
Looks great so far Alberto!
Crimea_River
Marshal
Nice work.
Airframes
Benevolens Magister
Certainly is.
Best wishes to all
It's a beautiful work,
the cushion and back seat were "bleu de nuit" as the area cockpit. (but the cockpit will be too dark)
The harness had 5 belts. 2 through the hole in the back seat, 1 each side and 1 ahead(between the legs of pilot).
You could make 2xtwo wires of rudder control. These wires, from rudder bar, go under the seat
Attachments
- Thread starter
- #56
al49
Tech Sergeant
Best wishes to all
It's a beautiful work,
the cushion and back seat were "bleu de nuit" as the area cockpit. (but the cockpit will be too dark)
The harness had 5 belts. 2 through the hole in the back seat, 1 each side and 1 ahead(between the legs of pilot).
You could make 2xtwo wires of rudder control. These wires, from rudder bar, go under the seat
Many thanks to all for the nice comments and particularly to waroff for his suggestions.
I will surely consider those concerning seat belts but I cannot any more add the wires (sadly) because the fuselage is already sealed. I also glued the resin nose and added some riveting on the fuselage to cope with the one existing on the nose.
I should be able to post some pictures by the end of the day.
Alberto
- Thread starter
- #57
al49
Tech Sergeant
Here are the pictures I promised, riveting on fuselage is hard to see


I also spent some time improving the wheel bays

Alberto
I also spent some time improving the wheel bays
Alberto
vikingBerserker
Lieutenant General
Very nice!
Users who are viewing this thread
Total: 1 (members: 0, guests: 1)