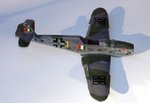
Bellagambi's Bird Hase 1/32

Ad: This forum contains affiliate links to products on Amazon and eBay. More information in Terms and rules

Hey Kev, Im pretty sure this is the one ur doin correct???
Bellagambi2-vi.jpg


I would have to say that u nailed the frickin camo man, spot on.... It looks great and I compare it to some of the work Wayne does....

Great mottle work Kevin...
 
That's the one Dan give me 6 months and I will be teaching Waynoo :p :lol: Cheers Kevin
 
Well I have started placing the decals guys and a little bit of a challenge but nothing that cannot be overcome .1st it was pointed out over at LSP that the ANR's on the upperwing arms are point in the wrong direction (Wayne you have to the arms off the shafts then flip) 2nd thing was no biggee was the 1 in front of the croos on the fuse was about 1' to long in scale according to the profile.So I had to take it back off and cut and reapply,looks better.I will have some picks in the next couple of days.WHO DAT!! Cheers Kevin
 
A couple of pics of the main decals plenty of stencils left to finish her up and some more weathering.;)Cheers kevin
 

Attachments

  • Bellagambi 016_edited (900 x 618).jpg
    Bellagambi 016_edited (900 x 618).jpg
    41.8 KB · Views: 62
  • Bellagambi 017_edited (900 x 650).jpg
    Bellagambi 017_edited (900 x 650).jpg
    43.6 KB · Views: 84
Hi Kevin,
I like very much your work so far, but I have a little comment too.
May be it depends on a misunderstanding with instructions but, to my knowledge, the Red Devil should look forward, like in these pictures:
reddevil-vi.jpg


Bellagambi3-vi.jpg

The caption of the above image also explain that, different from usual, the Italian flags on this aircraft had fringes on four sides.
In some cases, the badge was painted on a dark green background, like in my G55
DSCN0446-vi.jpg

I did the badges myself so, in case you have problem in recovering your decals, you can use mine:
reddevilscopy-vi.jpg

reddevil-vi.jpg

Alberto

I forgot to mention that photo and picture are taken from books I listed in a previous message.
 
One more word about wing fasces.
On ANR aircraft there were both options, parallel wing fasces, like in my G55
DSCN0453-vi.jpg

and symmetrical ones, like in this very nice model done by the Italian modeller and writer Maurizio Di Terlizzi
Me109DiTer-vi.jpg

The first option applied only to Italian built aircraft, so should't apply to 109.
Cheers
Alberto
 
Thks for the corrects Al easy enough to correct since no more clear has been applied.So my arms on the ANR's were correct in the first place with them pointing forward?? again it can be fixed if so.I am glad I posted and you enlighten me on that.;)Cheers Kevin

Thks again Al . Fixed
 
Last edited:
Great info Al right at the correct moment, hats off man...

Great save Kev... Decals look sharp with no silvering...

Thks for the Nod fellas ;) Yep I am glad Al poke his head in when he did been work'in on stencils :rolleyes: Cheers Kevin
 
Hey Albert whos the pilot in the pic and whats the crates SQ.?The pic is so good when you stare at it you almost feel that you are taking it,weird like one is there.Cheers Kevin

and none of the ZU latch markings left??? shes been painted and repaired a bit.
 

Users who are viewing this thread

Back