**** DONE: 1/48 Fairey Gannet AS.1 - Carrier Aircraft GB

Ad: This forum contains affiliate links to products on Amazon and eBay. More information in Terms and rules
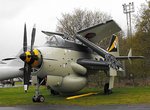
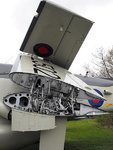
Many thanks for the kind words gent's, most appreciated.

Made a star on the wing folds yesterday, not an easy task as like I've mentioned, this kit is a solid thing. Plastic is between 1.5 and 2.5mm think which takes a lot of cutting. First wing cut is marked out with this yellow tape for a bit of guidance and protection. I made a couple of stuff-ups with the cutting. On the first fold I put in the step on the upper wing (right side of pic), though the step is needed, the fitment of the plastic is not and can be discarded.

120904-1A.jpg


The second mistake was me getting over zealous and hacking off more than needed on the second wing fold. It was soon fixed though by just adding a slim fillet where the saw cuts went and the sticking the piece back on.

120904-1B.jpg


120904-1C.jpg


The next set of pics show the pieces all cut up for the stbd wing. The same has to be done with the port.

120904-1D.jpg


120904-1E.jpg


How do you like the precision moulding of this kit. Not a problem with me but if the wing were kept whole there is quite a strain on the inboard joint if pressing the wingtips together. Both wings were the same.

120904-1F.jpg


Last up is the nose cone fitted. This was a bit problematic as it was not a good fit and the resin part was short of from top to bottom so a couple of days work was required to put things right. BTW, that very obvious gap at the top has been fixed with Zap-o-gap and cleaned back, so it will be gone once paint has been applied.

120904-1G.jpg
 
I will say this again.... I am continually amazed at the efforts some of you guys put into a model to make it "realistic".

Well done, Mr. B. (You're old enough to rate a Mr.)

Charles
 
Great stuff Vic, it's progressing well, and some nice detail work.
For those who don't know what the wing folds look like, this is what Vic is aiming for !!
 

Attachments

  • Elvington 022.jpg
    Elvington 022.jpg
    118.9 KB · Views: 71
  • Elvington 027.jpg
    Elvington 027.jpg
    124.2 KB · Views: 77
  • Elvington 028.jpg
    Elvington 028.jpg
    65.2 KB · Views: 88
It looks like a transformer, Bumblee B's airplane form maybe? hehe :D
 
Thanks guys and thanks for putting up the explanation Terry, I'd sort of took it for granted most folks would have known of the tri-fold wing.

Just a confirmation note folks, I'm doing a different version to the on Terry posted, the major differences being no pop belly for me and the exhausts will be behind the wing.
 
Now that is more like my ugly beast Karl. Looking at the way that sits high in the nose, I sure hope I've enough ballast at the front to counter not only the tail weight but also the backward tilt of the machine.
 
Slow progress today, it's taken quite a while to sort out how all these bits go together.

In the process of fathoming, found out that the fit of the etched detail on the first folding joins is not all that good, they are wider and slightly longer. Not a problem really, just add in a fillet between the leading edge wing join and file to shape. Almost perfect and in respect of the length I'll just cut the etched cover plates into segments and do a subtle bit of shortening. This will also help with the bends and twists they have to cover. Also had to add a spacer to the wheel bay resin part. They say these Classic kits are for experts, but I do think they leave a lot to chance.

120905-1A.jpg


Also when test fitting it was very noticeable where the extreme thickness of the wings plastic showed through the holes of the etched cover plates. Some careful Dremel work soon had these areas cleared and with a touch of paint should look okay.

120905-1B.jpg


On the second joint we have a similar problem with length of fit and more bends and twists to contend with so these etched bits will again be cut to fit. Again the problem of the thick plastic showing through the holes in the etched pieces and I also discovered my second mistake (blue arrow) when cutting the wing up. It should have just been a small slit in the plastic, so a much thinner replacement has been added. I'll cut the slit later just before adding the etched bits.

120905-1C.jpg


More work on the same wing tomorrow, slow progress but the second wing should go better………………..hopefully.
 
Last edited:

Users who are viewing this thread

Back