**** DONE: 1/48 Kittyhawk IV "Cleopatra III" - Aircraft in Foreign Service WWII (1 Viewer)

Ad: This forum contains affiliate links to products on Amazon and eBay. More information in Terms and rules

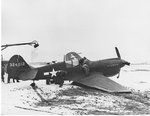
Thanks mate. Got the e-mail and pics. Seems there is evidnece that US serials churned out in 1944 had the patches but my machine is of late 1943 manufacture. Let's see what others might come up with.

Andy
 
P40N unidentified 002 800.jpg
Thanks mate. Got the e-mail and pics. Seems there is evidnece that US serials churned out in 1944 had the patches but my machine is of late 1943 manufacture. Let's see what others might come up with.

Andy

This was a US contract aircraft and the US government paid Curtiss extra to have the green splotches on the wings and tail surfaces. Lots of photo evidence available for aircraft serialed before and after this one. The pic above is from my own collection.

Cheers

Peter
 
Last edited:
Thanks very much Peter. So if it was your model, would you put the splotches on Cleo III?

Definitely.

Here's a pic of another P-40N-20 from 43 in what appears to be in fresh condition.

I didn't do the wings of my GB2 entry, but should have, I now realize. :rolleyes: Curtiss were still doing it on -40's, unless delivered in bare metal.

I would also moderate this by saying that it is possible that the aircraft may have had it's paint repaired/ reconditioned at some point during its service.

The Status cards are available online in the National Archives and gives basic information on it's whereabouts and any repairs or overhauls.

Cheers

Peter
 

Attachments

  • P-40N-20 002.jpg
    P-40N-20 002.jpg
    79.7 KB · Views: 123
Last edited:
Thanks Peter for the info. I took your lead and pulled the status cards (reduced copies shown below) which I'm trying to decipher. Doesn't look like there was a repaint. I also note that in all of the pictures posted above, there is evidence of the original US markings having been painted over so it stands to reason that the original factory camo had not been overpainted.

So it looks like I'll do the splotches. The only question now on the colours used?

A29-629 Status Card 1 Reduced.jpg

A29-629 Status Card 2 Reduced.jpg
 
Some slow progress. 3 day weekend coming up so should be some more real soon. Pic 1 shows a start on the instrument panel. I'm cutting the kit-supplied decals and placing them individually into the instrument faces and around switches. Slow but effective. The final two pics show the finished rear fuselage glued together and rescribed. The seam has been tested with a prime coat which has since been sanded off and polished.

13120805.jpg
13121201.jpg
13121202.jpg
 
Neat bit of panelling Andy and how on earth do you manage to cut out those individual dial faces.
 
Hi,

Could I join and build a cleo 3 along with you?
I do rc ships, but they take so long. Years.
I like the way you guys do "builds"...you have a model at end of three months?
 
Thanks for the positive comments guys.

Work on the instrument panel continued today. I experienced a head slap moment when I got to the stage of meticulously cutting and applying the instrument decals shown in the below picture.

13121304.jpg


It was at this point that I went looking in my spares box from my earlier Kittyhawk III build that I discovered a partly used Eduard PE fret with a full instrument panel on it. So it was decision time - chuck what I'd done so far and use the PE panel or keep going. Given that I was pleased with the work so far and that throwing it out would have been a shame, my decision was to keep going. I did however, use a couple of PE parts from the fret (a small switch panel and the red toggle switch) and finished the thing off tonight. Here's how it looks:

13121305.jpg


Then it was on to the seat belts. As I didn't fancy the look of the molded bar on the armour plate (see last picture in post #29), I decided to lop it off and replace it with a scratch build affair that was more 3-dimensional and that would allow the belts to drape over it. Here's how that went:

13121301.jpg


After painting, I attached two pieces of masking tape cut to the width of the PE belts and stuck these to the back of the seat as the PE belts were not long enough to go all the way around. Lap belts were also completed at this stage.

13121302.jpg


Then, the shoulder belts were added after bending the tops to hook over the bar.

13121303.jpg


That's it for now. I hope to get the pit installed tomorrow and the wings on. I'm debating whether to scrounge up some parts for the wing bomb racks, or scracth build something, or just leave the rack off as they look complicated. Does anyone have a good close-up pic of this bomb rack?
 
Last edited:

Users who are viewing this thread

Back