Lucky13
Forum Mascot
Looking good mate!
Follow along with the video below to see how to install our site as a web app on your home screen.
Note: This feature may not be available in some browsers.
Ad: This forum contains affiliate links to products on Amazon and eBay. More information in Terms and rules
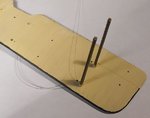
Guys i have a question. What, if any is the best way to rig a mast from the mid section of the aircraft to its tailfin. i have the aerial post as part of the kit, but no aerial. Would it be similar to stringing a biplane. This would be something I have neve attempted, but would be really cool if it can be done.
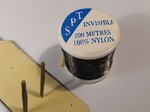
i was thinking of using nylon thread from a stocking, which should be approximately the right gauge. I was simply going to superglue one end to the tail , draw the other end to the aerial post, draw taught and superglue that other end a well.
Any advice or opinions is appreciated....including "are you mad????"

![000_0218[1].jpg](/forum/data/attachments/178/178966-9412dee4f6aa1cf7cabf5ec15d63913e.jpg)
![000_0221[1].jpg](/forum/data/attachments/178/178967-5c63e5f15d54bc2549ecf4d6b6f41d9a.jpg)
![000_0222[1].jpg](/forum/data/attachments/178/178968-704d91b54a616ac44324efdb760de2bc.jpg)