**** DONE: 1/72 Fairey Firefly AS5 - Your Favourite Aircraft of All Time GB (1 Viewer)

Ad: This forum contains affiliate links to products on Amazon and eBay. More information in Terms and rules
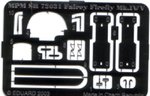
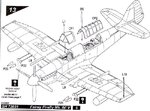
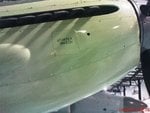
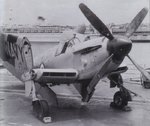
Hi guys, some further progress which i will post separately in a minute. But for the moment I have a question for the kit instuctions.

The kit ncludes some PE parts, two of which are numbered L9 on the scan of the attached sheet. The instructions (the relevant sheet of which is also attached) say these heat go above the exhaust stacks .

Trouble is I can find no evidence of these heat shields ever being fitted. Bob 9Woljags) kindly sent me some details of the Firefly at Yeovilton, which shows no such detail. I have reviewwed my photos and cannot find any such evidence. Are these heat shields fanciful? Has anyone ever seen one of these ?

Or am i misreading the instructions....


at
 

Attachments

  • PE Sheet.jpg
    PE Sheet.jpg
    46.5 KB · Views: 84
  • construction plan.jpg
    construction plan.jpg
    61.8 KB · Views: 178
  • Exhaust Detail.jpg
    Exhaust Detail.jpg
    73.3 KB · Views: 76
Im not 100% sure but I think its like the Mustang (I think the mustangs were dust covers), some had them, some didn't since they might of been in-effective and groundcrews took them off (double check my advice since i still have my sinus headache so i might be thinking one thing and saying another! :D)

So far it looks great I can't wait for the decals :D
 
Last edited:
Thanks rogi. i cant find any evidence on RAN birds, and Im pretty sure they arent/werent fitted to RN versions

Im looking forward with interest as tohow my home made fuselage stripes will fare as well

The attached progress shots are "in the rough". havent yet tidied the paint job at all as yet
 

Attachments

  • 000_0209[1].jpg
    000_0209[1].jpg
    40.3 KB · Views: 67
  • 000_0210[1].jpg
    000_0210[1].jpg
    36.9 KB · Views: 68
  • 000_0211[1].jpg
    000_0211[1].jpg
    45.3 KB · Views: 72
I believe they are anti-glare shields, to prevent the pilot being dazzled by the exhaust flames/glow, at night or in poor lighting conditions. Similar 'shields' were fitted to Spits and Hurricanes used on night ops in WW2.
 
Thankyou guys. I didnt realize the shields were fitted more or less at right angles to fuselage. iwas looking for metal plates fitte flush to the body.

Now that you guys have pointed out how they appeared, its blingingly obvious that they were fitted to many aircraft. Not all, but quite a few.

Im not sure if the picture we have of a/c 208K had the plates fitted or not, but I am going to fit them. I suspect the plates could be fitte or removed as required
 
Have to agree with Terry, your skills are improving in leaps and bounds and it's great to see. Also am thinking along the same lines as Karl, a 1/48 scale in this in my stash would not go amiss. Glad you got the answer on the anti glare shields, but I do have a simple rule Mike 'If in doubt, don't.'
 
I believe they are anti-glare shields, to prevent the pilot being dazzled by the exhaust flames/glow, at night or in poor lighting conditions. Similar 'shields' were fitted to Spits and Hurricanes used on night ops in WW2.

Thinking the same Terry.

Great work Mike! (and great pics Andy!)
 
Tonite I finished the rear fuselage UN banding as a paper mockup, to make sure the proportions, dimensions and tones are as good as i can get them. the attached images are paper mock-ups taped rather roughly as a final check before i print seal and apply the Decal.

There are two elements to the decals. the numbers and the balck striping will be printed on clear decal paper. underneath that is a white decal band on which the black banding and two of the numbers (the clear decal will however be applied as a single piece decal....its just that on the port side the "2" will have the aircraft "sky" colour as background. The "0" will be a black letter on a white background, whilst the "8" will be a white number on a black background. the starboard side the colour of the numbers will be reversed).

The bandwidths and the placement of the clear decal on the white has to be done precisely, otherwise the numbers will have the wrong backgrounds, and the whole thing will fail. admittedly thats no big deal, i will simply adjust the image and reapply after a reprint. but for any measure of success the two parts have to match, and then be applied with absolute precision. It will not be an easy task.

On top of that, the mock allowed me to check that the overall assembly will fit into the rear tail space that i have. at one end there is the tail plane...at the other ther is the rear cockpit glazing. There is no spare apce between the white banding and either of these two obstacles....and the banding does not encroach onto thes
 

Attachments

  • 000_0214[1].jpg
    000_0214[1].jpg
    40 KB · Views: 77
  • 000_0215[1].jpg
    000_0215[1].jpg
    45.5 KB · Views: 75
Good stuff Michael, and should work well. As the outside areas are white, you could actually print the whole decal on white decal paper, trimming as required. This would also give better density to the black areas and numbers. Any uneven edges can then be re-touched with the base colour paint, once applied, set and sealed.
 
generally what you are saying is correct and its made me think I can use the suggestion to simplify the process. There are however one of the letters that are outside the white banding. On the Port side it is a "2", whilst on the starboard side it is an 8. those two exceptions aside you are correct (my paper facsimile has all the numbers white background, which isnt the same as the actual finish) .

Which makes me realize I can do this a bit easier. If I do indeed print all except those two clear background numbers, I can indeed apply the decal as a one piece white background application. Considerably simpler than the challenge I have atthe moment. Then once thats down I just add the two numbers that are clear background, and the jobs done. I thgink i will try that.
 
Personally I'd paint the white rather than use a decal. You might find a challenge to get the curvature right with a decal and there may be wrinkles.

Hope those decals I sent arrive in time. Looks like you're going to need them soon!
 
Come to think of, Andy is right. The white area can be painted, with the black stripes, incorporating the white '8', and white '2' printed on clear decal paper,the numbers of course being the clear area of the stripe, with the required curve to the stripes. The black '20' and '08' can also be printed on clear, and applied separately.
 
That looks pretty good Michael and it looks like you're the one benefiting from this little discussion between a couple of gurus. Good input fellers!
 

Users who are viewing this thread

Back