Navigation
Install the app
How to install the app on iOS
Follow along with the video below to see how to install our site as a web app on your home screen.
Note: This feature may not be available in some browsers.
More options
You are using an out of date browser. It may not display this or other websites correctly.
You should upgrade or use an alternative browser.
You should upgrade or use an alternative browser.
**** DONE: 1/72 Lancaster Mk.III - Heavy Hitters II GB
- Thread starter N4521U
- Start date
Ad: This forum contains affiliate links to products on Amazon and eBay. More information in Terms and rules
More options
Who Replied?Nicely done so far Bill!
- Thread starter
- #104
N4521U
Plastic Pirate
One high and one low eh? I'll take a look and see if I can modify that.
I got the glycol tank in as a step.
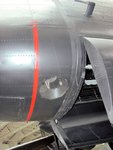
The photo below, is this the shot camera? Port side, in front of the BB doors????
These are the times I wish it was 48th scale.
Many thanks.
***and then there were two bars!
I got the glycol tank in as a step.
The photo below, is this the shot camera? Port side, in front of the BB doors????
These are the times I wish it was 48th scale.
Many thanks.
***and then there were two bars!
Attachments
Last edited:
Catch22
Major
Looks great Bill!
A4K
Brigadier General
Sure does!
Airframes
Benevolens Magister
Yep, that's the camera port Bill, and nicely done on the hand rails!
- Thread starter
- #109
N4521U
Plastic Pirate
Thanks guys.
The camera port will go in tomorrow then, I'm reviewing pictures and making a list!
Today Ive got the engine nacels on, leading edges cleaned up, propellers together and ready for paint, gun barrels attached and assemblies painted black, all the glass ready to go together.
One forgiving thing is all the turrets just drop in, none are trapped by the fuselage so it can be painted and not have to worry about protecting them from paint.
I'll paint wings before I attach them for ease of access to the fuselage and handling. A lot of progress and a couple of pics tomorrow.
Crimea_River
Marshal
You're doing a great job there Bill. Let me know if there are any more pictures you need. The Nanton Lancaster received its refurbished number two propeller and it has been installed. If all goes to plan, I'll see three engine run-ups next Saturday. The number 1 Merlin is ready to be put back into place and hopefully the prop will be back before the end of the summer.
- Thread starter
- #111
N4521U
Plastic Pirate
Unless you see something I can add, I think I'm all full up.
You've been more help than I could have hoped for....")
You've been more help than I could have hoped for....
Crimea_River
Marshal
Naw, looks like Terry's go you covered.
Vic Balshaw
Major General
Your sure cooking up some good stuff here Bill.
- Thread starter
- #114
N4521U
Plastic Pirate
Thanks guys. Just can't help myself Vic, you were right!
Been trying to spray the yellow for the prop tips, too bl00dy cold here, it's running everywhere. Will have to spray black forst and brush the yellow on.Shaped the shell chutes for the rear turret. Removed flashing in the gas struts for the bomb bay doors. Stuff!
Been trying to spray the yellow for the prop tips, too bl00dy cold here, it's running everywhere. Will have to spray black forst and brush the yellow on.Shaped the shell chutes for the rear turret. Removed flashing in the gas struts for the bomb bay doors. Stuff!
Lucky13
Forum Mascot
Awesome work Bill!
- Thread starter
- #116
N4521U
Plastic Pirate
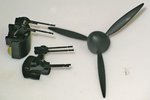
Been pickin at it...... a few pictures!
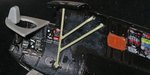
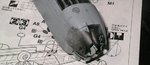
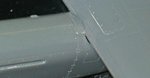
The tail wheel is a mystery. There is nothing to fill the gap between the flanges, and nothing indicates cutting them off...... so whot the?
Drilled a hole and filled it with clear, don't know if it is worth the time, "who's gonna see it"
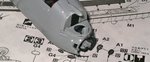
Fuselage is together. I sure get the beeby jeebies when I stick the halves together, I just know I have forgotten sumpin!
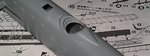
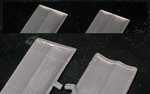
Cut the ends off the bay doors, they just looked too thick. Filed the concave down first, trimmed off .5mm for the flat sheet. "who's gonna see it"
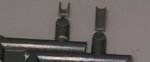
The little square thingies are the shell chutes for the rear turret, I failed them out since they were just ugly blocks.
The engine nacels have kind of a dodgey fit at the wing, all ofem, so fillin and sandin.
Props painted black, now for the yeller tips.
I sailor on.
The tail wheel is a mystery. There is nothing to fill the gap between the flanges, and nothing indicates cutting them off...... so whot the?
Drilled a hole and filled it with clear, don't know if it is worth the time, "who's gonna see it"
Fuselage is together. I sure get the beeby jeebies when I stick the halves together, I just know I have forgotten sumpin!
Cut the ends off the bay doors, they just looked too thick. Filed the concave down first, trimmed off .5mm for the flat sheet. "who's gonna see it"
The little square thingies are the shell chutes for the rear turret, I failed them out since they were just ugly blocks.
The engine nacels have kind of a dodgey fit at the wing, all ofem, so fillin and sandin.
Props painted black, now for the yeller tips.
I sailor on.
Attachments
-
 18 Lanc 12f.jpg58.1 KB · Views: 108
 -
 18 Lanc 12e.jpg39.3 KB · Views: 107
 -
 18 Lanc 12j.jpg35.7 KB · Views: 104
 -
 18 Lanc 12i.jpg43 KB · Views: 96
 -
 18 Lanc 12a.jpg39.8 KB · Views: 103
 -
 18 Lanc 12g.jpg47.1 KB · Views: 87
 -
 18 Lanc 12h.jpg42.4 KB · Views: 93
 -
 18 Lanc 12d.jpg39.3 KB · Views: 98
 -
 18 Lanc 12c.jpg28.8 KB · Views: 103
 -
 18 Lanc 12b.jpg26.6 KB · Views: 104
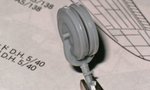
Bill, seems it had two ridges on the tire


Vic Balshaw
Major General
Doing very nicely Bill.
Airframes
Benevolens Magister
Good stuff so far Bill. And yes, the tail wheel tyre had the central groove - it was known as an 'anti-shimmy' tyre and, as the name suggests, it was designed to prevent, or at least minimise, shimmy of the tail wheel, especially on take off.
- Thread starter
- #120
N4521U
Plastic Pirate
Well I'll be buggerd! Anti-shimmy. Some little kids could do with one-o-them tail wheels!
Thanks for the well documented info on that strange looking tire Karl.
Thanks again Terry.
Thanks for the well documented info on that strange looking tire Karl.
Thanks again Terry.
Users who are viewing this thread
Total: 1 (members: 0, guests: 1)