Nicely done so far!
Navigation
Install the app
How to install the app on iOS
Follow along with the video below to see how to install our site as a web app on your home screen.
Note: This feature may not be available in some browsers.
More options
You are using an out of date browser. It may not display this or other websites correctly.
You should upgrade or use an alternative browser.
You should upgrade or use an alternative browser.
**** DONE: 1/72 Supermarine Seagull V - Heavy Hitters II GB
- Thread starter parsifal
- Start date
Ad: This forum contains affiliate links to products on Amazon and eBay. More information in Terms and rules
More options
Who Replied?- Thread starter
- #22
parsifal
Colonel
thanks guys for the feedback. I will tidy them up and keep them .......
N4521U
Plastic Pirate
At this scale, it's pretty darned difficult to get the same detail as 1/32nd mate.
In the end, the detail of the seats will be fine.
This will be a nice addition to the shelf!
In the end, the detail of the seats will be fine.
This will be a nice addition to the shelf!
Airframes
Benevolens Magister
Good work so far Michael, and that part on the lower cowling looks, in the drawing, to be the carb intake, so yes, the same (external) colour as the cowling.
- Thread starter
- #26
parsifal
Colonel
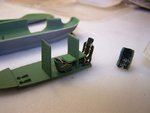
I had an enjoyable an productive evening working on the interior , putting in the crew seats and ataching the PE harness. it went pretty well, except I think i might have put the rear harness in backwards....too late now, and I think it still looks pretty good.
For limited run model, this kit is really nice. Its a difficult build for a novice, so much detail and theres a fair bit of flash and general clean up to do. But it goes together pretty nicely. One little detail I really like is that valom give you extra harness, I presume in case one gets stuffed up. it works well in my opinion...
For limited run model, this kit is really nice. Its a difficult build for a novice, so much detail and theres a fair bit of flash and general clean up to do. But it goes together pretty nicely. One little detail I really like is that valom give you extra harness, I presume in case one gets stuffed up. it works well in my opinion...
Attachments
Airframes
Benevolens Magister
Good work Michael, and it certainly loos like a nice little kit.
fubar57
General
Looks like the crew can enjoy a game of Battleships after a hard day of trying to sink...um...battleships.
Geo
Geo
- Thread starter
- #29
parsifal
Colonel
yeah, Ive no idea what would go at those crew positions in a 1930's a/c, possibly navigational charts and a radio, but which bench and what does the equipment look like?
The best that I have is this...which shows the IP detail really well, but not the CP interior
http://stratusbooks.com.pl/str/books_pdf/70.pdf
This document from Hendon shows the operational history of this particular airframe
http://www.rafmuseum.org.uk/documents/collections/73-A-426-Seagull-V-A2-4-(Walrus).pdf
Last edited:
vikingBerserker
Lieutenant General
Very nice!
that's looking real good Michael.
Catch22
Major
Good progress.
- Thread starter
- #33
parsifal
Colonel
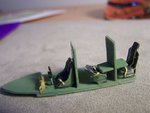
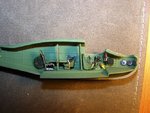
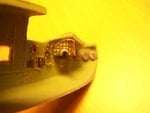
Here are a couple of shots that show what i did over the weekend. im gnerally fairly happy, but my photography is attrocious and Ive now found some additional information regarding the interior fitout of the seagull, which I will post in a few minutes. Basically the IP is missing the compass and i now have a few details on the the equipment in the CPs like the radio and a black box which I dont even have any detail of
I also have a short utube clip that shows some really useful detail on the aircraft like the gunnery weather covers and how the roof top hatch opens. It appears to be hinged, opening backwards towars the engine, folding all the way back to to the cabin roof
Anyway here are the progress shots
I also have a short utube clip that shows some really useful detail on the aircraft like the gunnery weather covers and how the roof top hatch opens. It appears to be hinged, opening backwards towars the engine, folding all the way back to to the cabin roof
Anyway here are the progress shots
Attachments
")
- Thread starter
- #35
parsifal
Colonel
Here are some links to some information that I think is both useful AND interesting
View: https://www.youtube.com/watch?v=4-2UAXblTUE
Flickr: Discussing Supermarine Walrus Sea Otter interior views... in Supermarine Walrus Sea Otter - Fleet Air Arm workhorse.
View: https://www.youtube.com/watch?v=4-2UAXblTUE
Flickr: Discussing Supermarine Walrus Sea Otter interior views... in Supermarine Walrus Sea Otter - Fleet Air Arm workhorse.
nice start
Crimea_River
Marshal
Looks great Michael.
fubar57
General
Nicely done on the innards.
Geo
Geo
A4K
Brigadier General
Good start mate!
- Thread starter
- #40
parsifal
Colonel
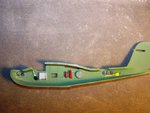
Tonite I fabricated a pilots compass for the IP, and the two black boxes for the two Cps that were in the attached articles. I havent joined the two fuselage halves by the inner bits are pretty much done. i want to get some decent shot of the interior before I zip it up as most of what Ive done will not be visible.
The interior was quite a challenge, but Im happy with what ive done. Main thing was patience....work slowly and carefully.
But whilst the inside was hard, it is not the hardest thing about this model. they are still coming. The wings have to be fitted and the wires strung. Ive never rigged a biplane before, so it might be difficult. The engoiine assembly needs to be mounted on the lower wingand wires rigged for that as well. all the reviews say that is a b*gger of a job and it looks it
The one I am really scratching my head are the gun rings located in the firing positions. There are PE parts involved with a turret ring, and attached to that, a gun emplacement. You guessed it, both these parts are made of PE metal. I have to coil the PE flat strip around a concave circle. I dont see that is going to work well, but I some ideas
I will post some progress shots tomorrow if the light is good enough....
Users who are viewing this thread
Total: 1 (members: 0, guests: 1)