Navigation
Install the app
How to install the app on iOS
Follow along with the video below to see how to install our site as a web app on your home screen.
Note: This feature may not be available in some browsers.
More options
You are using an out of date browser. It may not display this or other websites correctly.
You should upgrade or use an alternative browser.
You should upgrade or use an alternative browser.
**** DONE: Bf109E4 'White 6' I/JG3 BoB Group Build. (1 Viewer)
- Thread starter Airframes
- Start date
Ad: This forum contains affiliate links to products on Amazon and eBay. More information in Terms and rules
More options
Who Replied?Vic Balshaw
Major General
Gobsmacked..............................
- Thread starter
- #143
Airframes
Benevolens Magister
Thanks Jay and Vic.
T Bolt
Colonel
Very nice work on the radiators Terry. I went and had a look at my 109s and Tamiya put the notch only on the left side.
- Thread starter
- #145
Airframes
Benevolens Magister
Yes, I spotted that on the Tamiya kit. I'm quite surprised this old Matchbox kit has the notch on both sides, as the kit was made using the aircraft in the RAF Museum as a pattern. Maybe it was just a way of simplifying the moulds, although both shutters are 'handed'. All the scale plans I've seen so far also have the notch on both sides.
Don't know why I didn't think of this before, but when I moved on to the port wing, rather than form plastic sheet for the gear leg 'tunnel', I used a plastic drinking straw, cut along its length - perfect!
The wings are now complete and setting, following which any joint sanding will be completed, before mating them to the fuselage. Then it's time to attend to some of the smaller fittings, before priming the model, and setting it aside until the Hasegawa kit is at the same stage. I'll post some more pics, hopefully tomorrow.
T Bolt
Colonel
Brilliant idea about the straw Terry.!! So simple it's easy not to think of it. No adverse reactions with the glue? Plastic straw could be the next miracle building material for modelers! I can think of many places it could be used.
Crimea_River
Marshal
Impressive work Terry. You've really brought the rad details to life. I alos like the stitched leather covers inside the wells.
Drinking straws. I have actually already used these myself as the engine tunnels inside the rear nozzles on my CF-5. They glue up really well with CA with no distortion at all. Also a perfect fit.
Drinking straws. I have actually already used these myself as the engine tunnels inside the rear nozzles on my CF-5. They glue up really well with CA with no distortion at all. Also a perfect fit.
- Thread starter
- #148
Airframes
Benevolens Magister
I've used those small-diameter straws that come with soft-drink cartons before also, for making exhausts on big radial engines, and, once, for a mortar tube in a diorama of Arnhem!
The tubes on cotton buds (Q-tips) also come in useful sometimes.
Glenn, it held with normal polystyrene cement,without damage, but I knocked it off a couple of times whilst building the 'leather' zip-covered walls. So, a couple of spots of CA and all was well.
The tubes on cotton buds (Q-tips) also come in useful sometimes.
Glenn, it held with normal polystyrene cement,without damage, but I knocked it off a couple of times whilst building the 'leather' zip-covered walls. So, a couple of spots of CA and all was well.
Vic Balshaw
Major General
Drinking straws. Wow, would never have thought of that one and not having kids, don't have any in the house..............................Oh well, will just have to take the missus our out so we can sink a few cocktails, bringing the straws home for the 'must keep bits box'.
BTW T how are the hands today, I was thinking you may have to head down south to the warmer, possibly drier climate of Gosport. All them lovely sailors...............
BTW T how are the hands today, I was thinking you may have to head down south to the warmer, possibly drier climate of Gosport. All them lovely sailors...............
 could think of an application on an old P51 I started.Cheers
- Thread starter
- #151
Airframes
Benevolens Magister
Thanks guys.
The hands are giving me Hell at the moment Vic,and the ankles and knees. If I was to head south, it would be to a warm climate, nowhere near Gosport, and as far away from matelots as possible !!
The hands are giving me Hell at the moment Vic,and the ankles and knees. If I was to head south, it would be to a warm climate, nowhere near Gosport, and as far away from matelots as possible !!
Doin' great Terry, sorry to hear the joints are not working so well...take care mate!
Crimea_River
Marshal
Hurry back. Miss your stuff.
- Thread starter
- #154
Airframes
Benevolens Magister
Thanks guys, been really rough this past 36 hours or so, but I hope to get some more done soon.
vikingBerserker
Lieutenant General
That stinks to hear Terry, hope they get to feeling better quickly!
- Thread starter
- #156
Airframes
Benevolens Magister
Thanks David. Things seem to be slowly improving - just got to get rid a of a bl**dy cold now !!
Vic Balshaw
Major General
Thanks guys.
The hands are giving me Hell at the moment Vic,and the ankles and knees. If I was to head south, it would be to a warm climate, nowhere near Gosport, and as far away from matelots as possible !!
Figured you wouldn't want to be near the matelots. Had a submariner in Saudi once, only shower he knew was under a puff of talcum. Hope things are improving for you mate.
How ya doin' Terry? on the mend mate?
- Thread starter
- #159
Airframes
Benevolens Magister
Thanks Vic and Wayne. Up and about tonight, and hope to get a bit done. Had to have a neighbour run errands for me for the past three days!
- Thread starter
- #160
Airframes
Benevolens Magister
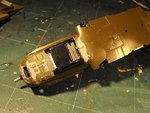
Managed to make some good progress, with the two cowlings now shimmed, the oil cooler and bath fitted and the gaps taken care of, and the wings and tail planes finished and fitted.
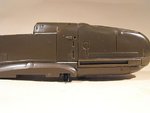
PIC 1. Shows the shims in place on the lower main cowling joint, and the lower and upper saddle cowling joint. These are two different thicknesses of plastic card, and are awaiting trimming and sanding flush in this pic.
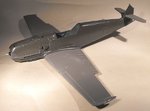
PICS 2 and 3. The cowlings loosely in place, showing the improvement. When properly fitted, and after painting, this should look more like a real panel joint.
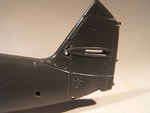
PIC 4. The curved slot for the tail plane incidence adjustment has been opend up. I should have done this before joing the fuselage halves, in order to thin the inside surfaces - but I forgot !
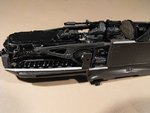
PIC 5. The oil cooler has been attached, mounted onto a strip of plastic card cemented across the rocker covers. The intake bath has had the front shutter added from a strip of plastic card, and the centre section panel has been added.
PIC 6. The intake bath in place, having been first painted RLM 02 inside, and the joints and sink marks filled and sanded. These have yet to be polished. Note the undercarriage mounting brackets, very similar to the actual aircraft.
PIC 7. The wings and tail planes are on, and the HP slats have been cut through to give the appearance of separate components.
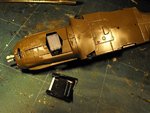
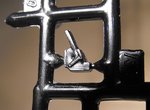
PIC 8. As I want to attach the windscreen and rear glazing before priming and painting, the gunsight will need to be fitted at this stage. This is the kit part, which will receive a lot of attention in an attempt to improve it !
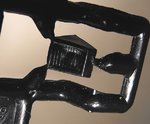
PIC 9. The supercharger intake has a poorly-formed 'grille', which has been the same on the other two Matchbox '109s I've built in the past. This will be drilled out and filed, and separate slats added from plastic card.
So, after these last two areas are taken care of, it'll be time to prime the model, to see what needs filling, and then put it aside until the same stage is reached with the Hasegawa kit.
Thanks again for your kind comments and interest, and I'll post another update soon.
PIC 1. Shows the shims in place on the lower main cowling joint, and the lower and upper saddle cowling joint. These are two different thicknesses of plastic card, and are awaiting trimming and sanding flush in this pic.
PICS 2 and 3. The cowlings loosely in place, showing the improvement. When properly fitted, and after painting, this should look more like a real panel joint.
PIC 4. The curved slot for the tail plane incidence adjustment has been opend up. I should have done this before joing the fuselage halves, in order to thin the inside surfaces - but I forgot !
PIC 5. The oil cooler has been attached, mounted onto a strip of plastic card cemented across the rocker covers. The intake bath has had the front shutter added from a strip of plastic card, and the centre section panel has been added.
PIC 6. The intake bath in place, having been first painted RLM 02 inside, and the joints and sink marks filled and sanded. These have yet to be polished. Note the undercarriage mounting brackets, very similar to the actual aircraft.
PIC 7. The wings and tail planes are on, and the HP slats have been cut through to give the appearance of separate components.
PIC 8. As I want to attach the windscreen and rear glazing before priming and painting, the gunsight will need to be fitted at this stage. This is the kit part, which will receive a lot of attention in an attempt to improve it !
PIC 9. The supercharger intake has a poorly-formed 'grille', which has been the same on the other two Matchbox '109s I've built in the past. This will be drilled out and filed, and separate slats added from plastic card.
So, after these last two areas are taken care of, it'll be time to prime the model, to see what needs filling, and then put it aside until the same stage is reached with the Hasegawa kit.
Thanks again for your kind comments and interest, and I'll post another update soon.
Attachments
-
 BoB Build 2 141.jpg50.2 KB · Views: 135
 -
 BoB Build 2 138.jpg41.8 KB · Views: 121
 -
 BoB Build 2 139.jpg36.7 KB · Views: 137
 -
 BoB Build 2 142.jpg34.7 KB · Views: 115
 -
 BoB Build 2 146.jpg68.2 KB · Views: 138
 -
 BoB Build 2 147.jpg67.6 KB · Views: 139
 -
 BoB Build 2 149.jpg27.7 KB · Views: 128
 -
 BoB Build 2 151.jpg42.2 KB · Views: 115
 -
 BoB Build 2 152.jpg41.5 KB · Views: 135
Users who are viewing this thread
Total: 2 (members: 0, guests: 2)