fubar57
General
…..and always neat and tidy
Follow along with the video below to see how to install our site as a web app on your home screen.
Note: This feature may not be available in some browsers.
Ad: This forum contains affiliate links to products on Amazon and eBay. More information in Terms and rules
No don't want to go there"Injuries R Us" - need a broken or bruised thumb ? Call Wayne on Freefone, Aus 290252 for a rapid, no obligation quote !
") .....three weeks out and its still not right, even though there is no swelling or bruising I can't grip with any strength yet.
.....three weeks out and its still not right, even though there is no swelling or bruising I can't grip with any strength yet.There are a couple of General Sprues common to all kits with the various other sprues with minor other bits for the different variants and Major Sprues for fuselages and wing combinations.Wayne - jumping in with coments a bit late, but this build is really of interest since I have the Eduard G-10 profipack, which I suppose is very similar in construction, if not some of the molded parts? I'll be looking for the pitfalls, if any, to avoid. I suppose working with two uninjured thumbs won't be an issue?
Thought about it but so far have let it slide.Not good, have you had it checked out.
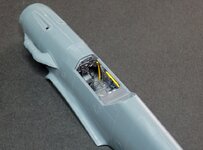
I don't know (I don't have any of their Fs).The profipack, I have chosen to use some etch but not a lot for this build.Just curious? Is this the Weekend edition or the Profipak? I don't see the PE parts like are in my kit and was wondering if you had chosen to not use (as is the option in mine)? Really looks great as is without.
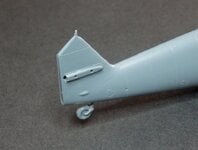
Both F-2 and F-4 kits use the same Starboard fuselage and there is no note in the instructions to remove it, so not sure on the intake.... will look further on that, it's rather easy to remove in any case.Wayne, one of the photos of the starboard side shows a small intake beside the starter crank hole on the starboard cowl.
View attachment 689104
This is a typical detail for F-2. For the F-4 this inlet for generator cooling was moved to the inside (to the engine-mounted compressor intake ring). A lack of the small starboard intake always means that it's an F-4. Maybe Eduard is using the same mold for their F-2 and F-4 models?
Here is a photo of a brand new F-4 showing the area without the intake:
View attachment 689105
And here's a F-2:
View attachment 689106
Check your sources though. As always there were exceptions - I read somewhere the WNF-production of F-4 kept this intake in the initial batches. I have no proof for this statement and never follow it myself.
Cheers!