Navigation
Install the app
How to install the app on iOS
Follow along with the video below to see how to install our site as a web app on your home screen.
Note: This feature may not be available in some browsers.
More options
You are using an out of date browser. It may not display this or other websites correctly.
You should upgrade or use an alternative browser.
You should upgrade or use an alternative browser.
**** DONE: MiG 21 PF 'Fishbed D', Moscow District PVO Aviation Fighter Regiment, 1967
- Thread starter Airframes
- Start date
Ad: This forum contains affiliate links to products on Amazon and eBay. More information in Terms and rules
More options
Who Replied?B-17engineer
Colonel
Wonderful Terry!!!
great paint job Terry
T Bolt
Colonel
Real nice Terry! She's gonna be a beauty!
imalko
Chief Master Sergeant
8) 

- Thread starter
- #186
Airframes
Benevolens Magister
Thanks very much indeed guys, makes it all worthwhile! Should have some more pics soon, if my hands behave!
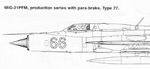
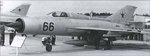
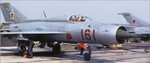
To answer your question about numbers Terry. Most of these early Russian MiG-21 PF/PFM wore solid numbers.But it seemed it has't been a rule. Have a look at these pics.So there were planes with the kind of numbers we were talking about.Later, the type of digitals could be noticed more often.Also on Polish MiG-21s
Attachments
Catch22
Major
Looks great Terry!
Yep..she looks great.
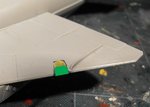
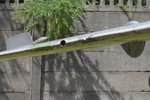
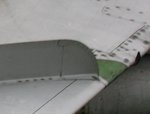
However there is a mistake Terry. Nothing major but please, look at the green dielectric transponder panels at the leading edges of wings. These were smaller ( shorter) than in the pic of your model. I can take a few pics of the PF variant wing at the area but just on Monday.
However there is a mistake Terry. Nothing major but please, look at the green dielectric transponder panels at the leading edges of wings. These were smaller ( shorter) than in the pic of your model. I can take a few pics of the PF variant wing at the area but just on Monday.
Attachments
vikingBerserker
Lieutenant General
You are a walking encyclopedia my friend.
- Thread starter
- #191
Airframes
Benevolens Magister
Thanks Cory, and thanks very much once again Wojtek!
I wish I'd seen your post earlier, as I've now painted - out the stencil breaks in the numbers! Oh well, at least both types were used!
I'd already noticed that the dielectric panels were too big, and too dark, so I've re-painted them the correct size, shape, and a slightly lighter shade.
The model now has all the decals in place, plus some hand painted stencils here and there, and has had it's final, semi-gloss clear coat. I can't move it to photograph yet, as I'm waiting for the clear coat to fully harden - one touch and it'll leave fingerprints! (it's an awkward shape to handle, being all sharp edges!)
Next step is to add some more 'burnt' tones to the jet exhaust area, and fit the variable nozzle I've found, after adapting it, as the kit doesn't include one. Then it's add some detail to the wheel bays and landing gear legs, before finsihing the forward part of the cockpit, and adding the scratch-built internal screen and gun sight. The ejection seat will take some time to detail, as the kit part, although generally accurate, is rather basic. Thankfully, Wojtek came to the rescue again, and sent me some great pics of the seat, out of the aircraft.
I should have some more pics sometime tomorrow, with a bit of luck.
lesofprimus
Brigadier General
Lookin great so far Terry....
I wish I'd seen your post earlier, as I've now painted - out the stencil breaks in the numbers! Oh well, at least both types were used!
Yep..it is not a problem. I have seen a few shots of different MiG-21s coded "Red 22". All of them were of different types. I mean solid ones and broken ones.Also these were different in shapes.
- Thread starter
- #194
Airframes
Benevolens Magister
I thought I'd seen 'broken' numbers before on MiG21's, but couldn't find any pics! Pity, I quite liked the look of the stencil breaks! Ah well, no problem, it'll still be almost authentic - no black outline to the numbers, and a bit difficult to hand paint due to the position.
- Thread starter
- #196
Airframes
Benevolens Magister
Thanks very much my friend. I should have some more pics later tonight - ins'h Allah !
A4K
Brigadier General
Bloody hell that looks sweet Terry! great work!
- Thread starter
- #199
Airframes
Benevolens Magister
Thanks a lot Lewis and Evan, glad you like it so far.
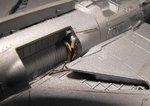
Made a little bit more progress over a period of around six hours!
The kit jet pipe is reasonable, in as much as it has the rear of the engine and 'grill', but lacks the variable nozzle. Whilst hunting for some bits in the spares boxes for Andy and Harrison, I came across a jet nozzle from a wrecked model, I think the old Monogram Super Sabre, which has been filed down and adapted to fit, and is now in place 'up the pipe'.
Some heat staining has been added to the exterior of the jet pipe, and some plumbing added to the wheel bays, based on reference photos.
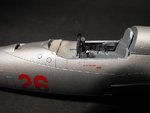
The tactical numbers (26) have been overpainted to get rid of the stencil breaks, and then I found out, via Wojtek, that stencil numbers had also been used!
PIC 1 Shows the jet pipe as per the kit.
PIC 2. The variable nozzle fitted and the basic colours added. The area has yet to be cleaned up and some detail painting done.
Pic 3. the jet pipe area was painted in various mixes of Humbrol enamel metallics and solid colours. Once dry, thin 'damp brushed' streaks were added, with variations of the same mixes and, once hardened, key areas were treated to some streaks of Tamiya acrylic 'Smoke', all applied by paint brush. A clear gloss coat has been applied, which has yet to be toned dowen with a final semi-gloss clear coat.
PIC 4. The overpainted tactical numbers, and the 'Excellent Aircraft Award' badge, which I finally decided to use.
PIC 5. The fuel and hyrdaulic lines and other bits added to the wheel bays. These are cable sheathing, copper wire and lead wire, and plastic rod and tube. The various lines and pipes will be picked out the in the appropriate colours once the bays have been painted.
PIC 6. the next step is to add the missing details to the front area of the cockpit, including some wiring, the gunsight, and internal blast screen etc. The rear bulkhead will also get some attention, with the ejection seat rails and wiring etc being added from plastic strip, rod and lead and copper wire.
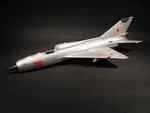
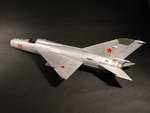
PICS 7 and 8 are how the model looks to date.
Thanks once again for your interest and compliments, and I'll post another update soon.
Made a little bit more progress over a period of around six hours!
The kit jet pipe is reasonable, in as much as it has the rear of the engine and 'grill', but lacks the variable nozzle. Whilst hunting for some bits in the spares boxes for Andy and Harrison, I came across a jet nozzle from a wrecked model, I think the old Monogram Super Sabre, which has been filed down and adapted to fit, and is now in place 'up the pipe'.
Some heat staining has been added to the exterior of the jet pipe, and some plumbing added to the wheel bays, based on reference photos.
The tactical numbers (26) have been overpainted to get rid of the stencil breaks, and then I found out, via Wojtek, that stencil numbers had also been used!
PIC 1 Shows the jet pipe as per the kit.
PIC 2. The variable nozzle fitted and the basic colours added. The area has yet to be cleaned up and some detail painting done.
Pic 3. the jet pipe area was painted in various mixes of Humbrol enamel metallics and solid colours. Once dry, thin 'damp brushed' streaks were added, with variations of the same mixes and, once hardened, key areas were treated to some streaks of Tamiya acrylic 'Smoke', all applied by paint brush. A clear gloss coat has been applied, which has yet to be toned dowen with a final semi-gloss clear coat.
PIC 4. The overpainted tactical numbers, and the 'Excellent Aircraft Award' badge, which I finally decided to use.
PIC 5. The fuel and hyrdaulic lines and other bits added to the wheel bays. These are cable sheathing, copper wire and lead wire, and plastic rod and tube. The various lines and pipes will be picked out the in the appropriate colours once the bays have been painted.
PIC 6. the next step is to add the missing details to the front area of the cockpit, including some wiring, the gunsight, and internal blast screen etc. The rear bulkhead will also get some attention, with the ejection seat rails and wiring etc being added from plastic strip, rod and lead and copper wire.
PICS 7 and 8 are how the model looks to date.
Thanks once again for your interest and compliments, and I'll post another update soon.
Attachments


Users who are viewing this thread
Total: 1 (members: 0, guests: 1)