- Thread starter
- #501
Navigation
Install the app
How to install the app on iOS
Follow along with the video below to see how to install our site as a web app on your home screen.
Note: This feature may not be available in some browsers.
More options
You are using an out of date browser. It may not display this or other websites correctly.
You should upgrade or use an alternative browser.
You should upgrade or use an alternative browser.
**** DONE: Revell 1/48 P-40B RAF 112 Squadron in Egypt in 1941 MTO Group Build (1 Viewer)
- Thread starter B-17engineer
- Start date
Ad: This forum contains affiliate links to products on Amazon and eBay. More information in Terms and rules
More options
Who Replied?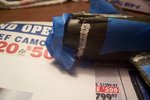
- Thread starter
- #503
B-17engineer
Colonel
Ok will go do that now! .
- Thread starter
- #504
B-17engineer
Colonel
OK. Now sand these second parts of putty on these joins.
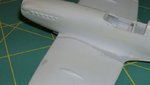
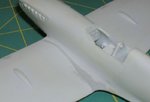
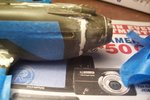
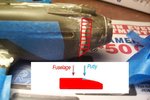
Here you are an example of the final effect of sanding of a putty.This is my very old project of Spitfire.As you can notice the difference in thickness of the wing halves and the wing-fuselage transition at the trailing edge was quite big.That's way there is much more of putty than everywhere at the area.Notice that going from the laeding edge to the trailing one of the wing root the putty filled the gap and stayed in this only.
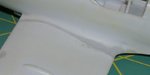
The join is very smooth now and you have to achieve the effect on the P-40 front area.
Here you are an example of the final effect of sanding of a putty.This is my very old project of Spitfire.As you can notice the difference in thickness of the wing halves and the wing-fuselage transition at the trailing edge was quite big.That's way there is much more of putty than everywhere at the area.Notice that going from the laeding edge to the trailing one of the wing root the putty filled the gap and stayed in this only.
The join is very smooth now and you have to achieve the effect on the P-40 front area.
Attachments
- Thread starter
- #506
B-17engineer
Colonel
Thanks Wojtek! I did the sanding and to the bottom of the nose.
lesofprimus
Brigadier General
Harrison, the sanded putty wants to be as smooth as ur baby brothers bottom... There doesnt want to be any imperfections in the surface, it should mimic the plastic.... No pits or crevices should be visible...
- Thread starter
- #508
B-17engineer
Colonel
Oh ok. Let me do that then.
Good point Dan.
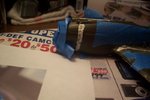
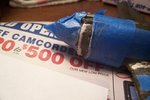
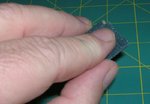
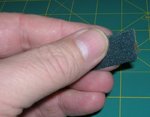
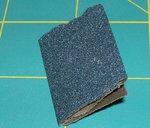
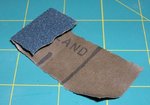
That's way put the stick away and get two strips of the sandpaper. One of the orange and one of the black one. Fold them a few tims like in the pics below..Then holding it as shown sand the join with the orange sandpaper firstly and then with the black one. The movment of sanding is of the same way like for the stick moving.
That's way put the stick away and get two strips of the sandpaper. One of the orange and one of the black one. Fold them a few tims like in the pics below..Then holding it as shown sand the join with the orange sandpaper firstly and then with the black one. The movment of sanding is of the same way like for the stick moving.
Attachments

- Thread starter
- #510
B-17engineer
Colonel
Sure thing Wojtek! And thanks Dan and Wojtek!
- Thread starter
- #511
B-17engineer
Colonel
lesofprimus
Brigadier General
Now, just to state the obvious from my side, the grit on the sandpaper and stick looks waaaaayyyy to course compared to what I use... Fine grade paper that can be used wet or dry is what I have on my bench...
Ive never used anything like what Wojteks pics show, I would think the scratchs in the plastic would be severe, and I can see some of those small scratches in ur pics H...
Also, remember, u dont want to, or atleast try to avoid sanding off or covering up any of the panel lines that want to stay visible... Truth time will be when u get ur first coat of paint on the seams, then u'll truely see just how well the sanded putty looks.... Ive had to go back several times on a couple of seams Ive done after a first coat of paint and sand more, then paint and then sand and paint again...
My least favorite part of model building....
Last edited:
- Thread starter
- #513
B-17engineer
Colonel
Well I went over with a smaller grit like Wojtek said. So I guess, it's just me.lesofprimus
Brigadier General
No need for embarrasment H, its not like Im the expert here...
Plastic is very easy to damage, as I have done in the past, and a bitch to fix.... Time consuming as hell....
Plastic is very easy to damage, as I have done in the past, and a bitch to fix.... Time consuming as hell....
- Thread starter
- #516
B-17engineer
Colonel
So it's wrong... what now then?
- Thread starter
- #517
B-17engineer
Colonel
Be right back, lunch.
dirkpitt289
Master Sergeant
No need for embarrasment H, its not like Im the expert here...
Plastic is very easy to damage, as I have done in the past, and a bitch to fix.... Time consuming as hell....
Time consuming is an understatement. I've been filling and sanding the wheel spats and 2 engine cowlings for the last few days. Its the worst part of modeling (IMHO) but also the part that will make or break a model.
lesofprimus
Brigadier General
Not wrong, just not enough feathering of the putty line....
Lemme tell u something Harrison, u are getting more tutorial knowledge on ur model here than Ive ever seen before, and at such a young age too... Hats off to u for trying to put forth the best effort....
Learning 101 man....
The fact that u have an expert like Wojtek giving u these pics and lessons is just about unequivacol in this hobby.... I didnt have this kinda help back in my day as a kid... Ur very lucky and if u keep up with the hobby (girls usually take over) u'll end up being one hell of a modeler...
Users who are viewing this thread
Total: 2 (members: 0, guests: 2)