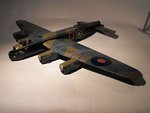
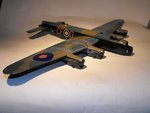
**** DONE: Revell 1/72nd scale Lancaster BIII, 'Oozlum Bird', 625 Sqn, RAF, GB.

Ad: This forum contains affiliate links to products on Amazon and eBay. More information in Terms and rules

Yeah, they're an enigma in a way. They look big and impressive when you stand underneath one, even by today's standards, but cramped inside. And that main spar is everything it's said to be!!
Alex, I reckon there is almost certainly a 1/48th Lanc in the offing soon, probably to be built as 'Oozlum Bird' again, but this time for me!
 
"Pinkish brown tinge"? "weaker on one side of one engine"? Gosh, have you done your homework or what?! You da' man!!
 
I agree with Alex Terry GET THAT LANC!

Wouldn't mind doing a 'Friday the 13th' Halifax in 1/48, I think theres even a kit?
 
There's a place here in the UK which has the updated Tamiya kit on offer at £58, and I've been seriously tempted. Doing this teeny (to me) Lanc is pushing me more and more towards getting the kit, so....I might buy myself a birthday prezzy !!

Go for it Terry, you know you deserve it, I dare you to resist the temptation.

:hotsun: :hotsun:
 
It shall be done - but the build will have to wait until after the JU88 .
EDIT:- Oops! Forgot to say thanks Alex! That's an interesting article, although Brett seems to think that paddle blades, high astrodome etc are distinguishing features of the B.MkIII. Wrong!
 
Last edited:
Just a quick update. The decals are on, with the exception of the 'Oozlum Bird' lettering, and the base for the exhaust staining has been done. This will be 'refined' later, after the matt clear coat.
I hand-painted the bird motif nose art, and the name, onto separate pieces of clear decal sheet, going off the description given to me for my painting, by Norman, the Flight Engineer, back in 1990. As no photographs of LM546 exist,there was no way of checking that the nose art is correct, but Norman told me it looked more or less as he remembered it. He also told me that, at the time, the Skipper thought the real thing was 'Bl**dy awful' !
Anyway, as I was adjusting the name decal, it got twisted and, being so thin, the decal sheet creased and tore in two. So, I hand painted the name direct onto the model, but didn't like the size or positioning, so removed it! The bird decal is in place, although it's so small there's not much detail to be seen, and I've made a new name decal, printed onto clear decal sheet this time. When the first coat of varnish has dried overnight, I'll paint-over the lettering, in order to improve the density of the yellow, and to give the printed lettering a more hand-painted appearance. I also adjusted the 'bomb log', reording the operations flown by 'Oozlum Bird', and used part of one of the kit decals for this.
In the introduction, I stated that LM546 was lost on it's 23rd operation, which is incorrect. It was the crew's 23 rd operation - 'Oozlum Bird' had only flown 16 Ops, having only been delivered to the Squadron, new, in May 1944, and had flown a total of 103 hours or, if the Final Flight is included, approximately105.5 hours.
The kit decals were used for the roundels and fin flashes, as well as the walkway lines and other stencils. The serial number was made up of individual letters and numbers from the kit decal sheet, with a figure '6' altered to a '5' on each side. The code letters came from a Modeldecal 'Dull Red Codes' sheet, and the small yellow 'O' on the nose was sourced from a USAAF serial number found on the Boston decal sheet.
The characteristic exhaust staining has been started, with layers being built up, using a 'damp brush' technique, in greys and browns. Once the matt clear coat has been applied, the stains will be smoothed out and blended in, to form a soft, but visible staining pattern. A liitle paint scuffing and wear has been added to the usual spots on the wing upper surface and leading edges, using lighter shades of the base colours.
The photos show the state so far, and I hope to get some more done tomorow, before moving on to the mid-upper turret, undercarriage and detail aditions.
Thanks again for your interest, and I have to say, I'm enjoying this kit - it's a little gem!
 

Attachments

  • Avro, Bomber GB 090.jpg
    Avro, Bomber GB 090.jpg
    41.8 KB · Views: 111
  • Avro, Bomber GB 092.jpg
    Avro, Bomber GB 092.jpg
    43.8 KB · Views: 115

Users who are viewing this thread

Back