**** DONE: Revell P-61A 1/48 scale, Nocturnal Nemesis, Night Fighter GB.

Ad: This forum contains affiliate links to products on Amazon and eBay. More information in Terms and rules
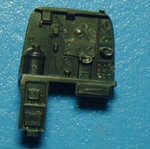
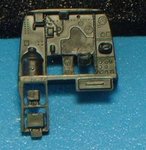
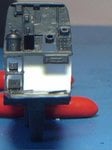
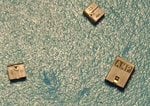
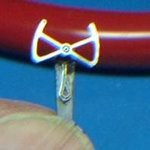
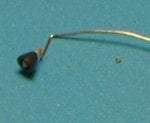
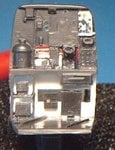
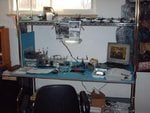
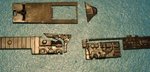
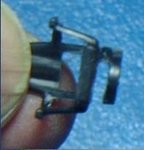
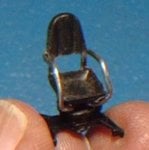
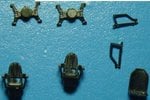
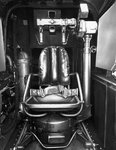
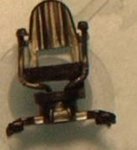
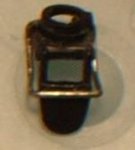
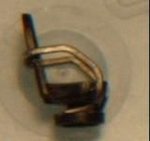
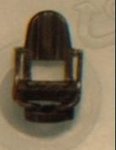
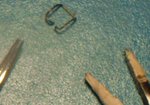
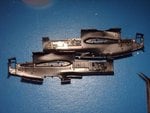
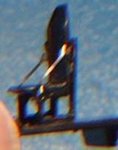
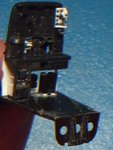
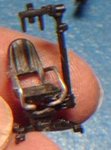
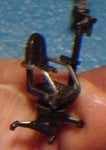
Ok, finally an update. I've been working on the R/O part. After Terry sent me the picture of the P-61A R/O compartment, I've been working on making the corrections from on the kit. I've added a back lower wall section and am working on the equipment shelving. I've also scratch built the light, which I will show later, to good effect. I've got a few days to work on this so hopefully more to follow soon. :) The last picture is of jumpers used in electronics. They make great componant boxes.
 

Attachments

  • control panel 002.jpg
    control panel 002.jpg
    28 KB · Views: 123
  • ROcompartment 001.jpg
    ROcompartment 001.jpg
    23.3 KB · Views: 142
  • ROcompartment 002.jpg
    ROcompartment 002.jpg
    26.1 KB · Views: 147
  • ROcompartment 003.jpg
    ROcompartment 003.jpg
    16.9 KB · Views: 143
  • ROcompartment 004.jpg
    ROcompartment 004.jpg
    40.6 KB · Views: 138
Last edited:
Here I go again. The first shot is my work bench. You can see the big magnifying glass that makes all my small pictures possible. :) Next shot shows a little more work done on the R/O compartment. The following two shows the lamp I scratch built. I even made the light bulb you can see inside the shade. :) The last picture is the pilots yoke with the photo etched stuff added. Thanks for your comments. Any suggestions would be great too. This is like my fourth plane and I'm still learning. :)
 

Attachments

  • ROcompartment2 006.jpg
    ROcompartment2 006.jpg
    5.5 KB · Views: 166
  • ROcompartment2 005.jpg
    ROcompartment2 005.jpg
    3.2 KB · Views: 182
  • ROcompartment2 004.jpg
    ROcompartment2 004.jpg
    4.4 KB · Views: 193
  • ROcompartment2 003.jpg
    ROcompartment2 003.jpg
    20.9 KB · Views: 189
  • ROcompartment2 001.jpg
    ROcompartment2 001.jpg
    53.7 KB · Views: 185
Thanks Vic. You know the funny thing is that that work station didn't cost me a thing. I work for a medical equipment manufacturer and they were going to chuck this out. I said, "hold on a minute, I've got a good home for it." It's really nice to work at and there is one more shelf not seen in the picture where my model stash is kept. :)
 
While I have a moment I thought I would do a little Frankensteining. :) Since I really have two kits, I took the nacelles from this kit and cut off the ends. Then I switched them. This is so when I put these nacelle's together, I will have both of them with cowl flaps open. The other with both cowl flaps closed. These were kind of tricky to cut. I used sewing thread since I don't have one of those fancy razor saws. The last picture shows that I cut up the two interior side panels. These will be worked up with PE parts along the the top part of the front wheel well. Well I got to keep moving. the pilot seat seems to be ok. Not much in the way of modifications needed but the gunner's and R/O's seats need some work. I'll post something on those later.
 

Attachments

  • nacelle 001.jpg
    nacelle 001.jpg
    30 KB · Views: 152
  • nacelle 003.jpg
    nacelle 003.jpg
    36 KB · Views: 170
  • nacelle 002.jpg
    nacelle 002.jpg
    40.3 KB · Views: 157
Ok, got to do some work on the seats. The first is one of the references I found some time ago. Looking at the seats in the kit, I found that they don't quite look like that. So I went to work on trying to improve how they look. I used a small paper clip and bent it into the shape I wanted for the arm rests. I found this looks much better. I took a dremel and cut a bit across the bottom of the seat so the paper clip would fit and to give it the appearance of what I see in the picture. Put the two together and thought now that looks much better. Added some PE parts on the cockpit area and a built up PE part on the back by the R/O station. Now just waiting for a chance to start painting. :) I'll do more to the seat a little later. Need to add the foot pedal and the locking pin along with the grip levers on the pistol grips... etc. :)
 

Attachments

  • seats 003.jpg
    seats 003.jpg
    43.3 KB · Views: 160
  • seats 002.jpg
    seats 002.jpg
    6.9 KB · Views: 162
  • seats 001.jpg
    seats 001.jpg
    8.8 KB · Views: 171
  • seats 000.JPG
    seats 000.JPG
    39.4 KB · Views: 160
  • 4555975665_88106be28c_o.jpg
    4555975665_88106be28c_o.jpg
    47.4 KB · Views: 143
  • seats 008.jpg
    seats 008.jpg
    4.9 KB · Views: 156
  • seats 007.jpg
    seats 007.jpg
    3.4 KB · Views: 159
  • seats 006.jpg
    seats 006.jpg
    3.2 KB · Views: 159
  • seats 005.jpg
    seats 005.jpg
    3.2 KB · Views: 169
  • seats 004.jpg
    seats 004.jpg
    28.9 KB · Views: 162
  • seats 009.jpg
    seats 009.jpg
    4.4 KB · Views: 164
  • seats 010.jpg
    seats 010.jpg
    37.6 KB · Views: 155
  • seats 011.jpg
    seats 011.jpg
    5.6 KB · Views: 155
  • seats 012.jpg
    seats 012.jpg
    25.7 KB · Views: 157
  • seats 013.jpg
    seats 013.jpg
    11.8 KB · Views: 153
  • seats 014.jpg
    seats 014.jpg
    9.4 KB · Views: 156
Last edited:
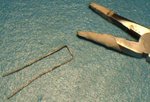
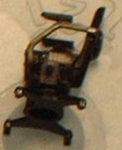
Amazing detail work there Bill. What did you use for those lampshades?

To make the lamp shade, I first heated and stretched the sprue or plastic parts tree as we call it here. Once its stretched you would see that the two opposite ends not stretched are cone shaped. I cut the stretched end off, which became the back of my lamp shade, and calculated how long I wanted the shade to be and cut it. This gave me my basic lamp shade but I continued by heating up a needle and stuck it into the pointed end of the shade and let it cool there making it stick to the needle. I then took a very sharpe hobby knife and hollowed out the wide end so that it looked like a bell. I paid close attention to the sides to make sure they were even and thin enough to be believeable at that scale. For the light bulb inside I stretched the clear sprue and cut off a section that would have been wide enough for a scale bulb then glued it inside the bell. :) 
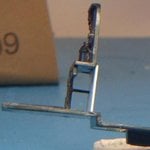
The needle comes out with a little effort and leaves a nice hole to attach a piece of wire for the lamp arm. :)
 

Users who are viewing this thread

Back