**** DONE: Revell P-61A 1/48 scale, Nocturnal Nemesis, Night Fighter GB.

Ad: This forum contains affiliate links to products on Amazon and eBay. More information in Terms and rules

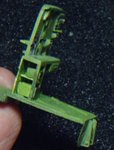
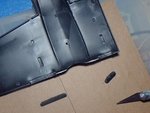
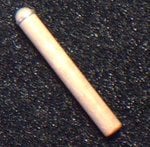
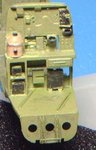
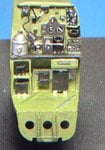
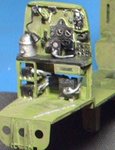
Found some at one of the hobby shops but was way too expensive. So I looked at comparable cheaper colors. Ok, I'm cheap... :) I couldn't see paying several dollars for a bottle half the size of my thumb. Atleast it gave me something to use as a standard for comparison with other colors. I found flat olive green to match it the best. They had to give it a fancy name because puke green doesn't really sell. Fortunately I was able to mix something that is acceptable to the chromate green. Thanks Terry for the tip. :)
 
Sure Terry, so far nothing has arrived. Last night I did a quick spraying with the green chromate. After a few tweaks, I think I was able to put down something acceptable. I built the turret and finished cleaning the cowling flaps. I also started cutting out part of the wing for the intakes to the oil coolers. Pictures to follow as soon as I can. I have a business leadership class to attend to today. I'll take some photos tonight and hopefully get them posted tomorrow. :)
 
Ok, more photos as promised. Still some sanding to do on the cowl flaps but not much. I plan on finishing the instruments for the cockpit and R/O station over the weekend. If there is a chance I intend to also get in a lot of the wiring. :)
 

Attachments

  • P61A 010.jpg
    P61A 010.jpg
    50.5 KB · Views: 128
  • P61A 011.jpg
    P61A 011.jpg
    28.2 KB · Views: 139
  • P61A 012.jpg
    P61A 012.jpg
    44.6 KB · Views: 137
  • P61A 013.jpg
    P61A 013.jpg
    42.3 KB · Views: 133
  • P61A 014.jpg
    P61A 014.jpg
    48.5 KB · Views: 136
  • P61A 015.jpg
    P61A 015.jpg
    44.6 KB · Views: 132
Nice work Bill. I hope the CD arrives in one piece, and soon! I sent CDs to Andy and Glenn a week before yours. Andy got his after about 8 days, but Glenn's took a lot longer, and arrived cracked !!
 
Looking very good NFN. The green looks spot on. Can't wait to see the rest of it.
They say being copied is the greatest form of flatery and i'm not ashamed to say that I'm making notes of your build for the P-61 that is sitting on my next to build list.

Cheers Switcha.
 
Well here we are for the latest update. Thanks guys for your support. :)

To start with I cut the premoulded vents out of the wings. I have some PE parts for this area so more to follow. Now for the final work on the R/O desk. Yes, I finally finished this part to my satisfaction. The side walls I'll work on later when the halfs are a ready to fit together. To start, I didn't like the look of that canister sitting on the left side of the desk and I always wanted to cut it out but only if I could figure out a reasonable substitute. Fortunately I did. I cut out the flat looking canister and filled in the holes. Then I took some wooden doweling that was the same diameter as the canister and proceeded to mold it to the right shape. I followed up with aluminum vent tape. For those unfamiliar with it, this is aluminum with an adhesive back... great stuff. I cut a sliver of it and put it around the dowel near the rounded end just like the canister before I removed it. I then cut some stretched sprue for the top and side part. Those little rounded bits. To seal the wood, I spread a thin layer of white glue and let it dry. I did some final shaping and glued it in place. Now that looked right to me and I was glad I did it. Did some more painting to the station before I added the PE parts followed with some wiring. The cables I made from stretched sprue. Kind of interesting how I got them to bend. At first I tried just bending while they were hot and let cool to the right angles but this left it too thick on the ends, especially when I tried using a hot knife to flatten the ends. Then I tried just bending it but this didn't work out either. Finally I put a cut end of stretched sprue toward the frame and it just slightly thickened near the end and curled right up. It took a little practice but I finally got it to look the way I wanted it. Memo to me... memo to me...New technique achieved. :)
Once I had the cables made, I attached them to the boxes in the shelving below the desk top. Painted them up and did a once over with a little colored chalk. The results are the final picture. Hope you guys like it. :)
 

Attachments

  • canister2.JPG
    canister2.JPG
    13.7 KB · Views: 176
  • canister1.JPG
    canister1.JPG
    33.6 KB · Views: 180
  • canister4.JPG
    canister4.JPG
    26.7 KB · Views: 197
  • wing 02.JPG
    wing 02.JPG
    12.5 KB · Views: 198
  • wing 01.JPG
    wing 01.JPG
    12.4 KB · Views: 200
  • canister3.JPG
    canister3.JPG
    26 KB · Views: 184
  • canister5.JPG
    canister5.JPG
    24.2 KB · Views: 185
  • canister6.JPG
    canister6.JPG
    29.5 KB · Views: 176
  • canister7.jpg
    canister7.jpg
    21.7 KB · Views: 182
Last edited:
I forgot to mention I also made a couple of handles and attached them to two of the panels but they are not as noticeable from this angle. :)
 
Impressive work Bill. I hope you'll be able to see it once the fuselage is buttoned up!

For bending the stretched sprue, I've usually found this to be fairly easy when bending it around tweezers but it depends on the quality of the plastic. Clear sprue tends to be stronger but more brittle - good for radio antenna wire. For bending, stick with non-clear sprue and, if possible, use plastic from higher quality manufacturers like Tamiya.
 
Great stuff Bill! The cylinder looks a lot better.
If you need to bend sprue to shape for other jobs, depending on size/angles etc, a pin board often helps. This is basically a sheet of balsa or similar, with a sheet of paper on top, which has the shape(s) drawn to scale. Where a bend is needed, insert pins, then anchor the sprue at one end, then bend it around the pins to form the shape, keeping it under tension. Apply gentle heat, maybe from a hair drier, then cold air. The sprue should then retain the shape, and can be trimmed as required.
 
thanks for the tips! and yes this stuff will be very visable. Most of the back end is window and I have another completed model for an example for what is visable.
 
Thanks guys... I'm mostly doing some dry fitting at the moment, pix to follow, along with putting in some PE parts in the forward section. :)
 
Last edited:

Users who are viewing this thread

Back