Geedee's P-51D Cockpit Project

Ad: This forum contains affiliate links to products on Amazon and eBay. More information in Terms and rules

:thumbup:
Outstanding, simply outstanding.

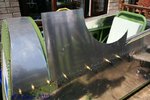
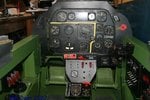
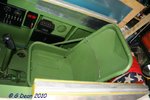
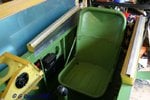
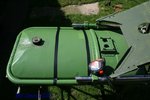
I love tinkering with motorbikes but 1:1 scale planes major parts?
Wow, talk about in a different league!

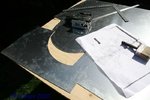
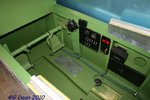
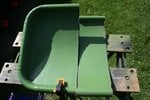
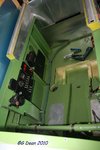
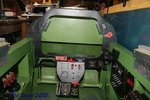
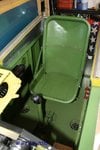
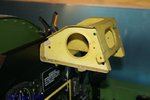
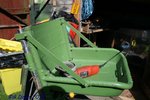
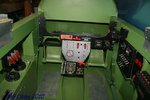
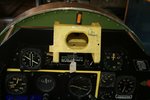
Really great documentation with the pics too, an interesting tale very well told.
Looking forward to the next installment (once the snows clear the holiday is gotten over, huh?)

Kudos.

Hey, thanks for your comments, really appreciated !.

I've found out over the Christmas break (spent Christmas day, Boxing day and my sons birthday ....the following day !....in bed with flu !!!! :evil:) that the start panel I've made is in fact not for a D model, but instead an earlier B /C model and the main electrical panel is also incorrect !.

Sooooooo....its out to the shed to sort out some heating tommorrow and get to work on righting my wrongs ! :rolleyes:

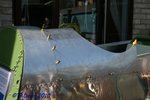
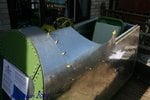
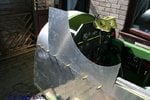
Should have an update on the new panels by the weekend and then...if I can get back into the building side of things....catch up with Glenn !.

I'm also hoping Goose will start a thread on his '51 build very shortly..... and Henk...wheres the thread on your '51B build ?....c'mon buddy, spread the news !!!!. There's no such thing as too many '51's in the making !!!:thumbup:
 
Spooky you should say that Eric.....been thinking of doing a full '51B panel for comparison display !
 
.....been thinking of doing a full '51B panel for comparison display !

Some very dangerous thinking Gary! Do you really think you can just stop at a panel. Before you know it you'll have two P-51 pits side by side out in the shed. I have more than have the instruments I need to make up a P-40C panel, but I know I wouldn't be able to stop there. I mean the early P-40 fuselage structure would be so much simpler to build than the P-47.........
 
You'll never guess what ? !!!! SHOCK HORROR PROBE !!!! I've done some more work on my '51 ...wheres the fanfare smilie ?

Decided to have it off today...oeerrr, can I say that ?....and I've put in 6 hours solid on my babe. Doesn't actually look as though I've done much, but thats the nature of the beast.

Started off by stripping everything out of the tub so I could finally get the rudder pedals bolted into place, instead of 'perched' in place. This is now complete and I'm now on the trawl for details about fixing the springs to the pedals, sorting out a 'brake' feel for when the pedals are depressed (why they be depressed ?...beats me !). Oh, and I need to get the springs themselves as well.

With the pedals sorted, it was time to install the new main electrical panel...which in the best tradition, didn't quite fit in the same place as the first one I made. A half hour of fiddling about got it all lined up and now its mounted properly and doesn't wobble about either. I also stripped the ammeter down and stopped the glass from rattling as well.

Then it was time to start putting it all back together and in the right sequence this time. Started off with lower instrument surround, closely followed by the top and then put the main instrument panel back in place. I've been having a nose through the blueprints to sort out the ones for the windshield and discovered where the gunsight mounting bracket fits...its now held in place with a clip until the glare shield is done.

And then it was time to look at the seat. Hmmmmm, its been bugging me for some time now that the back is way too high...remember its not a pukka 'Stang seat, its from a 'Seaking' chopper but is close enough for the time being to use. Marked it all out and then got to play with grinder. Once cut down to size, the seat looks a lot mor like the Warren Mcarthur. What I will be doing this friday...yup, having it off again !!! is to trim the section I cut out and use that to support the back of the seat back, with a fresh trim sheet of Ali cut from stock on the front of the back rest. With some steel rod inserted into the tubular 'edges' of the back rest to provide structural strength and the two sections of ali rivetted in place with proper rivets...not 'pop' rivets. this will look like a field repair and should last me for some considerable time. Then it was time for a quick couiple of shots with the seat in place...and still in pieces... and thats it for today as I'm off for dinner function at the Officers Mess at Boscombe Down tonight (can you imagine me in a DJ !!!)

I am really hoping that the weather holds over the next few weeks as I'm getting back into the swing of working on the '51 and you what ?....I'm really enjoying it !

And finally, sorry about the pics, they aint quite level as I was leaning over the back of the rear bulkhead for some of them, cos I noticed in some of them, things look a bit 'squiffy', they aren't, its just me not taking level shots ! (queue loadsa comments !!! :))
 

Attachments

  • m1.jpg
    m1.jpg
    71.5 KB · Views: 247
  • m13.jpg
    m13.jpg
    83.9 KB · Views: 221
  • m2.jpg
    m2.jpg
    88.8 KB · Views: 234
  • m4.jpg
    m4.jpg
    81.1 KB · Views: 243
  • m16.jpg
    m16.jpg
    89.1 KB · Views: 215
  • m7.jpg
    m7.jpg
    50.6 KB · Views: 248
  • m12.jpg
    m12.jpg
    84 KB · Views: 216
  • m10.jpg
    m10.jpg
    84 KB · Views: 210
  • m6.jpg
    m6.jpg
    85.7 KB · Views: 240
  • m17.jpg
    m17.jpg
    74.3 KB · Views: 246
  • m15.jpg
    m15.jpg
    71.3 KB · Views: 213
  • m11.jpg
    m11.jpg
    74.9 KB · Views: 211
  • m3.jpg
    m3.jpg
    70.7 KB · Views: 242
  • m14.jpg
    m14.jpg
    53.1 KB · Views: 218
  • m9.jpg
    m9.jpg
    63.9 KB · Views: 230
  • m18.jpg
    m18.jpg
    115 KB · Views: 226
Last edited:
Fabulous Gary!! Its really coming along nicely. I really need to get back to my 47, but I don't know if I'd be brave enough to cut a seat in half like that, but it looks like it worked out just fine. As far as the rudder pedal breaking operation, I had the same problem to solve and came up with a spring system made up of from threaded tube from table lamps with 1/4" threaded rods inside, along with various home made plates, nuts, washers, and a couple of springs. Something similar might work for you with some modifications. You can see a pic of it in post #3 of my 47 thread. I might even have the drawings I made up laying around here some where if you need them.

Keep up the work! You might just shame me into getting started again.
 
Gary, the work more than makes up for the off kilt shots.:thumbright: :lol: :cool: The photos look like I took them.:lol: I have a hard time holding a camera level, can't do it to save my life.:banghead: 
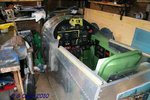
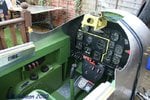
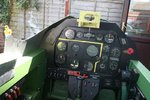
Your work on the pit is exceptional sir. Keep it up and hopefully the weather will hold out.:thumbright:
 
Thanks guys.

I've done s*d all since last years cockpitfest and just kinda got the urge to go and spend some quality time / work on her. Once I'd started, and put Glenn Miller on the ghetto blaster, I very quickly got 'in the mood'...and I'm still in it. Hoping to get some more done tomorrow (Friday)and as long as the weather holds out over the next few weeks, I'm aiming to get a lot more done.
 
Well....I finally got around to starting on the windshield...and rapidly got right out of my comfort zone !.

First off, the main blueprint is..errrr...ummm....ever so slightly complicated !. Took me a loooong time to figure out what I was looking for. Now I have absolutely no idea of the correct sequence for building the windshield...do I have a go at the main 'hoop'... or the front armoured windscreen surround... or ..errr, so in the best tradition I decided to go for the base metalwork. If any-one can tell me if I'm on the right track, I' would love to know.

I have to say that I am gobsmacked at how bl**dy hard it is to bend 2mm ali. with the pieces cut out and skin pinned in place, it took both my son and my wife to push down on the ali, while I as quickly as possible, drilled and put the skin pins in place. I am absolutely not looking forward to trying to profile the central sheet (I havent made this bit yet) and the two side parts to curve up to meet the glass.

And the hose pipe adaptor perched cheekily on the left hand side panel is there to stop me ...and anyone else...doing themselves a mischief.

I'm quite pleased with end result. allthough, having said that, I'm not able to complete this bit yet as I dont have any of the 'twist and lock' fittings. Yet.

When I can get the 'hoop' built and installed, then I can have a go at the instrument glare shield. In some of the inside shots with the new metal work pinned in place, you can see some funny shaped gaps between the instrument panel and the fuselage sides. This is in accordance with the blueprints and when the glare shield is installed, all will make sense.

Hoping to do some work on her this weekend if the weather holds out. I have a few cold tinnies in the fridge and I am looking forward to getting even further out of my depth.....hey....thats how we learn right ?
 

Attachments

  • m1.jpg
    m1.jpg
    122.8 KB · Views: 272
  • m11.jpg
    m11.jpg
    100.7 KB · Views: 258
  • m7.jpg
    m7.jpg
    66.4 KB · Views: 241
  • m6.jpg
    m6.jpg
    66.5 KB · Views: 241
  • m3.jpg
    m3.jpg
    81.6 KB · Views: 241
  • m9.jpg
    m9.jpg
    108.5 KB · Views: 268
  • m8.jpg
    m8.jpg
    90.5 KB · Views: 270
  • m4.jpg
    m4.jpg
    90.1 KB · Views: 258
  • m2.jpg
    m2.jpg
    69.4 KB · Views: 250
Last edited:

Users who are viewing this thread

Back