Geedee's P-51D Cockpit Project

Ad: This forum contains affiliate links to products on Amazon and eBay. More information in Terms and rules

i didnt realize that recreating a cockpit was such a craze. are you planning on putting on the bubble glass?can one even buy a running merlin these days?

My plan is to stop with the glazing once the windscreen assembly has been completed. With the section of cockpit I'm aiming to complete, I would only need just under half the sliding canopy part, so I'm not going to bother with part (look a bit daft with only half a canopy I reckon)...at least not yet.

Merlins are available but getting scarce now. I want one....no I dont, I want two !!!!. Fortunately I have a great contact who rebuilds and runs Merlins as a 'hobby'. I've run one of his engines at Flying Legends and let me tell you, I'm still in awe of that gorgeous V12 as it lurched into life and made me a very happy chappie indeed !.... http://www.ww2aircraft.net/forum/aviation-videos/day-i-got-start-merlin-16189.html . Check out his website...simply amazing !

Thanks for the comments guys, much appreciated.

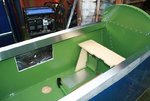
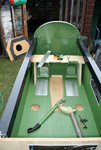
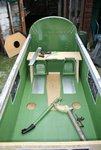
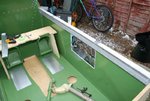
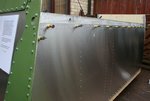
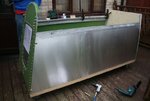
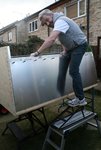
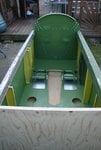
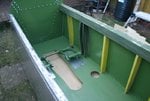
Havent done much on the '51 for a while but have now, this week got the ball rolling on getting some longerons made at a local supplier. Hoping to have them, in stock by the end of this week, then I can fit them to the body tub and get stuck into making new ribs (didn't like the first set, so binned 'em !)

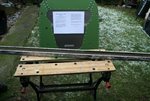
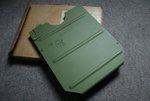
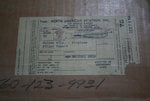
I've scored two fantastic bits towards my project. First off is a document / map holder complete in its original North American Aviation wrapping dated 28 dec 194?. I am 'over the moon' to acquire this original, un issued NAA item.

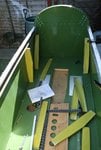
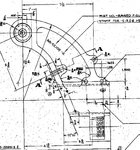
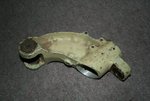
The second bit is the 'Goose neck' casting that the control column attaches to, that I'd been puizzling how to make. Absolute top marks to my mate Tony (AKA Rocketeer) who tracked one down for me. This will be cleaned up, re-sprayed and fitted to a 'torque tube' prior to fitting to the floor.

Hopefully get some building done over the next few weeks once the 'white stuff' has melted and I can get back into the shed !!!!
 

Attachments

  • p1.jpg
    p1.jpg
    74.8 KB · Views: 477
  • p5.jpg
    p5.jpg
    70.5 KB · Views: 474
  • stickstuff3.JPG
    stickstuff3.JPG
    230.7 KB · Views: 485
  • naa1.jpg
    naa1.jpg
    87 KB · Views: 477
Last edited:
Hows this for dedication...been out in the back garden since 09:45 this morning ...in the cold and frost !!!! and finally got my Longerons installed.

You will remember from one of my previous posts that the original Longerons where of a H profile. No way could I afford some of the original stuff and I've been wracking my brains how to get around this for some time. A while ago I pickup up some ali extrusion in a U channel shape....and by laying it on its side...first two pics...I thought that with some extar ali folded to 'cap' the open end this would do. Picked up the new ali from the Metal working place in my local town last week and thought it about time to get stuck in.

Ok, I can hear you asking why I'm not using the correct stuff for this bit ?. Actually, if you look at the inside of a '51 cockpit, you cannot actually see the profile of the Longerons...all you see is a vertical surface with the ribs dissapearing up anderneath. The only difference on my 51 is that the ribs will be about 1/2 and inch shorter in height and will rivet directly to the base of the new longeron. It might not look like it but the internal dimensions of the cockpit with the Longerons in place is correct....I even held the instrument panel surround in place to check and its a perfect fit !!!

What this means now is that I can crack on and get making the new ribs and finish off the base of the cockpit. Once the bottom end is done than I can get started on the top half and get the instrument panel mounted and then the windshield assembly and 'bonnet'. Obviously there is still all the umpteen bits 'n' bobs to be made up and mounted in between the ribs, but at least I now have a solid base to work to and it can only get stronger as I add more stuff.

In the meantime, I'm also working on making the mountings for the stick that you see lying in the tub in one of the pics. Crickey....I need a cuppa to warm up !!
 

Attachments

  • t14.jpg
    t14.jpg
    80.5 KB · Views: 448
  • t13.jpg
    t13.jpg
    162 KB · Views: 499
  • t12.jpg
    t12.jpg
    154.9 KB · Views: 441
  • t11.jpg
    t11.jpg
    106.2 KB · Views: 434
  • t10.jpg
    t10.jpg
    112.3 KB · Views: 445
Last edited:
Time for an update….

Spent some time last weekend on starting to make a new set of ribs (didn't like the last set !) out of a thicker gauge of Aluminum. This has given me a better profile on each rib and they are also substantially stronger. Only problem is…they're a real b*tch to form the fuselage curves on…they distort like b*ggery !. It doesn't matter how many clamps I use, how small a section I try and bend….they all come out distorted and it takes about half an hour on each one tidying it up. That's the problem with Aluminum, each time you bend it or hit it with a hammer, it stretches. B*m !

Anyway, finished the set this weekend and with some….sorry, lots :notworthy:!... of help and enthusiasm from Tony (AKA Rocketeer the Riveteer !), my '51 has started to look like a plane. Basically, we spent around 7 hours plus this weekend working on the bottom half of the cockpit tub that is now nearing completion…nigh on 700 rivets cut to length, rivet holes drilled and countersunk followed by lots and lots of noise from the rivet gun and compressor (My neighbours love me …teehee). My back garden is now covered in Ali swarf, snipped off bits of rivets and two…yes TWO !!!, broken drill bits and a slack handful of swear words.

Sunday we did the riveting on the decking…great for back ache and decking sized imprints on each knee, so today, we decided to raise the whole tub to a better working height (hence the dodgy shot of me climbing in ready for another bout of riveting, standing an wheel ramp balanced on a small Ali step.). Net result…still got back ache, no decking imprints in the knees and me suffering from vertigo !.

Right, if you haven't fallen asleep yet, on with pics. First one looks a bit of a mess (I am not a tidy person Ok…) with the first set of ribs in yellow primer. Then I ran out of yellow and started on the green. Don't worry, they will all be sprayed with correct colour very soon. Next weekend hopefully if the weather is OK !.

As she stands at the moment, the protective plastic is off, all ribs are now fully riveted in place and the longerons are ready. Plans for the next few weeks are to make the mounts for the rudder assembly bar and get them fitted, and then start to make the various panels that fit in between them. Oh... and get the stick mounted !.
 

Attachments

  • mp1.jpg
    mp1.jpg
    134.6 KB · Views: 442
  • mp2.jpg
    mp2.jpg
    60.6 KB · Views: 442
  • mp3.jpg
    mp3.jpg
    75.6 KB · Views: 441
  • mp4.jpg
    mp4.jpg
    146 KB · Views: 440
  • mp5.jpg
    mp5.jpg
    122.6 KB · Views: 446
  • mp6.jpg
    mp6.jpg
    76.2 KB · Views: 440
  • mp7.jpg
    mp7.jpg
    70.5 KB · Views: 438
Severely envious of your Alu work mate!! Looking great.
I spent an hour last night trying to bend up ONE solitary switch housing...and threw it away at the end of the night in disgust....

Darryl
 
Last edited:
Boy Gary looking great there if I did not know this was a P51 pit I would of guessed it within seconds.Cheers Kevin
 
WOW this is an ambitious project to say the least. I can't help but wonder what will you do with it when its done? I'm thinking if you are married keeping it in the living room will be a big no no. :D

As a kid I use to make cockpits out of old cardboard boxes. Not quite the same... :oops:
 

Users who are viewing this thread

Back