He 162 - silk purse from a sow's ear

Ad: This forum contains affiliate links to products on Amazon and eBay. More information in Terms and rules

Thanks guys! :D

After I've painted the wheel well, I need to reattach the lower portion of the wheel well that I cut away. That should have been visible in one of the earlier pics.

I thought I would post some of my research material here in case anyone else wanted some details on the He 162. Many thanks to some of the folks here for pointing me to this site:

He 162

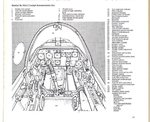
Here's what's in store for the cockpit:

He_162_cockpit6.jpg


He_162_cockpit7.jpg


and some color pics:

He162_Interior.jpg


He_162_cockpit4.jpg


and some details on the canopy and the braces:

d366.jpg

d368.jpg

d370.jpg


You can see how much I need to cut down those temporary braces/pivot arms.

That little red thing just in front of the canopy is a forward wheel position indicator - it pops up when the forward gear is in the down (and, I assume, locked position). :D
 
Wow! You're donig a great great job! Its always good to see an old kit being given the attention of a skilled modeller and being totally transformed. Any idea what colour scheme you're going to finish it off as?
 
Wow! You're donig a great great job! Its always good to see an old kit being given the attention of a skilled modeller and being totally transformed. Any idea what colour scheme you're going to finish it off as?

Thanks. :D

Haven't decided on a definite color scheme yet. Standard He-162 factory camo is RLM 81 brown violet and RLM 82 bright green over RLM 76 light blue but I'm still looking around for other options. :D
 
I've had a quick look for colour schemes, but the only 'different' ones I've found, so far, are aircraft in factory primer. The attached drawing might come in useful though?
 

Attachments

  • Can Jan 137.jpg
    Can Jan 137.jpg
    129.3 KB · Views: 153
I've had a quick look for colour schemes, but the only 'different' ones I've found, so far, are aircraft in factory primer. The attached drawing might come in useful though?

Thanks for the pic. Definitely will come in useful. :D

As for the color schemes, I think youre right. I seem to recall an overall RLM 80 scheme for at least one He 162 but can't find the reference again. I'm not at the painting stage anyway, so there's no rush. :D
 
Why not paint it as a war prize. You know, some British roundels or US stars and bars over the Luftwaffe markings. The French repainted at least one of theirs a dark blue if I remember.

By the way, I was skeptical at first if you could make that pig of a kit into something worth while. You have proven me wrong. Great work. Keep going and good luck.
 
Let me know if you need any details of her, Dwight, got a couple of great books on her.

There's a great thread that Sunny91 (I think) posted which will be of interest to you too - I think it's called 'He 162 undercarriage retraction', or something similar...
 
By the way, I was skeptical at first if you could make that pig of a kit into something worth while. You have proven me wrong. Great work. Keep going and good luck.

Thanks CV. :D These old kits are challenging if nothing else. :D I'm pretty happy with the way it's turning out.


Great work Dwight, loving the updates and it's looking good.
:hotsun: :hotsun:

Thanks Vic. :D

Let me know if you need any details of her, Dwight, got a couple of great books on her.

There's a great thread that Sunny91 (I think) posted which will be of interest to you too - I think it's called 'He 162 undercarriage retraction', or something similar...

Thanks Evan. :D I've seen the undercarriage retraction video. It's kind of interesting to actually see something on these old birds WORKING. I've debated whether to add additional detail to that wheel well or not. I think I'll need some more schematics of that if I am going to do anything beyond running a few hydraulic lines around the bay. I might use the dragon kit as a guide to the shape and position of addition details. :D

The cockpit is actually in the "how do I get all this stuff into that little bit space" stage. I've done all the base coat painting on the cockpit side panels and the instrument panels and started working on picking out the details now. Fitting everything into that space is going to be interesting.
 
Keep up the good work mate!

Glad you caught the video too. When you just see a photo, you think 'Wow! An He 162!', but to see it actually working like that helps to understand the nature of the machine aswell, like adding the realism to a cherished myth...Thanks to Sunny for the footage!
 
One small update. The interior of the wheel well has been painted and the wheel well restored to it's original shape. I had to drop a third shim at the aft end of that assembly but it wasn't a big deal.

IMG_0110v2.jpg


IMG_0111v2.jpg


I didn't think I was going to be able to get that piece realigned but I think I got it in okay. :D I still need to touch up the paint on the plasticard shims, and do a little bit moretrimming, sanding and buffing, but the alignment looks good and everything is flush. :D

NOW I can start working on finishing the cockpit. :lol:
 

Users who are viewing this thread

Back