Airframes
Benevolens Magister
Restoration in Miniature.
Updating and re-painting the Typhoon has sparked me off on a bit of a 'restoration' spree and, as a bit of a warm-up for the BoB Group Build later this year, I thought I'd breath a bit of 'new life' into an old Bf109E.
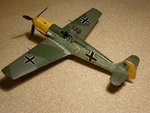
This is the old Matchbox 1/32nd scale kit, originally released in 1976, which I built sometime in the early to mid '80's. It was originally painted as Werk Nr. 3712, an E4, flown by Oblt. Heinz Ebeling of 9/JG26, but was re-painted as 'White 7' of 4/JG26 about 15 years ago, and has sat gathering dust and grime ever since. Co-incidentally, I've just acquired another example of this now out of production kit, and have often wondered why Revell, who acquired the Matchbox moulds in 1991, and have issued a number of the old kits under the Revell lable, have not re-released this kit which, overall, is rather good, even by today's standards.
I'll be posting a review of this kit, together with a direct comparison to the Hasegawa 'Emil', elsewhere in the Modelling section in the near future, so I won't waste time describing the kit here. The model was built out of the box, with the exception of a scratch-built canopy and seat belts.
The intention is to completely re-paint the model in the colours of W.Nr1990, 'Black 13', flown by Oblt. Helmut Tiedmann of 2/JG3, which force landed in Kent in August 1940, and I'll post a profile of the machine in the next update.
So, the first thing to do was to remove as many delicate parts as possible, before thoroughly degreasing and washing the model, prior to sanding overall.
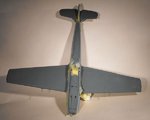
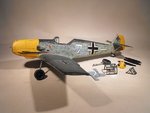
PIC 1 Shows how the model looked before the 'restoration', somewhat grubby and tired!
Among the parts removed was the opening section of the canopy, which was scratch-built from 38 separate parts, as I intend to use this on the other Matchbox kit I'll be entering in the BoB GB. This will be replaced by the canopy section from the Hasegawa kit, suitably modified to fit, in the closed position. The rear glazing panel was also removed, in order to trim it to allow the Hasegawa canopy to fit snugly, and also to allow access to the rear bulkhead, which will have further details added.
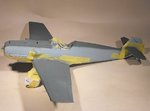
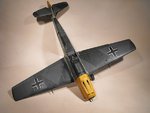
PIC 2 Shows the model with the parts removed, after cleaning, and during initial sanding. Unfortunately, the port undercart leg refused to budge, so it was left in place!
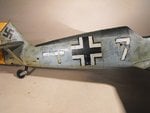
PIC 3 With sanding underway, traces of the original paintwork and markings are now visble, rather like the 'real thing'. Note how the remains of the final clear coat, applied with an enamel varnish, have yellowed with time.
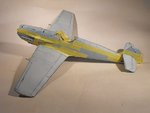
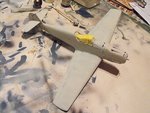
PIC 4. The model after sanding. This was done to provide a 'flat' surface, ready for priming, and also to remove a few minor imperfections, as the model was originally brush painted overall.
PIC 5. Now primed overall, using a light grey enamel, applied thinly and built up with three coats - just enough to obscure the original markings, and provide an even, relatively smooth surface for the camouflage colours. These will be RLM65/71/02, with an 02 mottle, and the wing tips, tailplane tips, and top segment of the rudder will be 04 Yellow. The spinner will be white, with a thin red spiral, and a 70 Scwarzgrun backplate.
The 'Black 13' decals have been produced on the inkjet printer, and will be outlined in white once applied.
Decals for the red 'Tatzelwurm' badges for the nose have also been made, along with some stencils and the Werk Nummer.
So, the next step is to spray the RLM 65 Hellblau on the fuselage, fin, rudder and undersides, after the primer has been allowed to cure for around 24 hours or more.
Thanks for looking, and I'll post another update soon.
Updating and re-painting the Typhoon has sparked me off on a bit of a 'restoration' spree and, as a bit of a warm-up for the BoB Group Build later this year, I thought I'd breath a bit of 'new life' into an old Bf109E.
This is the old Matchbox 1/32nd scale kit, originally released in 1976, which I built sometime in the early to mid '80's. It was originally painted as Werk Nr. 3712, an E4, flown by Oblt. Heinz Ebeling of 9/JG26, but was re-painted as 'White 7' of 4/JG26 about 15 years ago, and has sat gathering dust and grime ever since. Co-incidentally, I've just acquired another example of this now out of production kit, and have often wondered why Revell, who acquired the Matchbox moulds in 1991, and have issued a number of the old kits under the Revell lable, have not re-released this kit which, overall, is rather good, even by today's standards.
I'll be posting a review of this kit, together with a direct comparison to the Hasegawa 'Emil', elsewhere in the Modelling section in the near future, so I won't waste time describing the kit here. The model was built out of the box, with the exception of a scratch-built canopy and seat belts.
The intention is to completely re-paint the model in the colours of W.Nr1990, 'Black 13', flown by Oblt. Helmut Tiedmann of 2/JG3, which force landed in Kent in August 1940, and I'll post a profile of the machine in the next update.
So, the first thing to do was to remove as many delicate parts as possible, before thoroughly degreasing and washing the model, prior to sanding overall.
PIC 1 Shows how the model looked before the 'restoration', somewhat grubby and tired!
Among the parts removed was the opening section of the canopy, which was scratch-built from 38 separate parts, as I intend to use this on the other Matchbox kit I'll be entering in the BoB GB. This will be replaced by the canopy section from the Hasegawa kit, suitably modified to fit, in the closed position. The rear glazing panel was also removed, in order to trim it to allow the Hasegawa canopy to fit snugly, and also to allow access to the rear bulkhead, which will have further details added.
PIC 2 Shows the model with the parts removed, after cleaning, and during initial sanding. Unfortunately, the port undercart leg refused to budge, so it was left in place!
PIC 3 With sanding underway, traces of the original paintwork and markings are now visble, rather like the 'real thing'. Note how the remains of the final clear coat, applied with an enamel varnish, have yellowed with time.
PIC 4. The model after sanding. This was done to provide a 'flat' surface, ready for priming, and also to remove a few minor imperfections, as the model was originally brush painted overall.
PIC 5. Now primed overall, using a light grey enamel, applied thinly and built up with three coats - just enough to obscure the original markings, and provide an even, relatively smooth surface for the camouflage colours. These will be RLM65/71/02, with an 02 mottle, and the wing tips, tailplane tips, and top segment of the rudder will be 04 Yellow. The spinner will be white, with a thin red spiral, and a 70 Scwarzgrun backplate.
The 'Black 13' decals have been produced on the inkjet printer, and will be outlined in white once applied.
Decals for the red 'Tatzelwurm' badges for the nose have also been made, along with some stencils and the Werk Nummer.
So, the next step is to spray the RLM 65 Hellblau on the fuselage, fin, rudder and undersides, after the primer has been allowed to cure for around 24 hours or more.
Thanks for looking, and I'll post another update soon.
")