- Thread starter
- #181
Airframes
Benevolens Magister
I'd just like to say -%£%ing %$£%%$£ and b*ll*cks !
The few decals that have been applied have been on the model for 12 days now, and should have settled down and be well 'bedded in'.
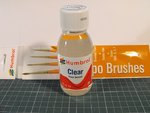
So, in order to avoid chipping or other damage to those decals on the 'bare metal' areas whilst handling the model, I applied a very light coat of the recently acquired Humbrol Clear, using a soft brush and just covering the area of the decal. This is something I've done, using various types of clear coats, without any problems whatsoever, for at least 35 years, ever since the introduction of more 'modern' clear coats, and especially since the discovery, by modellers, of Johnson's Klear/Future, around 20+ years ago.
And guess what?
The bl**dy decals wrinkled !!
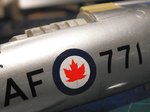
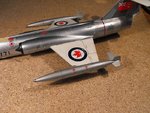
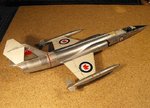
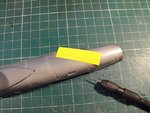
I'll admit that this has only happened to those decals on the raw, 'bare metal' areas, with the 'RCAF' lettering,'771' numbers, and the roundels on the fuselage, and the Red Ensign flag on the port fin being affected, with slight wrinkling of the yellow 'Rescue' arrow, also on the port side.
The roundels on the wings, applied to the white-painted areas which were clear-coated with Xtracolor enamel gloss varnish before adding the decals, where also given a brushed coat of the Humbrol Clear, and these are fine. The roundel and 'RCAF' on the starboard side of the fuselage, were clear coated in the Xtracolor enamel gloss varnish, just covering the decal and carrier film, and there's no sign of wrinkling or bubbling in this area.
Whether this is something to do with this brand of decal, which are very thin, or whether the Humbrol Clear has got under the decals on the metal areas (unlikely after so much time) or whether it's a reaction in combination with the varnish, decals and the 'metal' areas, I have no idea.
The effect was difficult to photograph, with the black lettering absorbing the light, but it can just be seen on the roundel in the photo below.
I find it extremely odd that a solvent-based, enamel vanish should have no effect, and yet a more 'friendly' acrylic clear coat should cause such a dramatic change to the decal surface.
I'm going to leave this for at least 24 hours, and see if the 'wrinkled' areas settle down at all, as the effect is very like what could be expected from a decal softening or setting solution, and warnings about the use of these are printed in the decal instructions.
Meanwhile, I'm going to have to re-think the way the rest of the decals are handled and sealed. I do not want to have to clear-coat the NMF areas before decalling, as this will spoil the effect of the polished metal areas, and I'm reluctant to use more enamel varnish as a sealing coat, as this, over time, can change the tones where it's been used, on a NMF surface, again spoiling the overall effect.
One of these days, I'll be able to do a simple, straightforward, trouble-free build !
I'm going to the pub ..................
The few decals that have been applied have been on the model for 12 days now, and should have settled down and be well 'bedded in'.
So, in order to avoid chipping or other damage to those decals on the 'bare metal' areas whilst handling the model, I applied a very light coat of the recently acquired Humbrol Clear, using a soft brush and just covering the area of the decal. This is something I've done, using various types of clear coats, without any problems whatsoever, for at least 35 years, ever since the introduction of more 'modern' clear coats, and especially since the discovery, by modellers, of Johnson's Klear/Future, around 20+ years ago.
And guess what?
The bl**dy decals wrinkled !!
I'll admit that this has only happened to those decals on the raw, 'bare metal' areas, with the 'RCAF' lettering,'771' numbers, and the roundels on the fuselage, and the Red Ensign flag on the port fin being affected, with slight wrinkling of the yellow 'Rescue' arrow, also on the port side.
The roundels on the wings, applied to the white-painted areas which were clear-coated with Xtracolor enamel gloss varnish before adding the decals, where also given a brushed coat of the Humbrol Clear, and these are fine. The roundel and 'RCAF' on the starboard side of the fuselage, were clear coated in the Xtracolor enamel gloss varnish, just covering the decal and carrier film, and there's no sign of wrinkling or bubbling in this area.
Whether this is something to do with this brand of decal, which are very thin, or whether the Humbrol Clear has got under the decals on the metal areas (unlikely after so much time) or whether it's a reaction in combination with the varnish, decals and the 'metal' areas, I have no idea.
The effect was difficult to photograph, with the black lettering absorbing the light, but it can just be seen on the roundel in the photo below.
I find it extremely odd that a solvent-based, enamel vanish should have no effect, and yet a more 'friendly' acrylic clear coat should cause such a dramatic change to the decal surface.
I'm going to leave this for at least 24 hours, and see if the 'wrinkled' areas settle down at all, as the effect is very like what could be expected from a decal softening or setting solution, and warnings about the use of these are printed in the decal instructions.
Meanwhile, I'm going to have to re-think the way the rest of the decals are handled and sealed. I do not want to have to clear-coat the NMF areas before decalling, as this will spoil the effect of the polished metal areas, and I'm reluctant to use more enamel varnish as a sealing coat, as this, over time, can change the tones where it's been used, on a NMF surface, again spoiling the overall effect.
One of these days, I'll be able to do a simple, straightforward, trouble-free build !
I'm going to the pub ..................