Trackends Attempts 2nd ever build a Spite IX

Ad: This forum contains affiliate links to products on Amazon and eBay. More information in Terms and rules
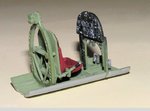
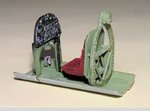
The majority of Spitfire seats were made from a resin-reinforced papier mache, which had a reddish brown colour. Later, these were sometimes painted, either in 'aluminium' or the Cockpit Green. The final versions had metal seats.Until recently, most restored Spits had painted seats, or a padded back-rest and a cushion in the parachute pan, so the overall colour wasn't that visible.
 
Its one of the colours I found doing a search and Waynes notes also show it was made in three main colours black, green and near enough this the picture makes it a bit redder than it really is though.
 
I need some more advice guys the seat colour is not too far off the real thing reddish brown bakalite but the more I look at it I'm not sure that it suits a model. do you think it would be best to remove the paint and change it to the more common airframe green. Waynes super PDF is in the green and he did warn me to KISS when doing my model, am I going over the top and worrying too much about colours and not enough about learning basic modeling skills?
 
Well, we all strive for different goals.. In my perspective, the cockpit gets mostly covered and the viewer sets more emphasis on the plane. So, I usually take it easy on the cockpit.. black instrument panel, silver drybrush on dials, and a green chair (plane permitted). I do paint anything that the instructions point out and glue it up and go to work on the outside.

But, some people enjoy the perfection of the cockpit and scratch-building little bits and aiming for realism. I haven't gotten to that depth in modeling, as I am still trying to fine tune my basic skills and make a reasonable model that shows the basics with a bit of 'wild' outside of the box techniques. Such as weathering techniques and such, or you can take it full in the cockpit. I usually like going wild on B17 interior and those bombers, as there is much more going on inside then a single engine cockpit.

Thing with modeling is, it's your journey and we only see the end result (unless you choose a start / finish build :lol:).

Hope this helps lee! :)
 
According to one of Murphy's rules.....if you want to correct something already made ..it will be the best to start making it once again. I doubt you have another set for the seat Lee.So If I were you I would leave it well alone.
 
I kinda like it. It has a nice gritty feel to it :) And I agree with Wurger, leave it alone, and if you feel you made a mistake with it, improve your next kit with the information you now know. Personally, I think it looks fine and if the rest of the Spit matches up, you'll have a nice model on your hands!

You can't quote me on this though! :p
 
Wait till you see some more PDF stuff...to see how nice you can make the cockpit then put the fuselage around it and check just how much you can and can't see!:...there is a frustration and satisfaction element here too Lee.... which you will note soon enough my friend!:D
 
Lol, I like it Lee, but maybe an idea???

Strip it down and spray it that red/brown color again, just tape off the green areas... If it still looks glossy, tone it down with a flat/matte and lose the shine... The color is close enough for inspection man...
 
Personally Lee, I'd leave it as is. You could maybe change the colour of the ribbed back padding, to a dark green, semi-matt, to give the appearnce of leather, but again, it looks fine as it is.
It's only fairly recently that I noticed the red/brown seat colours on Spits, as the real ones I'd worked with all had painted seats, and had been done during restoration. In one case, the owner thought the original colour looked like sh*t, and painted it dull silver! Since then, having studied loads of period pics, I was surprised how many seats were that reddish colour, and how many had back padding whilst others didn't, and so on. The three 1/32nd scale Spits I have that have seats (the fourth is a 'hulk') all have different colours of seat!
As Wayne noted, once the rest of the cockpit is built up around the seat, it should fit in well, and probably be a nice contrast.
 
Thanks Terry i'm glad you said that as you can see i have left it alone. The wife was at red cross today so it gave me a chance to follow Waynes super build instructions and do part 2 of the build.
The panel was dry brushed but my early attempts were rubbish.
First I used too wet a brush then i brushed too much, so to practice I tried highlighting all the numbers on my previous Bren build sprus I got to number 48 before I was happy to have another attempt. :D
Oh and before Wayne asks me I have not fixed the panel in place yet as per your instructions.:)
 

Attachments

  • spite cockpit 3.jpg
    spite cockpit 3.jpg
    55.1 KB · Views: 102
  • spite cockpit 2.jpg
    spite cockpit 2.jpg
    55.3 KB · Views: 98
Last edited:

Users who are viewing this thread

Back