1/72 Hasegawa B 17 F 'Hells Angels', 8th AF 303rd BG 358sqd.

Ad: This forum contains affiliate links to products on Amazon and eBay. More information in Terms and rules

Here you go Alex, some stuff which might help.
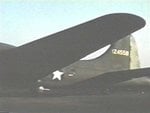
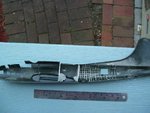
PIC 1. An external view of the Radio room gun on the 'F' moel. Note the early ammunition box on the right of the gun receiver. This was later replaced by a belt feet - see next pics.
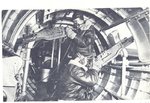
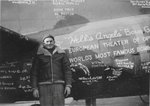
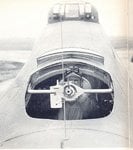
PIC 2. Sgt. Frank Kimotek in 'Hell's Angels', actually firing the gun - note the blur of empty cases on right, and below the ejection port, ans the cordite smoke, Presumably a posed shot, as he isn't wearing a parachute harness, and the ammo is a short length of belt. The gun mount is the later type, with the central swivel.
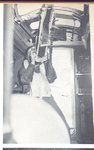
PIC 3. An interior shot, showing the earlier 'ring' mount, but also showing the ammo box and belt feed on the starboard radio room wall.
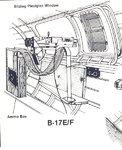
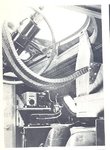
PIC 4. The type of cheek gun mounting used on 'Hell's Angels', this one over the Navigator's table on the port side. Note the gun recoil damper - these were fitted to the later waist gun mounts also.
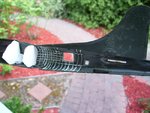
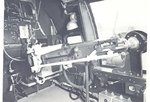
PIC 5. A clearer shot of the .50 cal Browning and recoil mount (the silver 'tubes' and brackets etc.), taken at Duxford.
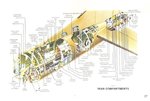
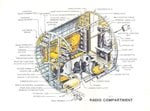
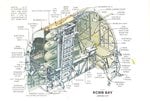
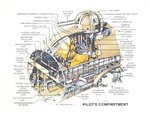
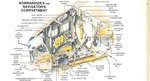
PICS 6 to 10. Boeing Flight Manual cutaways for the B17F.
I'll scan and post some pics of the waist gun mounts now - thought I'd done them!
Other photos, original source unknown, via Roger Freeman.
 

Attachments

  • Buys 085.jpg
    Buys 085.jpg
    61.8 KB · Views: 105
  • Buys 084.jpg
    Buys 084.jpg
    43.5 KB · Views: 114
  • Buys 086.jpg
    Buys 086.jpg
    61.3 KB · Views: 108
  • Buys 092.jpg
    Buys 092.jpg
    96.8 KB · Views: 115
  • Czech 182.jpg
    Czech 182.jpg
    69.7 KB · Views: 107
  • Buys 091.jpg
    Buys 091.jpg
    82 KB · Views: 119
  • Buys 090.jpg
    Buys 090.jpg
    102.1 KB · Views: 111
  • Buys 089.jpg
    Buys 089.jpg
    102.3 KB · Views: 92
  • Buys 088.jpg
    Buys 088.jpg
    112.4 KB · Views: 93
  • Buys 087.jpg
    Buys 087.jpg
    89.2 KB · Views: 94
Here's the waist gun details.
PIC 1. Another posed shot, showing the pintle mount and the early ammunition cannister feed. this was later replaced by the belt feed, the ammo being stored in plywood boxes, aft on the port side, forward on the starboard. The recoil dampers were changed from the early type shown here, to the 'tube' type hydraulic struts shown in the previous post. The guns would have a suspension wire, running from the top of the reciever to a pully system on the roof, to balance the weight of the breech- heavy Browning. The sliding hatch cover is clearly visible. Note this pic is looking aft. Later still, the pintle mount was changed slightly, being mounted actually on the hatch sill, and the cover was unclipped and stored when in flight.
PIC 2. A drawing showing the same mount, this time with the ammunition box and the 'flexi feed' chutes for the ammo belts. Again, port side, looking aft.
Images: USAAF and Squadron Signal.
 

Attachments

  • Buys 094.jpg
    Buys 094.jpg
    72.2 KB · Views: 113
  • Buys 093.jpg
    Buys 093.jpg
    113.9 KB · Views: 119
Wow!! Terry that's brilliant :D

The shots of the radio operator are perfect thanks! The cutaways are fantastic, extremely useful given that a lot of my reference is from modern preserved 17s which are mostly Gs obviously.

I know surfaces like that rudder faded but on the profile on page too its a brownish olive drab? I sourced that profile from the 303rd site.

Ah those 2 are just what I was after for the waist gunners!

Anyway Terry thanks :D:D
 
You're welcome Alex.
The Olive Drab was notorious for fading, weathering and 'powdering', especially in the beautiful climate of eastern England (!), and the cold skies over Europe. The general appearance tended to be an overall brownish green, but could be still dark in places, turning to brown, and even a purpleish shade! Fabric covered areas tended to fade at a different rate, more quickly than metal surfaces. I've found one colour shot of the pattern showing the Medium Ggreen splotches used, known as 'Crow's Feet', and a grainy B&W shot. Soon as I find some more, I'll post the, together with some colour shots showing how OD normally looked after a few months in Britain. This was the original color scheme used on 'Hell's Angels'. It's a pity I can't get some VHS video footage converted to DVD at a reasonable cost, as I have some B&W and colour footage, including a couple of clips of your bird, showing the colours, markings etc. which I could then capture still from.
 
For sure Terry, thanks again! 8)

I've done some more trawling of the 303rd BGs site and found some more shots. Including some colour stills from a film made at Molesworth. It shows nicely the variation between metal and fabric, this will be very handy when painting later on. Also found a slightly clearer version of a shot the Paul posted of the port side of the nose, showing that only one side had the missions painted on the nose.
 

Attachments

  • pp-ha-signing.jpg
    pp-ha-signing.jpg
    65.6 KB · Views: 179
  • pp-ha-signing1.jpg
    pp-ha-signing1.jpg
    53.9 KB · Views: 194
  • pp-ha-signing2.jpg
    pp-ha-signing2.jpg
    43.8 KB · Views: 186
  • pp-ha-signing3.jpg
    pp-ha-signing3.jpg
    46.8 KB · Views: 171
  • v55.jpg
    v55.jpg
    27.1 KB · Views: 154
  • v53.jpg
    v53.jpg
    28.1 KB · Views: 157
  • v65.jpg
    v65.jpg
    22.8 KB · Views: 177
  • pp-spud-whitson.jpg
    pp-spud-whitson.jpg
    40.9 KB · Views: 177
  • pp-hellsangels-engine.jpg
    pp-hellsangels-engine.jpg
    67.7 KB · Views: 166
Last night I had the fuselage halves off the sprue! :lol:
Its not much but the kit itself is fairly simple so once I add the detail where I want she 'should' come together pretty fast.

Cheers.
 
Fantastic information to hand there Alex, it's kind of daunting, hope you can sift through it all.

:hotsun: :hotsun:
 
Got some stuff done today fellas this arvo.

Sanded the moulding marks and the detail around the waist gunners internally off. Probably should of left it however it looked at a little chunky. My effort to replace the ribbing and internal framing with thin a4 paper strips and masking tape is fairly rubbish but once some paints on it I hope it will be ok.

Also made the walk way/flooring for the waist gunners out of some biscuit packaging (isnt pictured) and finally made the radio operator's area bulk heads which need obviously walk ways cut out and of course detail!

Cheers.
 

Attachments

  • B 17 start.jpg
    B 17 start.jpg
    51.2 KB · Views: 121
  • B17 start2.jpg
    B17 start2.jpg
    56.1 KB · Views: 146
I hope you intend on hand painting all those names on the plane alex.. I mean, we do strive for accuracy in this house! :lol::lol::lol:
 
Nice work there Alex. The internal framework should look fine when painted. Are you going to make the bomb bay catwalk and racks, with the doors open?
 
Thanks guys.

Cory do I come across as insane?:shock: :lol:!

Not sure yet Terry, still considering it. Plan at the moment is finish off the waist areas and add ammo boxes, feeds to the guns and then detail the radio operators area with the desk seat and radios. Then onto the nose area.

I think the bomb bay maybe biting off more than I can chew in some respects.

Anyway, Cheers.
 

Users who are viewing this thread

Back