Heinz
Captain
This is one is going to come up great! Great work so far man!
Follow along with the video below to see how to install our site as a web app on your home screen.
Note: This feature may not be available in some browsers.
Ad: This forum contains affiliate links to products on Amazon and eBay. More information in Terms and rules

Dwight - I gotta say this is an interesting choice and the kit looks like it has lots of detail to keep you busy. Is that a turret on the top behind the cockpit, or a set of "My Favourite Martian" style Antennae?
Cheers
Peter
The underside of the Sm 82 (in all three paint schemes shown in the first post) appears to be some sort of NMF (aluminum probably). The instructions call for a Silver underside but that seems too polished or perhaps bright is a better word. I've never done a NMF finish before so any tips anyone has (remember I am working with Acrylics here) would be helpful.
I was planning on using Tamiya Flat Aluminum but not sure that is a good idea (and at least one person over at Fine Scale Forums thinks it's a BAD idea). A number of people suggested Talon Acrylic NM paints. Anyone ever used them?
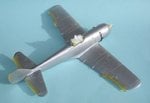
Not used Talon, but have used Citadel/Warhammer Mithril Silver for a NMF finish....used Tamiya thinner to run it through my airbrush....
...example of finish on my Ki-84...
Wayne, that looks pretty close to what I am going for. What did you use for the paint / thinner ratio and psi?
Honestly don't remember exactly...but was about 60/40..70/30 paint to thinner and I reckon about 30-40 psi....but I do play around with the ratio's and settings, found that light passes building up did the job with best results....now I have been airbrushing for along time with the same airbrush so I know it pretty well.
You may choose to do things a little differently....good luck mate!
Thanks again.