Boscombe Down Harvard 1/48th scale.

Ad: This forum contains affiliate links to products on Amazon and eBay. More information in Terms and rules

Airframes

Benevolens Magister
62,431
11,576
Aug 24, 2008
Cheshire, UK
I've been suffering from a bout of modelling lethargy lately which, along with stiff hands, has prevented me from progressing with the scratch-building on the Mosquito project. So, in an effort to give myself a 'kick start', I've decided to do a simple 'Out of the Box' build (well, almost OOB) to get back into the swing of things.
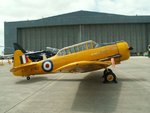
This is going to be the single remaining Harvard still serving at Boscombe Down (there were once three), and hopefully Gary (Geedee) is going to try to get me some pics or details, security permitting, as he works at Boscombe.
This is quite a remarkable aircraft, being a Noorduyn-built AT-16, Harvard MkIIB, which was taken on charge by the RAF in 1944, and is still in service, lately with QinetiQ at Boscombe, previously with the ETPS !
It's been used for photographic work, as a chase plane, for test-pilot duties and also used in the training programme for BBMF pilots, and continues to give ongoing service, 67 years after being accepted!!
The kit is the Italeri T-6G Texan which, although differing in some detail areas compared to the MkIIB, is close enough for my needs.
The main external differences show in the rear, fixed canopy section, and the main canopy frame work, which are not a major problem, and also the longer, extended exhaust of the MkIIB. Research shows that, although Harvards procured direct and under Lend-Lease from North American Aviation had British instruments, and the British 'spade' type control column grip, those built by Noorduyn (for RAF use) retained the American layout, which makes things easier.
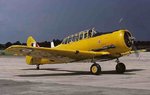
PIC 1 Shows the subject aircraft, serial number KF183, sourced from the Internet.
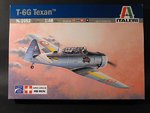
PIC 2. The kit box.
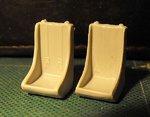
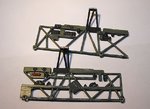
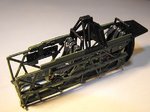
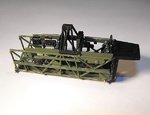
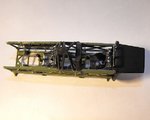
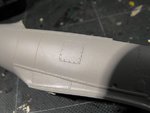
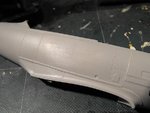
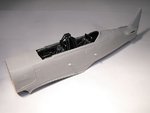
PIC 3. The first preparation stage, thinning the seat sides and pan. On the left, a kit-supplied seat, on the right, work underway thinning the sides and removing the moulded seat harness.
Hopefully, this relatively quick build will get the motivation going again, and I'll post some more pics when there's something to show.
 

Attachments

  • Can Jan 159.jpg
    Can Jan 159.jpg
    51.8 KB · Views: 228
  • Boscombe Hravard 7.jpg
    Boscombe Hravard 7.jpg
    38.3 KB · Views: 230
  • Harvard Build 002.jpg
    Harvard Build 002.jpg
    53.7 KB · Views: 238
Good luck Tel !! I have about 3 hours in KF!!! Piccy here!
 

Attachments

  • PICT0233.jpg
    PICT0233.jpg
    40.3 KB · Views: 248
That's a nice kit Terry. Built the Luftwaffe version. No problems with my kit(with the exception of my 10 thumbs trying to put on the cowling checkers). Can't wait to see what mine should have looked like. :D
 
Thanks for the interest chaps, and many thanks for the pic Tony, I'll add it to my collection !
I've got most of the interior work painted and part assembled, although apart from seat harnesses, I'm not adding any scratch-built detail such as the auxiliary switch panels on the main instrument panels.
No doubt Tony will be able to confirm, but I suspect the cockpit of KF183 is now black, in line with the standard post-war finish. I've taken a bit of artistic licence here, as even if painted in dark greys and 'shades' of black, in this scale, I think most of the detail would disappear. So, a bit of a compromise has been reached, with the rear bulkhead, seat frames, instrument cowls and roll bar being painted black, with the remainder in 'worn' Interior Green. The seats have been painted in Dark Olive Drab, as per the original finish, and 'modern' harnesses added, made from foil from a yoghurt container, with a sliver of plastic rod for the quick-release box.
PIC1 Shows the cockpit sub-frame, with the seats, seat frames and control columns fitted, and the foil seat harnesses. Some light 'paint wear' has been carried out.
PIC 2. The port and starboard cockpit side frames, with the various switch and instrument housings picked out, the main frames being Interior Green with light 'wear and tear'.
PIC 3. The internal fuselage sides have been painted in a darker shade of the green, with the bottom darker still, to create a sense of depth once the cockpit and fuselage are finally assembled.
Next step is to finish the cockpit assembly and fit it into the fuselage, before joining the fuselage halves.
Apologies for the poor lighting in the pics, but my hands were too stiff to move and arrange my main lighting set-up.
Thanks again for your interest, and I'll post some more pics probably tomorrow.
 

Attachments

  • Harvard Build 007.jpg
    Harvard Build 007.jpg
    38.8 KB · Views: 230
  • Harvard Build 015.jpg
    Harvard Build 015.jpg
    55.8 KB · Views: 228
  • Harvard Build 010.jpg
    Harvard Build 010.jpg
    46.8 KB · Views: 220
lovely work Terry! From memory, the panels are grey i think (but will check), framing is proper green like your model. The spadegrip in the front has a camera type gunbutton. back stick is bicycle type. i have cockpit shots somewhere
 
Thanks Tony. I had a feeling the front cockpit had a spade grip on the column, even though MkIIBs supposedly had American controls etc. The only Harvard I had an hour or so in was ex-RAF, with spade grips too.
Good to know the frames are still green, but I'll leave the panels black, as they're already done!
I should get the cockpit together tonight with a bit of luck, then it's time to fill a couple of panel lines on the fuselage.
 
Thanks very much Neil, that's an extremely useful site.
Thanks Evan. This particular Harvard would have started off with an Interior Green / Bronze Green interior, with black instrument panels and switch consoles etc. Post war, it probably had the 'black' treatment, and I remember seeing it in the 1960s where the interior looked black, at least on the upper sections.
Tony has confirmed that the cockpit is still green, but with the 'modern' grey finish to the instrument panels, and I'd guess some modern avionics/instruments too. However, as mentioned, I've compromised to an extent, as I haven't yet decided on which period it will be depicted as, so I can get away with the black panels!
Anyway, the cockpit is now finished and assembled, with a minor 'hassle' along the way, and the assembly has been fitted into the fuselage and the fuselage halves joined.
PICS 1 to 5 show the completed cockpit assembly, less the forward instrument panel, which is fitted later with the top decking. The instruction diagram was rather vague as to the precise location points for the rear bulkhead, and this caused the minor hassle mentioned, as the fuselage halves would not fit snugly around the rear section of the cockpit. A quick job with the scalpel, prising the offending part off, trial fitting and re-positioning, soon sorted this.
PIC 6. This panel is not present on the MkIIB, and in fact, I haven't seen it on any Harvard or T-6 yet. The engraving was filled with a bead of superglue and, once fully hardened, this was sanded to remove the panel outline.
PIC 7. The same area after sanding and first polish. After a primer coat, this should disappear completely.
PIC 8. The cockpit successfully installed, the fuselage halves joined, and all seams and joints sanded. A tiny amount of filler will be required on the underside, immediately aft of the wing trailing edge, and this will be done once the wing has been fitted.
Thanks again for your interest, and I hope to post some more pics tomorrow.
 

Attachments

  • Harvard Build 025.jpg
    Harvard Build 025.jpg
    56.3 KB · Views: 169
  • Harvard Build 027.jpg
    Harvard Build 027.jpg
    46.7 KB · Views: 195
  • Harvard Build 028.jpg
    Harvard Build 028.jpg
    44.3 KB · Views: 163
  • Harvard Build 018.jpg
    Harvard Build 018.jpg
    43.8 KB · Views: 159
  • Harvard Build 021.jpg
    Harvard Build 021.jpg
    51.3 KB · Views: 166
  • Harvard Build 029.jpg
    Harvard Build 029.jpg
    43.3 KB · Views: 179
  • Harvard Build 031.jpg
    Harvard Build 031.jpg
    48.7 KB · Views: 164
  • Harvard Build 034.jpg
    Harvard Build 034.jpg
    32.2 KB · Views: 171

Users who are viewing this thread

Back