CF-5A Freedom Fighter Kitbashed 1/48 Monogram F-5E

Ad: This forum contains affiliate links to products on Amazon and eBay. More information in Terms and rules

The Margueritas have worn off and it was back to the cockpit buildup. The below shot carries on from before to show the bulkhead behind the canopy hood added complete with gussets in the cutout. Also seen is a T-shaped tub support that was fabricated from a square plastic rod.

100808 Bulkheads continued.jpg


With the tub dry fitted and the fuselage halves taped together, the ejection seat rails were added (difficult to see in this shot) as well as the cylindrical canopy actuators both sides and to the rear of the seat seen in green.

100808 Cockpit dry FitEjection Seat Rails.jpg


The pic below shows the added details as completed tonight with the fuselage halves disassembled. The rails don't go all the way down to the floor as these can't be seen anyway.

100808 Ejection Seat Rails.jpg


Work will continue through the week on the canopy linkages and other stuff. Once again, thanks for your interest and comments.
 
Thanks Glenn.

Finished working for tonight. Resting my eyes now:shock:. Nothing really exciting to show, just the flanges on the ejector seat rails and the start of the actuator hinges. Maybe tomorrow.
 
Slow progress but here's how it looks after I finished tonight.

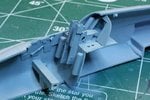
The first shot shows more work done to the ejection seat rail and the area behind the cockpit. After adding all the details (rail flanges and plates behind the seat) I ended up actually cutting off the rails and raising them as I glued them too low before. After gluing them back on with all the detail added, I noticed I gued them on backwards so as the glue was just setting, I pulled them off again and turned them around.

Various gussets and plates were added behind the rails on the horizontal bulkhead but lots more is yet to come. If you notice the strip of rivets in the foreground, this was made using my ponce wheel and a very thin sheet of plastic card. After running the wheel aliong a ruler on the card twice, the second time offsetting the teeth to create a closer rivet spacing, I cut the sheet into a thin strip and turned it over. The wheel left indentations but did not penetrate so it turned out to represent the raised rivets quite well, I think. At this stage, I decided to spray a coat of the cockpit colour as the next steps will add a lot of detail and a lot of these areas will be hidden or in the spray shadow. The other purpose was to reveal area that need more work and these are many. I need to do a lot more smoothing of the rail surfaces and other areas to get rid of the rough edges.

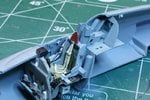
The second pic shows the cockpit test fitted. All is well so far.

I'll really need to step this project up to get it done by the deadline. Not declaring it impossible yet but it's pretty close unless I can spend several full days on it. We'll see.

Thanks for checking in.
 

Attachments

  • 100815 Cockpit Buildup.jpg
    100815 Cockpit Buildup.jpg
    94.8 KB · Views: 127
  • 100815 Cockpit.jpg
    100815 Cockpit.jpg
    105.3 KB · Views: 121

Users who are viewing this thread

Back