**** DONE: 1/32 F4U-1 - Aircraft Nose Art GB.

Ad: This forum contains affiliate links to products on Amazon and eBay. More information in Terms and rules

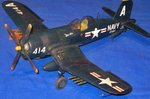
Very nicely done Cory, and fast work too.
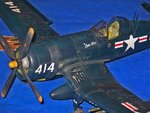
I agree with Bill re the photography.
The glass-topped table is not only absorbing the available light, it is also scattering and diffusing it, giving a 'flat' look to the photos. The highlights of the background, and the plant pot or whatever, are also a problem. The back light is affecting the overall look, and the pot is a distraction.
Try covering the table, and arranging a backdrop, using a neutral coloured piece of card, or smooth, plain sheet such as a tablecloth, again in a plain, neutral colour, such as light grey or light blue.
Like Bill, I'm not being critical, just hoping to help.
 
Very cool, the whole model looks so "smooth" a very nice turn out with the decals and weathering :)
 
Must add that I've seen much worse pictures on this site that would deserve some feedback. Cory's are pretty good in my opinion but there's good feedback here for those of us receptive to it.
 
Thanks guys! Ok, what is the general opinion on stencils? Corsairs like this normally had black lines on the top of the wings for walking areas, but those are pretty clearly not there from the photos. Due to obvious repaints, do you think many of the normal stencils would even still be there?

EDIT: Also, how would one go about doing oil and fuel stains such as these?

9300505560_2dc18db09d_b.jpg


9297719159_084468ab30_b.jpg
 
Last edited:
No comment on stencils I'm afraid. For oil stains, I use just that - black and brown artist's oil painted blended together and thinned to varying degrees depending on how heavy I want to go. The key is to not over do it on your first attempt, go lightly and built up in layers. For oil stains under the engine, I tend to go pretty heavy and I think you know that Corsairs go pretty dirty.

For the wispy stains you see on that model, use a small brush with thinned oils. Don't overload the brush but just get enough to make a thin line on paper. Then lightly brush the desired lines onto your model. I think many people make the mistake of making these stains too wide and too wet. When that's done, you can see darker edges and rounded, drippy looking ends which don't look right in the model scale.

Another thing I do is use a bit of black or dark brown artist pastels around the engine area to dirty it up a bit more after I run the oils into the panel lines and finish the streaks.
 
Last edited:
Cory I went to the local IPMS Sydney meeting last night. Here's a little something that was there!
 

Attachments

  • IPMS-NSW 8-2013 Cors-1.jpg
    IPMS-NSW 8-2013 Cors-1.jpg
    53.4 KB · Views: 76
  • IPMS-NSW 8-2013 Cors-2.jpg
    IPMS-NSW 8-2013 Cors-2.jpg
    62.5 KB · Views: 81
Too bad Bill, it's a great kit, unlike that F4U-4 you posted. It must be the Trumpeter one. The fact that I couldn't tell it was the Trumpeter kit means the modeller did a fantastic job.

Well, didn't have a chance today to set up and get outdoor photos so I just grabbed a few quick ones to keep things up to date. All that's really left are a couple fiddly bits, gear doors and an aerial (which I hate doing). I painted some oil stains, but the lighting is bad and I kept it pretty low key so it may not show up well in this set of photos.

DSC_0254_zps9de81e45.jpg


DSC_0251_zpsb4429b93.jpg


DSC_0253_zps907efa0d.jpg


Suddenly ridiculous blue! :lol:

DSC_0252_zps85ba0f61.jpg


DSC_0255_zps9dd734c4.jpg
 

Users who are viewing this thread

Back