**** DONE: 1/48 Arado Ar 196A-5 - Seaplanes / Floatplanes of WWII

Ad: This forum contains affiliate links to products on Amazon and eBay. More information in Terms and rules

Nice woek Mike....

Landcart.
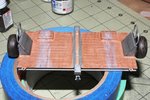
Should it be kinda Bleached out from in and out of the water and sitting in sun and weather? I wonder if it would have been left Bare wood when built? If you kinda dry brushed a light tan gray color over it, let the dark lines show as the growth rings would. Just sayin.
 
Thanks to all. Geo if I had thought ahead, I would have painted it RLM 72 then dry brushed with wood to simulate paint rub-off. But having started with WOOD I decided to do the next best thing and dry brushed with HELLBLAU to simulate float rub-off on the wood and dry brushed FLAT ALUMINUM on the floats to simulate complete Hellblau rub-off down to bare aluminum. The side steel panels were dry-brushed with RLM 73 once again to simulate float rub-off. Plus some MUD on the tires.
On the Arado, all parts installed. Exhaust staining, 20mm cannon stain, fuel stained, oil stained, prop chipped, leading edges wing/tail chipped, wing/pontoon walkways chipped, access panels chipped, and panel lines done. Installing canopies. Will do Future tomorrow
 

Attachments

  • IMG_1446.JPG
    IMG_1446.JPG
    79.9 KB · Views: 87
  • IMG_1447.JPG
    IMG_1447.JPG
    60.3 KB · Views: 93
  • IMG_1448.JPG
    IMG_1448.JPG
    73.4 KB · Views: 90
  • IMG_1449.JPG
    IMG_1449.JPG
    54 KB · Views: 81
  • IMG_1451.JPG
    IMG_1451.JPG
    64.3 KB · Views: 78
  • IMG_1452.JPG
    IMG_1452.JPG
    46.6 KB · Views: 82
  • IMG_1453.JPG
    IMG_1453.JPG
    53.9 KB · Views: 86
  • IMG_1454.JPG
    IMG_1454.JPG
    58.5 KB · Views: 90
  • IMG_1458.JPG
    IMG_1458.JPG
    65 KB · Views: 87
  • IMG_1461.JPG
    IMG_1461.JPG
    90.5 KB · Views: 87
Last edited:
Mike me old mate, that looks real good and I do like the trolley.

Can I also make a wee suggestion, where you have done the chipping marks on the aircraft areas like the propeller, tailplane and wing root, if you can, get a cotton bud and gently rub the area so that the chips soften a little, if it works right it should take away the hard edges.
 
Yeah, chipping.
Got a tip at IPMS today. Wet the acrylic finish color to soften, and chip off with a tooth pick.
But then you would have to have silver under the color coat..... scratch that idea.

Soin well Mike.
 
Nice work Mike, I like the trolley.
Another little tip regarding paint chipping - when bare metal shows, it's very rarely 'bright silver', unless paint has been knocked off violently, by a bullet strike, for example. Add a very small amount of matt white to the silver, which will give more of a silver-grey aluminium look. For prop blade wear, apply this sparingly and gently, in a dry-brush method, using the edge of the brush along the edge of the blade, with a stroking motion, feathering it where required. For 'foot wear' or other 'worn' areas, a soft pattern of very small, triangular areas, applied carefully then gently smudged with a finger tip or cotton bud when almost dry, works well. Very small, fine lines, some perhaps criss-crossing each other, can simulate scratches, and can be done with a fine brush or a silver pencil.
It'll look softer and much more realistic.
 
Terry, as always my most sincere thanks. I am using the prismacolor Metallic Silver pencil to do the chipping not paint. So I have no way to change/alter the color. Do you think I overdid the chipping? With my level of skill the pencil is easy, blending paints and good dry-brushing much more difficult.
I still have the Future to apply, then decals, then an overcoat with 50/50 Future/Flat Clear. Lastly I'm going to apply a very dilute over spray of DUST. That should soften the chipping effect and alter the color a bit? Was also considering a light dilute over spray of OFF WHITE on the pontoons to simulate salt. What do you think?
Vic many thanks to you as well, I will definitely try the cotton and see if I can soften the chipping a bit
 
Last edited:
No, the chipping is fine as it is Mike, and will soften and look even better once the clear coats and weathering coat are done. The 'off white' sounds good too.
 
As always Terry thanks, your advice is very much appreciated. I used Vic's idea with the cotton Q-tip and just a few wipes did indeed take the hard edges off the chipping and softened it.
 
Due to the bad influence of the Frumunderers I've begun to care about small details. SOOO... I removed the 1943 Packard headlights and installed the 20mm cannons. Also some close-up pics of the exhaust and oil stains
Model has been sprayed with Future and I am also decaling.
Note to Vic: Italerie decals are THICK. MicroSET was not enough to get them to conform. Having to hit them twice or so with MicroSOL
 

Attachments

  • IMG_1462.JPG
    IMG_1462.JPG
    106.7 KB · Views: 79
  • IMG_1463.JPG
    IMG_1463.JPG
    65.6 KB · Views: 76
  • IMG_1464.JPG
    IMG_1464.JPG
    103.4 KB · Views: 81
  • IMG_1465.JPG
    IMG_1465.JPG
    65.4 KB · Views: 79
  • IMG_1466.JPG
    IMG_1466.JPG
    90.2 KB · Views: 82
  • IMG_1467.JPG
    IMG_1467.JPG
    83.2 KB · Views: 82
  • IMG_1468.JPG
    IMG_1468.JPG
    89.9 KB · Views: 77
Very nice Mr. Wint. I bought me some of them fancy schmancy metal guns for my George,to be built in the not so distant future. Peer pressure is a cruel mistress.

Geo
 
About that 50/50 mixture of Future/Flat Clear Mike, if it's Tamiya Flat Base you're using for that, you could be asking for trouble as that will give you a very heavy white ghosting.
 
Great minds think alike Mike, pulled my headlights off last night, wanted to show them 20mm cannon.
b0227.gif


Like what you've done as well, it looks good and my thanks for the heads-up in the decals, I'll also make sure I've a nice shiny surface to pit them on.
 
The thick decals are nice in a sense. They're easy to move around but a PIA to get to settle in. That "7 R" was on a nice shiny Future coat but I had just put it on and had not hit it with Microsol yet. That's why you see that film. Those big underwing Malteese crosses are even worse to get to conform. More decaling today and soaking in Microsol. Need to do some work on those 20mm gun mounts as well. The holes where the "headlights" were mounted are a perfect fit for the 1mm (scale) cannons.
Note to Wurger: Those are Polish cannons!
 

Users who are viewing this thread

Back