**** DONE: 1/48 Bf 109G-4/R6 "Yellow 11" of 13.(Slow)/JG 52 Eastern Front GB

Ad: This forum contains affiliate links to products on Amazon and eBay. More information in Terms and rules

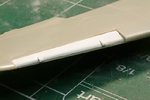
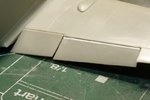
Thanks guys. Should get the wings glued on tonight - just need to be careful to get the seam exactly lined up since the back end of the upper wing half is now gone and is unsupported. I've installed some spacers and will shim those to get the exact line-up.

Ski-day at Lake Louise tomorrow then back at it Saturday so no pics for a couple of days.
 
Enjoy the weekend Andy, come back refreshed and ready for more...................Uh!!!!........OOB detailing.
 
Back at it after a great day of skiing yesterday. 20cm of fresh snow over an already near-record base. Best conditions I've seen in years.

Ok, off we go. To stick with the basic OOB concept (Obliteration Of Bits), I've now cranked the elevators and, in the spirit of leaving something alone, I've left the rudder as is.

110312 Elevators.jpg


The wings have now been glued on and the fit was very good. Minimal filling is anticipated although there's a bit of shaping and filling to be done underneath where the wing meets the fuselage - nothing dramatic. As can be seen in the below pic, some filling with plastic card has been done at the LE slats and the gap where the flap has rotated away from the wing. These areas have been roughly cut at the moment and will be tidied up before taking some detail shots. Also seen is some filling started at the engine cowl.

110312 Overall Wings On.jpg


Work has begun on fixing the LE slats. Seen below is one of them finished with the trailing edge filed and sanded to a sharp edge and the volume lost in the saw cut replace with a piece of card on the end shaped to resemble an airfoil.

110312 Slat Section.jpg


Below pic shows where I drilled out the cannon barrels in the gondolas.

110312 Cannons Drilled.jpg


Next batch of pics will likely be sanding, scribing and finishing off the wing details. Thanks for your continued interest.
 
Looks great Andy, nice steady hand for drilling the cannon. Needed that yesterday when using the Dremel on my many exhaust outlets just to give them a bit of feature.
 
Thanks everyone. At that stage now where progress will slow down with sanding and scribing being the main focus.

EDIT: Took these two shots before wrapping up for tonight showing final work on the wing leading edge where the slat will be installed and also the flap, both on the starboard wing. I'm not that concerned about the rough front edge in the slat area as this will be hidden once the slat is glued on. The little tabs will be filed down to suit the needed slat position. Close up of the flap shows that a bit of filling is still needed where the plastic card meets the flap but a bit of surface primer should cover this up.
 

Attachments

  • 110313 LE at Slat.jpg
    110313 LE at Slat.jpg
    54.1 KB · Views: 155
  • 110313 Flaps.jpg
    110313 Flaps.jpg
    61.8 KB · Views: 69
Last edited:
A bit of progress to show you. Most of the last few days has been sanding, and scribing - not done yet but in the meantime I did a bit of other stuff to releave the monotony.

First pic shows a bit of work I did to reduce the thickness of the flanges on the small cooling vents on the cowl. The one on the right has not been modified yet but the one on the left has had the flange thinned down with a round edged blade and the edges soften a bit with a few strokes of Tamiya liquid glue. Looks a bit more realistic I think.

110314 Cowl Scoops.jpg


The next pic shows the boundary layer duct I added to the upper rad louvers, a fairly simple but effective addition in my opinion. A coat of RLM 02 will need to go on these areas before I glue on the lower louvers as it will be difficulat to get at afterwards.

110315 Boundary Layer Louver.jpg


Thanks for stopping by.
 

Users who are viewing this thread

Back