**** DONE: 1/48 Hawker Typhoon Mk.1B 245 Sqn "Sharky" Commonwealth Group Build

Ad: This forum contains affiliate links to products on Amazon and eBay. More information in Terms and rules

I agree. The prop looks especially nice.

That was me also Andy and the rest looks top notch also Peter.I wish sometimes I had the patience and interest to research like you guys do.I just like to build with research possibily for the most common flaws are found.:thumbleft: Cheers
 
Thanks for the great words of encouragement guys - much appreciated. Heres this week update.

Pic 1
I made a seat cushion from plain card stock, and used a scribing tool to carve the check pattern for the padding. It was then painted in 'Khaki', with a wash of dark green to bring out the pattern.

Pic 2
I added the Eduard photo etch belts, and I also did some work on the panel. Sprayed matt black, I highlighted the instrument faces with white, painted the k-gass primer brass and added drops of gloss to replicate the instrument glass.

Pic 3
Okay - time to assemble the cockpit fully with the seat, panel and other parts. I gave the 'floor' a wash of 'dirt' black to bring out the detail.

Pic 4
Another view of the cockpit assembly

Pic 5
Fuselage halves. Did I get this right T? Black half way down and 'Aluminium below? The ali is hard to see against the light gray plastic in these shots - I blame the camera man!

More progress soon guys - thanks for looking.
 

Attachments

  • seat 006 - resized.jpg
    seat 006 - resized.jpg
    90.5 KB · Views: 177
  • seat 005  and panel- resized.jpg
    seat 005 and panel- resized.jpg
    46.7 KB · Views: 176
  • cockpit 003 - resized.jpg
    cockpit 003 - resized.jpg
    52.2 KB · Views: 181
  • cockpit 004 - resized.jpg
    cockpit 004 - resized.jpg
    41.1 KB · Views: 178
  • fuselage 003 - resized.jpg
    fuselage 003 - resized.jpg
    43.6 KB · Views: 182
Last edited:
Thanks Glenn - it worked out quite well I think.

Anyway, with the cockpit and radiator sorted it was time to assemble the fuselage half and wings.

Pic 1
Before I closed everything up I painted the inside of the radiator opening in front of the radiator the outside colour, in this case dark green, and everything to the rear in aluminium.

Pic 2
Everything went together well, apart from the gap created by the inserts. Heres the pic from post 18 earlier to illustrate.

152344.jpg


To deal with this I was a little concerned that if I just filled the gap with plastic card, it would be too wide for the windscreen and canopy, so I simply filed back the edge either side of the gap, feathering it out to each end of the fuselage. (ie removed the 'step') I then clamped them together for gluing, and the result was spot on.

Pic 3
Still those inserts are a pain. Will require a fair bit of sanding and filling as they are not on 'natural' panel lines. Should turn out okay in the end. I started using Mr Surfacer, but a little bit of CA or regular filler may have been the go.

Pic 4
The new tail planes from Ultracast went on very well with CA. A little smigeon of filler and they will be done too.

End of update. 8)

Cheers

Peter
 

Attachments

  • fuselage 006 - resized.jpg
    fuselage 006 - resized.jpg
    40.7 KB · Views: 175
  • fuselage 005 - resized.jpg
    fuselage 005 - resized.jpg
    39.5 KB · Views: 175
  • fuselage 008 - resized.jpg
    fuselage 008 - resized.jpg
    74.9 KB · Views: 179
  • fuselage 007 - resized.jpg
    fuselage 007 - resized.jpg
    28.7 KB · Views: 170
Nice work Peter. The cockpit is looking good. And yes, black on the upper walls, with first tubes Cockpit Green, and lower walls, and lower tubes 'Aluminium' painted.
 
You're doing a good job Peter and that seat engraving is great and very inventive. I've now tucked that idea away for future use.
 
Cheers Guys

Nearly there. Tonights update comin at ya! :D

Pic 1
Finished sanding and filing. Not that there was that much of it really. Better fit than the Hasegawa P-40 series. Main problem around the fuselage insert dealt with.

Pic 2
The leading edges of the wings had yellow identification stripes extending from the outside of the inside cannons to the wing tip. Make sense? I followed the profiles from Aviaology in this respect, although some had the stripes only from the outboard cannons.

Pic 3 and 4
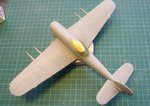
I masked off the yellow id leading edges with Tamiya tape and painted the whole Typhoon Medium Sea Grey using Model Master enamel.

Pic 5
I painted the top deck underneath the Bubble dark green. This I was not particular sure about I must admit. The Hasegawa instructions say 'interior green', but I don't think so. I'm inferring from the photos that by the time of June 1945 Sharkey had been resprayed and this area could either be dk green or black.

Pic 6
I have attached the front screen (after fitting the gun sight and painted the front area black), permanently. The bubble I have attached with PVA, so I can position it open later if I want to.

Pic 7
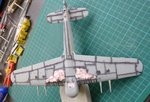
I did some pre-shading on the panel lines underneath.

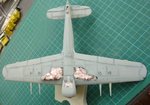
Pic 8
This how it turned out after another coat of MSG.

End of update. 8)

Cheers

Peter
 

Attachments

  • fuselage 009 - resized.jpg
    fuselage 009 - resized.jpg
    48.9 KB · Views: 128
  • paint 002 - resized.jpg
    paint 002 - resized.jpg
    55.9 KB · Views: 121
  • paint 003 - resized.jpg
    paint 003 - resized.jpg
    59 KB · Views: 125
  • paint 004 - resized.jpg
    paint 004 - resized.jpg
    60.7 KB · Views: 119
  • paint 008 - resized.jpg
    paint 008 - resized.jpg
    83.4 KB · Views: 121
  • paint 007 - resized.jpg
    paint 007 - resized.jpg
    75.4 KB · Views: 122
  • paint 006 - resized.jpg
    paint 006 - resized.jpg
    54 KB · Views: 118
  • paint 009 - resized.jpg
    paint 009 - resized.jpg
    79.6 KB · Views: 119
Last edited:

Users who are viewing this thread

Back