**** DONE: 1/48 Hawker Typhoon Mk.1B 245 Sqn "Sharky" Commonwealth Group Build

Ad: This forum contains affiliate links to products on Amazon and eBay. More information in Terms and rules

Update for this week, and thanks for the responses and encouragement. 8)

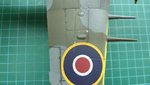
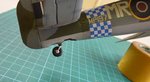
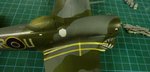
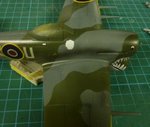
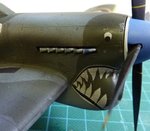
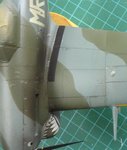
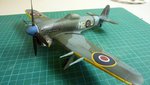
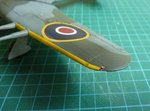
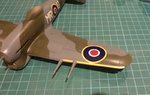
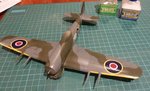
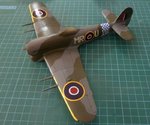
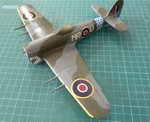
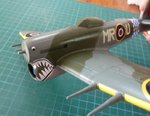
Two coats of Humbrol Clear enamel, followed by the Aviaology decals. I must say that the Aviaology decals are some of the best I have worked with. They went down very nicely, and without any silvering.

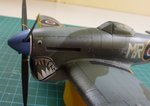
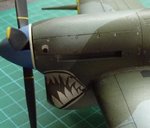
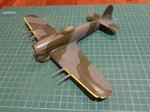
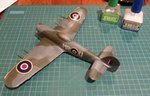
The sharkmouth was a bit tricky to get right, but turned out just perfect. There is an option to have a red background to the mouth, but I preferred depicting this aircraft with the mouth painted over the camouflage (the camo showing between the teeth).

Cheers

Peter
 

Attachments

  • decals 008 - resized.jpg
    decals 008 - resized.jpg
    77 KB · Views: 168
  • decals 001 - resized.jpg
    decals 001 - resized.jpg
    69.7 KB · Views: 193
  • decals 002 - resized.jpg
    decals 002 - resized.jpg
    64.3 KB · Views: 171
  • decals 003 - resized.jpg
    decals 003 - resized.jpg
    72.7 KB · Views: 164
  • decals 004 - resized.jpg
    decals 004 - resized.jpg
    78.7 KB · Views: 174
  • decals 006 - resized.jpg
    decals 006 - resized.jpg
    84.5 KB · Views: 178
  • decals 007 - resized.jpg
    decals 007 - resized.jpg
    61.5 KB · Views: 191
Last edited:
Arrrrrrrh......................... Hoping everyone thinks mine looks nearly as good.


well done.
 
Okay, thanks guys.

I'm just about done as at now, so I'll post another update. Hopefully I'll get the finished pics done very soon.

Pic 1
After completing the decals, I gave Sharky a once over with gloss enamel to seal the decals. Next I used an airbrush to put in the exhaust stains along the cowl and fuselage side, using the photos as a guide. The exhaust seems dark, probably black, which I guess is a sign the carb was running too rich.:)

Pic 2
Next I painted in the walkways. Not by choice mind you. I used at first the Hasegawa decals but they didn't react to the setter and softner too well. I tried another set from the Stash, and they too went bung. So I gave up on the decals and masked up for paint.

Pic 3
This is how the walkways turned out. Should have done this to start with. I did a bit of scuffing and such as you can see.

Pic 4
I added some wear along the ammo bay doors with silver. I also gave all the panel lines a go with a water colour wash to highlight those.

Pic 5
Bit of an overview of work thus far - getting close. I faded back the spinner with white to match the tail checks and add wear. I went over the plane with a mist of black smoke just to makes things look a bit dirty and 'used'. When I was happy with the details I gave it a once over with 'Future' to matt everything.

Pic 6
Close up of the exhaust. I was trying something new here, with a coat of 'steel' and a tinge of blue at the 'hotter' areas. I reckon it turned out nicely, so might do it this way again.

Pic 7
Details of the cowl. I added paint chipping and the water colour wash highlighted the panel lines.

Pic 8
Another view of the cowl. Its there because I couldn't work out how to delete in the new forum version!

Pic 9
Tail wheel added. Gave it a black wash also. My one big stuff up with this model was not allowing enough room for the codes and the check band. I would have liked to replace them but time is against me, so there it is.:oops: :lol:

Pic 10
Wing tip lights added. Drilled a hole in the transparency and them filled the hole with either red or green depending on the side.

Well that's it so far. I have a few of the smaller details to attend too, plus sort out the rockets. I'll make one more update before finishing.

Thanks for looking.

Cheers

Peter
 

Attachments

  • wing details 001 - resized.jpg
    wing details 001 - resized.jpg
    49.7 KB · Views: 180
  • tail wheel 001 - resized.jpg
    tail wheel 001 - resized.jpg
    51.6 KB · Views: 182
  • cowl details 002 - resized.jpg
    cowl details 002 - resized.jpg
    50.6 KB · Views: 178
  • cowl details 001 - resized.jpg
    cowl details 001 - resized.jpg
    68.8 KB · Views: 165
  • walkways 001 - resized.jpg
    walkways 001 - resized.jpg
    45.8 KB · Views: 183
  • exhaust 003 - resized.jpg
    exhaust 003 - resized.jpg
    68.1 KB · Views: 164
  • exhaust 002 - resized.jpg
    exhaust 002 - resized.jpg
    70.1 KB · Views: 243
  • walkways 002 - resized.jpg
    walkways 002 - resized.jpg
    90.7 KB · Views: 193
  • overview 001 - resized.jpg
    overview 001 - resized.jpg
    61.4 KB · Views: 161
  • wing tip light 001- resized.jpg
    wing tip light 001- resized.jpg
    58 KB · Views: 185
Superb work Peter. It's a beauty. I need to add a Tiffie to my growing collection now that you've inspired me.
 

Users who are viewing this thread

Back