**** DONE: 1/48 P-47D Razorback - Aircraft in Foreign Service WWII

Ad: This forum contains affiliate links to products on Amazon and eBay. More information in Terms and rules

fubar57

General
32,286
18,514
Nov 22, 2009
The Jungles of Canada
User Name - Fubar57
Name - George
Category - Intermediate
Kit - Revell P-47D Razorback
Extras - LPS Decals "British Thunderbolts"

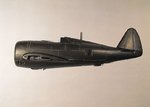
As with my first GB#20 build, this will be a 73OTU kite in Razorback form. Aircraft #18 has been done to death in photo and model form so I'll be doing #36. Hopefully I'll be able to find a photo of the actual aircraft. I'll start once I've cleaned up the "crap"(as SWMBO calls it) from my last build.

001.JPG

002.JPG


Geo
 
Last edited by a moderator:
Another Jug, very cool George. It that's a re-boxing of the old Monogram it's a decent kit other than the raised panel lines
Yeppers, raised panel lines but not gonna worry about them. For weathering on this model, I'm going to heavily rub pastels onto the panel lines and then lightly hit it with a flat finish spray bomb. Thanks for the sticky Wojtek.

Geo
 
Should have posted these before. Date on the sprues, 1967. Lots of flash and ejector pin marks. The cockpit is a one piece tub. Have never liked this method as it really screws up detail painting. No foot pedals, just bars. With the one piece canopy, I'm not going to worry about the cockpit too much. The wings are once again joined to the fuselage ala the Academy kit but a trial fit seems to show a better fit. And now the kicker....Revell has molded the guns in the wrong position, parallel with the wing and not the ground as shown in the diagram. I've got two options, 1) I have some inserts left over from the Academy kit. Cut out the kits pieces and blend in the Academy parts, 2) cut the guns off, get some hypo needles, drill some holes and insert the needles into the leading edge. Anyone know the diameter of needle I would be looking for?

006.JPG

008.JPG
009.JPG

Capture.JPG


Geo
 
Still looking. Even though not much will be seen with the one piece canopy, I added rudder pedals. Also seen are the gun inserts, trying to build up the courage to make the first cut.
002.JPG

Some ejector marks, before and after...
003.JPG
004.JPG


Geo
 
Good one Geo, and coincidentally, I've just been messing about with the same old kit, and have built a few before. I decided to engrave the panel lines and, surprisingly, this didn't take very long at all, just following the raised lines, and then slicing off the detritus.
I'm surprised at the one-piece canopy though, as my kit, and all those before, have a rather nice, clear, two-part canopy. The detail looks quite basic now, but back when the kit was first released, and even in the late 1980's, it was considered to be good.
Diameter for the hypo tubes would be somewhere in the region of 1mm, maybe 1.25mm - basically, if they look right, they are right! The P-47 barrel jackets, as you probably know, where smooth, fairly heavy-weight items, so a bit larger in diameter than the perforated version. I'll probably just stick with the kit parts, as the model will be part of a small diorama, and hopefully they won't be too noticeable.
 
Here's a quick shot of one fuselage side, and note the older, harder plastic of this example. I just used a scalpel blade, freehand, along the existing panel lines, which also removed most of the raised line. The rest was just shaved off, then the engraved line repeated, in reverse, using the back of the blade, which removed the loose plastic.
The dark green plastic in the kit scratched easily, so any marks were later polished out, but you shouldn't have mush trouble with the more forgiving, 'modern' plastic of your kit.
Engraving the wings was much easier, being 'flat', as there was no curve to compensate for.
As for the cockpit, you'd be surprised how the moulded detail, although fairly 'low relief', pops out when painted and dry brushed. As my example will have a modified pilot figure in place as part of the diorama 'scene', it actually looks acceptable even with the canopy open.
 

Attachments

  • P-47 Build 009.jpg
    P-47 Build 009.jpg
    63.1 KB · Views: 203
Ah my old friend, you've come to call again. This is also duplicated inside a wing half.

001.JPG


Still humming and hawing about the panel lines. My error Terry, the canopy is two piece, I just can't pose it open. Waiting for the wings and interior to dry and I can button this sucker up.

Geo
 
I built this kit about 2 years ago as a re-introduction exercise. It was a newer molding (maybe 3 years old). Overall, it was not a bad kit considering the price. I will dig it out and snap a pic or two.
George, I am looking forward to watching this build. I just love the Jug.
 
The moulds are showing their age, unless China are just 'banging them through' !
When you say you can't pose the canopy open, do you mean it can't be done, or you don't want it to be open?
The canopy fits neatly over the spine in the open position, and has the correct curve at the line of the runners, making it look very realistic. For the closed position, the rear of the canopy sits in the triangular recesses on each side of the fuselage, behind the cockpit, giving a positive fit in the closed position.
As I can't go any further with the Fennec at the moment, I've started on the P-47, so I'll post a thread in the 'Start to Finish' section later. It might be old, have raised detail and fixed control surfaces, but it's still a good kit, and looks the part when built. I think I might be getting a few more of these in time, and at a third of the price of Tamiya, and a quarter the price of Hasegawa, they're worth it.
 
George, I've just checked the guns on my kit. Although they're not exactly horizontal, probably a limitation of the tooling processes of the time, neither do they follow the line of the wing, being slightly offset and, in my opinion, acceptable as is. However, if you do decide to replace them, then the metal nozzles on the Revell 'Contacta Professional' liquid cement are spot on for diameter, and, being bright metal, are the right colour and texture too!
 
Good enough for me Terry. As with the Academy P-47 there are noticeable gaps in the wheelwell/fuselage join so I once again plastic strip was added.There was also a slight outward bow in the wing, where it meets the fuselage causing the wing to pivot, so this was sanded flush. Engine added early in the build.

002.JPG
003.JPG


Geo
 
Good stuff Geo. I've mentioned in my P-47 thread about the wing joint, particularly in the wheel well, and hope to have this sorted, and pics posted, by tomorrow night (Saturday) at the latest.
 
I'll be doing it with the wings already fitted - easier to fill the joint, than have to fit a wing around a filler strip. I noticed on my kit, that the joint on the starboard wing is much better than that on the port wing, with a correspondingly bigger gap in the port wheel well, although nothing major.
 

Users who are viewing this thread

Back