Very nicely done John!
Navigation
Install the app
How to install the app on iOS
Follow along with the video below to see how to install our site as a web app on your home screen.
Note: This feature may not be available in some browsers.
More options
You are using an out of date browser. It may not display this or other websites correctly.
You should upgrade or use an alternative browser.
You should upgrade or use an alternative browser.
**** DONE: 1/48 Spitfire IXc - Defense of Britain/Atlantic.
Ad: This forum contains affiliate links to products on Amazon and eBay. More information in Terms and rules
More options
Who Replied?Lovely work so far!
- Thread starter
- #103
JKim
Senior Master Sergeant
Thanks all of the comments! After a brief hiatus (fishing commitments ya know!), I am back in the workshop and inching forward with this Spitfire IXc. First off... the two forward cowlings, upper and lower have been carefully puttied, sanded and primed.

The wings were glued together and left to dry for a few days.

After drying, the wing seams were attended to. No drama here as the Eduard fit has been universally excellent throughout this build. Special attention was paid to the seams on the cannon fairings. I tried drilling out the machine gun ports but wasn't happy with the result so I decided to putty them up and leave them closed.

The wingtips were attached and again the fit was superb. No filler here... probably don't even need to sand!


The landing gear has been assembled and painted. I added a small piece of wiring for the brake line.

The prop was painted up. I used the hairspray method to achieve some very light chipping on the edges of the blades. I touched up the blades by streaking them laterally with heavily thinned grey.

The spinner was painted Sky and weathered using a dark pastel wash.

That's it for now but I reckon I'll be doing more work on her the next couple of days. So I'll be back soon!
The wings were glued together and left to dry for a few days.
After drying, the wing seams were attended to. No drama here as the Eduard fit has been universally excellent throughout this build. Special attention was paid to the seams on the cannon fairings. I tried drilling out the machine gun ports but wasn't happy with the result so I decided to putty them up and leave them closed.
The wingtips were attached and again the fit was superb. No filler here... probably don't even need to sand!
The landing gear has been assembled and painted. I added a small piece of wiring for the brake line.
The prop was painted up. I used the hairspray method to achieve some very light chipping on the edges of the blades. I touched up the blades by streaking them laterally with heavily thinned grey.
The spinner was painted Sky and weathered using a dark pastel wash.
That's it for now but I reckon I'll be doing more work on her the next couple of days. So I'll be back soon!
Looking good so far!
Airframes
Benevolens Magister
Nice work there John.
Just a small point concerning the prop blades - they were laminated wooden 'Jablo' type blades on the MkIX, with a thin, black rubber membrane to prevent moisture ingress, and a narrow brass strip down the leading edge, also painted black, so no chipping.
Apart from slight fading, the black membrane on the blades didn't normally show streaking, remaining plain due to the rubber, although if the aircraft taxied through a muddy puddle, for example, then there might be water staining diagonally across the blades, only just visible close up.
Crimea_River
Marshal
Great work John. Based on this pic, I'd be OK with a bit of chipping but, as Terry says, it would be limited to the metal edge. Source: Spitfire: The Canadians by Robert Bracken.

Doin' good John.
Airframes
Benevolens Magister
Yes, I'd agree with Andy.
- Thread starter
- #110
JKim
Senior Master Sergeant
Thanks for the comments guys! Upon reading Terry's comments about the prop blade chipping, I debated whether or not to remove the chipping since it was extremely subtle. It was easy enough to correct so I did it and then came back and read Andy's comment/picture. I kept the streaks because the decals have already been applied and I didn't want to muss it up any further.

Working on some odds and ends. MH712 was documented with bombs under the wings but in order to stay within the spirit of this GB, I may leave them off to show the plane as it would've looked in the role of a defender. But... I wanted to mess around with the bombs anyway cuz I like ordinance. I shaved down the circular fins to a more in-scale edge...

The downstream edge of the radiator flaps were similarly shaved down. The fit of the radiator assemblies is so good that I have the option of leaving them off until painting is finished.

The light on bottom of the plane was next to receive attention. I finished the light enclosure in gloss black and Alclad Chrome. I pinged the original clear part into oblivion but luckily, my hole punch set had an appropriately sized circular punch to fashion a new one out of clear acetate, which was glued in place using White Elmer's glue. I used Micro Mask to mask off the clear circular glass.

The sprue attachment for the clear windscreen encroached into the top window pane (bad design by Eduard). Since the external rear view mirror covers this area, I cleaned it up a bit but didn't have to achieve perfection.


The canopy masks were masked off using the supplied masks. My kit was missing its masks but an email to Eduard prompted a quick replacement (great CS by Eduard).


Some major assembly was next. First the wings were attached onto the fuselage. Fit was very tight.

The tail planes and rudder were added. As always, the fit was very good.


Starting to look like a Spitfire now! I really like the elegant lines of this aircraft!


Some very minor putty work was required at the bottom rear wing to fuselage joint and at the wing tips. Since the seams occur at existing panel lines, I used Milliput White putty wiped down with a wet paper towel to fill the seams but leave the joint.


I will be showing MH712 with the canopy and cockpit door open. The door comes with a little photoetched fiddliness. These little pieces are hardly bigger than the dust that's on my bending tool.

These bits are glued onto the door.

And then a thin PE piece is snaked through the bits to form the door locking mechanism. The handle is prepainted but will be covered in new paint and will have to be repainted.

Working on some odds and ends. MH712 was documented with bombs under the wings but in order to stay within the spirit of this GB, I may leave them off to show the plane as it would've looked in the role of a defender. But... I wanted to mess around with the bombs anyway cuz I like ordinance. I shaved down the circular fins to a more in-scale edge...
The downstream edge of the radiator flaps were similarly shaved down. The fit of the radiator assemblies is so good that I have the option of leaving them off until painting is finished.
The light on bottom of the plane was next to receive attention. I finished the light enclosure in gloss black and Alclad Chrome. I pinged the original clear part into oblivion but luckily, my hole punch set had an appropriately sized circular punch to fashion a new one out of clear acetate, which was glued in place using White Elmer's glue. I used Micro Mask to mask off the clear circular glass.
The sprue attachment for the clear windscreen encroached into the top window pane (bad design by Eduard). Since the external rear view mirror covers this area, I cleaned it up a bit but didn't have to achieve perfection.
The canopy masks were masked off using the supplied masks. My kit was missing its masks but an email to Eduard prompted a quick replacement (great CS by Eduard).
Some major assembly was next. First the wings were attached onto the fuselage. Fit was very tight.
The tail planes and rudder were added. As always, the fit was very good.
Starting to look like a Spitfire now! I really like the elegant lines of this aircraft!
Some very minor putty work was required at the bottom rear wing to fuselage joint and at the wing tips. Since the seams occur at existing panel lines, I used Milliput White putty wiped down with a wet paper towel to fill the seams but leave the joint.
I will be showing MH712 with the canopy and cockpit door open. The door comes with a little photoetched fiddliness. These little pieces are hardly bigger than the dust that's on my bending tool.
These bits are glued onto the door.
And then a thin PE piece is snaked through the bits to form the door locking mechanism. The handle is prepainted but will be covered in new paint and will have to be repainted.
Airframes
Benevolens Magister
Very nice work John, and the prop is fine as it is. I'll admit, I hadn't looked closely at the chipping you had done, so hadn't realised it was so subtle.
Those little brackets for the door are tiny ! I'd have no chance working with them, with the state of my bent hands !!
Just two minor observations :- The I.D. lamp under the center section was coloured amber, and the handle on the door locking bar was normally just the plain Cockpit-Grey Green - the yellow/black stripes were a post-war colour, often seen on present-day restorations.
Also, when you get to it, the crow bar on the door was bare steel, sometimes painted in the interior colour, not red as often shown on models. Again, this was one of the post-war colour codes, denoting emergency equiment, used on emergency tools, such as crow bars and axes, fire extinguishers etc etc. The later were not red during WW2, but either brass or steel.
- Thread starter
- #112
JKim
Senior Master Sergeant
Thanks for the great comments Terry... invaluable! Ok on the amber landing light. Although I painted it Chrome, I have Clear Yellow paint that I can shoot the clear covering with.
The comments on the door are great too. I had already decided NOT to paint the crowbar red as the picture of MH712 seems to be in line with your observations. And I'm glad I don't have to replicate the stripes on the handle once I paint that door!
The comments on the door are great too. I had already decided NOT to paint the crowbar red as the picture of MH712 seems to be in line with your observations. And I'm glad I don't have to replicate the stripes on the handle once I paint that door!
Lovely work so far!
- Thread starter
- #116
JKim
Senior Master Sergeant
Continuing work on the IXc... The covers on the non-used cannon fairings were popped into place.

Eduard provides two doors for the kit, one in the closed position and one in the open position. I wedged the closed position door in place without glue to help mask the cockpit. After painting, it will be popped out and replaced with the open door.

The lower cowling was glued into place.

Another view of the exhaust stacks, this time with the better camera and lighting.


Based on the picture of the bombs on MH712, I dappled the front half of the bombs with Mr Surfacer 500 to give it a rougher texture.

I painted the back half of the bombs black and the front half dark green.

The bombs were weathered by dry-brushing various shades of lighter and darker green and then given a flat coat.

The open door was painted and weathered. It's kind of plain looking and I may paint the crowbar a different shade of green just to set it off from the background a little.

The pictures of MH712 show the older style non-spoked wheel hubs. The kit includes these as photo-etched pieces that are simply placed over the 3- and 5- spoked wheels. Not the best way to do it but beggars can't be choosers.

Based on the clean pic of the plain wheel cover that Peter posted in his MkI build, I decided to drill out the centers of the photo-etched covers to let the center portion of the molded hubs to show through. I thought I botched it when I couldn't secure the small covers under the drill bit. Luckily, the centers were decently circular and I was abled to pound out the bends and kinks.

Here's what it looks like with the covers attached to the wheels.

The canopy frames were painted in interior green and then glued into place using white glue. This will help simplify the cockpit masking and protect some of the delicate cockpit details like the gun sight.

The sliding middle section has some PE details that were glued first and then carefully masked and painted.

Uh-oh... a sharp point on the trailing edge of the wing tip has been broken off. I'll have to do some repair work.

Eduard provides two doors for the kit, one in the closed position and one in the open position. I wedged the closed position door in place without glue to help mask the cockpit. After painting, it will be popped out and replaced with the open door.
The lower cowling was glued into place.
Another view of the exhaust stacks, this time with the better camera and lighting.
Based on the picture of the bombs on MH712, I dappled the front half of the bombs with Mr Surfacer 500 to give it a rougher texture.
I painted the back half of the bombs black and the front half dark green.
The bombs were weathered by dry-brushing various shades of lighter and darker green and then given a flat coat.
The open door was painted and weathered. It's kind of plain looking and I may paint the crowbar a different shade of green just to set it off from the background a little.
The pictures of MH712 show the older style non-spoked wheel hubs. The kit includes these as photo-etched pieces that are simply placed over the 3- and 5- spoked wheels. Not the best way to do it but beggars can't be choosers.
Based on the clean pic of the plain wheel cover that Peter posted in his MkI build, I decided to drill out the centers of the photo-etched covers to let the center portion of the molded hubs to show through. I thought I botched it when I couldn't secure the small covers under the drill bit. Luckily, the centers were decently circular and I was abled to pound out the bends and kinks.
Here's what it looks like with the covers attached to the wheels.
The canopy frames were painted in interior green and then glued into place using white glue. This will help simplify the cockpit masking and protect some of the delicate cockpit details like the gun sight.
The sliding middle section has some PE details that were glued first and then carefully masked and painted.
Uh-oh... a sharp point on the trailing edge of the wing tip has been broken off. I'll have to do some repair work.
Crimea_River
Marshal
Beauty John.
Very nice John.
Airframes
Benevolens Magister
Nice work John, it's going to be a beauty.
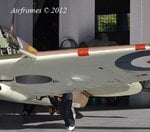
I noticed you filled the drilled-out mg ports. With intact fabric patches in place, there was often a depression, an impression of the port, seen as a 'dimple' in the patch.
Here's an example on a Mk.V at Duxford
I noticed you filled the drilled-out mg ports. With intact fabric patches in place, there was often a depression, an impression of the port, seen as a 'dimple' in the patch.
Here's an example on a Mk.V at Duxford
Attachments
Users who are viewing this thread
Total: 1 (members: 0, guests: 1)