great job Vic, like how you've achieved the slightly lived in look !
Navigation
Install the app
How to install the app on iOS
Follow along with the video below to see how to install our site as a web app on your home screen.
Note: This feature may not be available in some browsers.
More options
You are using an out of date browser. It may not display this or other websites correctly.
You should upgrade or use an alternative browser.
You should upgrade or use an alternative browser.
**** DONE: 1/48 Spitfire Mk.II – 266 (Rhodesia) Sqn, RAF Wittering. BofB Group Build
- Thread starter Vic Balshaw
- Start date
Ad: This forum contains affiliate links to products on Amazon and eBay. More information in Terms and rules
More options
Who Replied?ozhawk40
Master Sergeant
Looks a treat Vic - a great re-birth!
Looks a treat Vic - a great re-birth!
have to go there myself
Airframes
Benevolens Magister
Looks bl**dy marvellous Vic !
Two things though, if it's not too late. The starboard wing should have an 'indentation' of Dark Earth in the leading edge portion of the larger, central, Dark Green area. Also, although a few Squadron Leaders, and some Flight Commanders, had their spinners painted in a quick recognition colour, such as white, blue or red, they were a standard black on all other aircraft. Of course, if your reference for this aircraft shows the light coloured spinner (Sky?) then fine, but the Sky spinner wasn't introduced overall until November 27th 1940, along with the Sky tail band etc.
Two things though, if it's not too late. The starboard wing should have an 'indentation' of Dark Earth in the leading edge portion of the larger, central, Dark Green area. Also, although a few Squadron Leaders, and some Flight Commanders, had their spinners painted in a quick recognition colour, such as white, blue or red, they were a standard black on all other aircraft. Of course, if your reference for this aircraft shows the light coloured spinner (Sky?) then fine, but the Sky spinner wasn't introduced overall until November 27th 1940, along with the Sky tail band etc.
Crimea_River
Marshal
Looks beauty Vic.
- Thread starter
- #86
Vic Balshaw
Major General
Thank you gentlemen, as always, much appreciated and Terry, OH BOY what would I do without you!!!!!!!!!!!!!.................................
It's not been a good day, first up I had a large Pyrex bowl explode on me and I do mean explode....
 ........I was about to make some Salmon Patties and took the bowl out of the drawer to use for mixing and suddenly I was just holding a shard of glass in my hand, it exploded into a million pieces spreading all over the kitchen, the lounge room carpet, the main computer station
 all over the drawer I was taking it from and even under the door into the hall. Then while making the patties, I'd taken an egg from the shelf of the fridge but for some reason it would crack open. Taking a knife to it I found that it had been hard boiled
 it seems that Hilary had done this a couple of days ago intending to make a sandwich, then changed her mind.
Then I logged on and found your 'if it's not too late' message. OH BOY, I'd decaled the model, it's just not fair.
 But, I rise to the challenge and have corrected the errors and my thanks to you for pointing them out
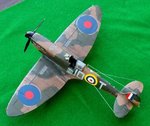
 Having done this and re-decaled where needed I tackled the weathering, particularly as it is my intention to have this machine look very battle weary. This done I started on the final refinements and added the IFF aerials and the radio aerial, this done the undercarriage went on and I left the model to set. Returning later I found the radio aerial wire has snapped
 must have been a kink in the fine wire I'm using and on putting the model onto its legs, it promptly collapsed. At that stage, the sun was almost over the yardarm, so I departed the hanger and cracked open a bottle of wine.

Maybe more updates with photos tomorrow after I've been out bargain hunting for reference books.
It's not been a good day, first up I had a large Pyrex bowl explode on me and I do mean explode....
Then I logged on and found your 'if it's not too late' message. OH BOY, I'd decaled the model, it's just not fair.
Maybe more updates with photos tomorrow after I've been out bargain hunting for reference books.
Last edited:
Busy day then Vic?...
Good job so far my friend!
Good job so far my friend!
Airframes
Benevolens Magister
Not a lot happening then !
I had a Pyrex dish explode on me once, when it was full, just out of the oven ! Got some nasty burns from that one!
Good to hear you've corrected the bits mate, look forward to the next pics.
I had a Pyrex dish explode on me once, when it was full, just out of the oven ! Got some nasty burns from that one!
Good to hear you've corrected the bits mate, look forward to the next pics.
- Thread starter
- #89
Vic Balshaw
Major General
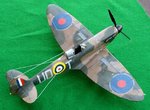
Ok folks, Spit's almost done (a few pics below) but I'm not liking all that decal flash, with it being an oldish kit the provided decals left a lot to be desired but I had no alternative and had to use most of them. So all you good guys out there, what can I do?............................
Attachments
Got any decal setting solution Vic, ....or can you get some?
- Thread starter
- #91
Vic Balshaw
Major General
Yes I have, one to set the decals and one to soften the decals for removal or contouring. I used the setting solution to position the decals. I should add that the decals were somewhat yellowed with age.
Airframes
Benevolens Magister
Wayne is probably going to suggest pricking the decals, and putting some solution under them, which normally works, given they haven't had a clear coat. However, with really old decals, particularly the Revell type which tend to be fairly thick and 'hard', this might not work fully. All I can suggest then is to paint around them with a fine-pointed brush, then gloss coat, followed by the matt clear coat to blend them in.
Crimea_River
Marshal
Sounds like you had a tough day Vic. I like the Spit though and hope you can get past the silvering. Good chance that the decal solution helps.
Wayne is probably going to suggest pricking the decals, and putting some solution under them, which normally works, given they haven't had a clear coat. However, with really old decals, particularly the Revell type which tend to be fairly thick and 'hard', this might not work fully. All I can suggest then is to paint around them with a fine-pointed brush, then gloss coat, followed by the matt clear coat to blend them in.
Yes was going to suggest that on a portion of the decal to see if it would do the job....should to a certain degree.....the painting is or was Plan B...!
- Thread starter
- #95
Vic Balshaw
Major General
Sounds like you had a tough day Vic. I like the Spit though and hope you can get past the silvering. Good chance that the decal solution helps.
Thanks Andy, at least it's all together now, excluding the decals.
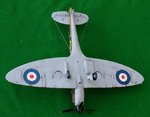
Thanks also Terry, you are most probably correct with your assumption and thanks to you as well Wayne for taking an interest. As it so happens I've taken a completely different track and having riffled through the spare decal box, I've come up with replacement roundels and have spent most of this evening making up the template for a mass print run of 'aircraft instruction stencils' decals. Thanks to Terry and the detailed plans he sent me, I've a host of other detail that can be added to this machine, which because of my laziness would not have been done had the kit decals worked okay. I have clear sheets of decal paper and need to print some off for the Roc. So all the crappy decals have been removed from Spit and will hopefully be replaced tomorrow if the mood takes me.
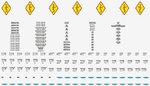
These are the decals planed with a few extra for another time. Terry, can you confirm if the Spit Mk II had a 'Rotol' propeller, I spent an age making that logo up.....................
Attachments
Last edited:
Nice work on the decals Vic!
- Thread starter
- #97
Vic Balshaw
Major General
Nice work on the decals Vic!
Thanks mate, I hope they work as last time I tried it, they printed okay, but damned if I could get them to sit properly, as they dried, so they curled.
Airframes
Benevolens Magister
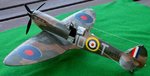
Nice work mate! I like the Rotol badges particularly - last time I did a 1/48th scale Spit, I had to hand-paint each one!
Yes, the MkII had a Rotol prop as standard. As with most things, there might have been exceptions, but general production was with the Rotol.
Yes, the MkII had a Rotol prop as standard. As with most things, there might have been exceptions, but general production was with the Rotol.
Crimea_River
Marshal
Great work on the decals Vic!
Peebs
Senior Airman
G'day Vic,
My home printed decals for the stuka curled a little as they dried, i just applied more setting/softening solution and gently pressed them back down.... worked fine
cheers
pete
My home printed decals for the stuka curled a little as they dried, i just applied more setting/softening solution and gently pressed them back down.... worked fine
cheers
pete
Last edited:
Users who are viewing this thread
Total: 1 (members: 0, guests: 1)