**** DONE: 1/72 Lockheed P-38H Lightning - Heavy Hitters II GB

Ad: This forum contains affiliate links to products on Amazon and eBay. More information in Terms and rules

Its very late guys, but I will post my photos as promised. I have made a lot of progress today, but I need to sleep now. .

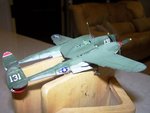
Let me know your opinions....thats the only way i will learn. I'm pretty happy with the colour, less happy with the edge blurring, but overall I think it looks pretty good.

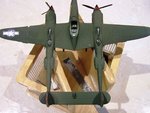
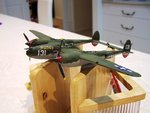
I have a question at this point. Getting back to whether the P-38H could, or di carry ordinance outboard of the engine nacelles, I just havent been able to determine it one way or another. According to this site, P-38 Lightning - History, Photos, and Specs of Lockheed's Great Fighter , the H subtype carried the same bombloads as the later versions that certainly did carry the HVAR (and other stores outboard of the engines. Are there any P-38 officianados that might know conlcusively one or another about this isue. Kinda defeats the idea of the P-38 being a heavy hitter if my version is not kitted up to bomb something.....
 
Thanks Geo, much appreciated


Photos on progress as promised
 

Attachments

  • 102_2539.jpg
    102_2539.jpg
    60.5 KB · Views: 91
  • 102_2540.jpg
    102_2540.jpg
    67.5 KB · Views: 96
  • 102_2541.jpg
    102_2541.jpg
    63.3 KB · Views: 78
A good job. However you should have applied a clear gloss coat at least at these areas where decal markings had to be put on. The silvering effect is noticable I'm afraid.
 
First book states "Beginning with the P-38F-1-LO, all Lightnings had two pylons under the center wing section...." Hopefully find a photo to seal the deal shortly.

Geo

EDIT: From Pilot Notes P-38H Still looking for the photo.

Capture2.JPG
 
Last edited:
A good job. However you should have applied a clear gloss coat at least at these areas where decal markings had to be put on. The silvering effect is noticable I'm afraid.


oh dear. I was going to apply the sealing coat after the decals....should i have done it before? The silvering i hope wont be as obvious when im not using flash photography
 
Lockheed P-38F-1-LO "Lightning" #41-7525

P38-TUNISIA.jpg


P-38H-1-LO "Porky II" #42-66506

P-38-PorkyII-3mile.jpg


P-38H "Pitter Pat" #42-67058

CY-S%20Pitter%20Pat%20P-38H%2042-67058.jpg


P-38J "The Black Hawk IV"

CY-J%20The%20Black%20Hawk%20IV%20P-38J.jpg


Lockheed P-38G-1-LO

Lockheed_P-38G-1-LO_Lightning_LOC_fsa.8d22579.jpg

Lockheed_P-38G-1-LO_Lightning_LOC_fsa.8d22581.jpg

Lockheed_P-38G-1-LO_Lightning_LOC_fsa.8d22580.jpg


P-38F-5-LO "Regina I" #42-12654

p38-nose-30-suehr.jpg
 
oh dear. I was going to apply the sealing coat after the decals....should i have done it before? The silvering i hope wont be as obvious when im not using flash photography

The gloss clear coat should be applied as an undercoat for decals. It maks the matt surface more smooth for them. In the way decal marking can be stuck to a gloss smooth surface much better than to the matt one. Also it prevents against the effect of the silvering. The final coat should be the matt one. There is a group of modellers who apply the gloss varnish both as the decal base and the sealing coat. And then they apply the clear matt coat as the final one.
 
I have found another shot of the unknown one with the caption ... Lockheed P-38J Lightning fighter with the 8th Air Force, England, 1944.

lockheed-p-38j-lightning-fighter-8th-airforce-england-1944-01.png
 
Good stuff Michael. And yes, it's best to give the complete model a gloss clear coat first. This evens things out, especially if varying types of paint have been used (eg gloss, matt and satin), and provides a smooth, gloss surface for the decals to bed down into or over panel lines etc, allowing a 'painted' look, without silvering. Once done, a clear coat of the required finish can be applied - gloss, matt or semi-matt, depending on the original.
The 'H' certainly carried bombs on the inboard pylons, as shown, but it's doubtful if HVARs were carried, mainly because of the time period - the 'H' had been replaced with the 'J' and 'L' by the time HVARs were introduced.
 
Hi guys. Thanks for the coments and advice. With regard to the silvering issue, i had a quick look this morning before going to work (what a sad little man I am), its not nearly a bad as the photo I took would have you guys think. The decal was still wet when I took that, combined with the light glare from the flash to give the effect that you see. Not saying that what I did was optimal, but not as bad as it looks either.

Regarding the HVAR issue, Terry is spot on. I did some further "remembering of my research, and went back to this. There were no HVAR carrying aircraft until the "L". B*gger!!!!

WW2 Warbirds: the Lockheed P-38 Lightning - Frans Bonné


Sorry to have wasted your time guys....still i get some mighty cool photos in my build diary (trying to make the best of this).....
 
You haven't wasted our time at all. We are glad of the possibilty for helping you. What is more I would add these pylons and rack two bombs there like the picture shows above. And all be nicely done.
 
Last edited:
I agree with Wojtek - no time wasted, and we're happy to help. That's at least part of the idea of this forum - no 'look how good I am' syndrome here, just a sharing of knowledge and experience, in order to help each other. And learning by a mistake always reinforces the retention of knowledge gained, compared to learning slowly!
 
well good news and bad news (two things). Mostly bad though. The gloss coat worked pretty well and certainly cleaned up and bedded down most of the decals. ive successfully fitted the canopy as well

Unfortunately, one of the decals (the starbord side smaller pylon mounted roundel) lifted. Not only that, in my attempts to recover, I managed to damage the paint work underneath (not too bad)

So now Im in the market for a 1/72 scale USAAC roundel (1943 pattern) for the pylon of a P-38H. Ive sourced one already....not cheap at 14 Aussie Dollars, but I will get it. Any recommendations as to where to get good quality decals for this bird. the ones ive sourced are okay, but pricey and not outstanding.

Other backward step was that I did not put enough forward ballast in the model. I have since done that (and that might be why the decal lifted as i manhandled the model). but the udercarriage had to be removed to do it. Ive put a ton of additional weight in the nose and the two nacelles, and the thing is finally balanced now (I think).

So, some repairs I think....very frustraing, but despite the setbacks im pretty happy with the way it went. I big hurdle after I get out of the rough will be whether, and how I put the radio lines to the two tails. if i do, it will lok very spiffng, but its going to be risky, since I think the anchoring point is into the canopy.

Not all work is good and not all news positive, but this is a manageable problem in my opinion
 
Good stuff Michael. Not sure about the decals, as I don't normally work in 1/72nd scale, but there's a good chance someone on the forum might have some spares.
As for the radio antenna wires, if this is a UK-based aircraft, they were on VHF by this period I believe, so there wouldn't be any wires, the antenna being either a di-pole or blade type. Hopefully someone with more knowledge of the type can advise. (The last photo posted is of a 'J' or 'L' version, without wires.)
Otherwise, if you have to fit the wires, use either very fine nylon thread from a pair of ladies tights, or 'invisible' mending thread. Drill a small hole in the central, rear frame of the canopy, and one in each fin leading edge. The thread might hold, and probably will, with ordinary polystyrene cement, or you can try superglue.
Fit the tip of a 'V' of thread into the canopy hole, after dipping it in the cement. If using 'superglue', mask around the area of the hole, preferably after giving it a coat of Future which has dried thoroughly, to prevent clouding from the glue.
Insert the 'V' of thread, and let it set - at least an hour for cement, 15 minutes for 'Superglue'.
The thread should be cut to at least twice the lengths required, to assist in handling.
Take one strand, and here you can use 'Superglue', and pull it taught against the hole in one fin. (This hole should be made as a notch, at a slight angle across the fin leading edge.). Apply a small drop of 'Superglue', off the tip of a pin or needle, onto the taught thread, in the notch, and retain the tension until it is set enough to release the grip on the thread - about 10 to 20 seconds probably, although allow a little longer.
Repeat this for the other fin and, after waiting about ten minutes, to allow the glue to fully harden, cut off the excess thread, and then, using a pair of nail clippers, get in close against the fin and snip off the remaining small tag of thread.
Any disturbance of the paint or glue mark can then be re-touched, hiding the joint.
Hope this helps.
 
spent this evening carrying out repairs basically. I retouched the paintwork I had damaged, sealed up the holes in the landing gear wells (ididnt make them, its a very unsatisfactory way that Airfix do their undercarriage bays.....I basically filed the cavities with cotton wool and then put a thin coat of filler over that base. Same princial as when you have to fill cracked walls panels and gyprock. its sounds dodgy, but it actually worked pretty well). Next I repaired the broken props. I think that just gluing them is a very weak (structurally) method of reair, soI went for something a bit more elaborate....i used a pin vice and a small protractor to drill hulls into the spinner,attached small bits of styrene rod to the ends of the broken props and then glued them back on the spinner where the holes were. I inserted the Styrene rod into the hole, and this made the prop nice and flush and fairly strong. Not great, but im happy.

Lastly I re-attached the undercarriage Oleos. It was a bit tricky actually as the holes dont seem to line up quite correctly.

Ive only got a few things left to do, so progress is good. I still have to wait for my replacement decal, fit a few bits and pieces like pitot tubes, and make a decision about the radio antenna. I havent been able to find any photos of PTO P-38s so Im just not sure about the antennae fit.


Ill try and post some pictures tomorrow guys. Very tired must sleep for now
 

Users who are viewing this thread

Back