**** DONE: 1/72 PBY-5A Catalina RAAF 42 Sqn - Seaplanes / Floatplanes of WWII

Ad: This forum contains affiliate links to products on Amazon and eBay. More information in Terms and rules

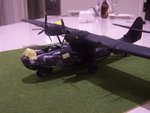
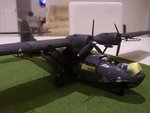
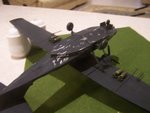
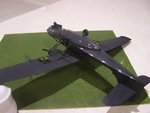
its more black than it appears in the photos. When i was preparing the photos I press a button called "optimize". Unedited, the colour is a deeper black. Its come up with a definite oxided look, which i kinda like.

As far as weathering, it definately needs it, but ive never attempted such effects. i was thinking of putting oil stains behind the exhaust stacks, but Im unsure how to go about that weather beaten look

The actual aircraft im trying to simulate appears in one of the following photos. Fuselage code RK-E. This particular aircraft is not too battered. Ive made a mistake however. The kit i have comes with these blower assemblies that fit to the top of the engine. But RK=E doesnt have them. ill have to remove them and clean the model up around the cowlings....b*gger....B*gger, B*gger.

The airborne radar assembly atop the main canopy is problematic. The immediately precedeing aircraft Ive seen photos of show it as fitted, but the shots of the subject aircraft after she ditched show them as not pr3esent. In the hours before the crew rescue, the crew lightened the bird as much as they could by ditshing all excess equipment. Was the radar array fitted or not at the time of her loss? I tend to think not. she was configured for a mining operation, and ASV would not be all that useful for that trytpe of mission. On the other hand, Ive configured my aircraft as carrying 1000lb GP bombs, so in terms of that "fantasy" configuration, might be appropriate to fite the A{S housing. What are your opinions? .
 

Attachments

  • Image6.bmp
    1,004.6 KB · Views: 109
  • Image1.bmp
    827.4 KB · Views: 123
  • Image2.bmp
    928.4 KB · Views: 103
  • Image3.bmp
    674.9 KB · Views: 106
  • Image4.bmp
    823.6 KB · Views: 107
  • Image5.bmp
    530 KB · Views: 104
Michael, the chiping is easy using Prismacolor Metallic Silver pencils. I think that the Verithin work better than the Premium. Sharp point RANDOM dots and run them together making Random bigger splotches. Any leading edge: Props, wings, tail, stabilizer, cowlings, ect. Being a SEAplane a VERY thin off-white spray where seawater would have hit and evaporated. Vallejo makes DUST #1 and #2. Again a VERY thin spray over upper surfaces. I used a translucent OIL(color not type) paint on the Widow but it did not show well over the black perhaps NATO black will be lighter, lower engine cowlings, use a dry brush technique. Less is more
 
Ive attached (and un-attached) much of the external equipment, finished off the black finishes, added a ton of nose weight (had already done that, but i needed more), and applied the weathering effects. Doesnt look too bad, for a first effort.

Still have to put a sealing clear coat, and then the decalling, before ataching the remaining glazing bits. might post interim shots before then, for appraisal of the weathering effects. not too late to change it yet, but a clear coat would make it more difficult....


Slowly getting there. i might still be able to do the Seiran after all....
 
so here are my photos of the model at this stage, with weathering added. ive also added some oil streaking on the upper edge of the wings behind the engines, though its a little difficult to see
 

Attachments

  • 102_2943.jpg
    102_2943.jpg
    69.1 KB · Views: 108
  • 102_2944.jpg
    102_2944.jpg
    81.8 KB · Views: 106
  • 102_2945.jpg
    102_2945.jpg
    73.9 KB · Views: 96
  • 102_2946.jpg
    102_2946.jpg
    65.3 KB · Views: 96
  • 102_2947.jpg
    102_2947.jpg
    68.3 KB · Views: 106
Agreed, AND it now appears BLACK. IMHO: Some very light DUST on the upper surfaces and a bit of white salt spray on the lower and towards tail. Not sure what type of exhaust staining the Cats had
Very nice Michael
 
I have done some oil staining and it is just visible in those shots, but the light played havoc on its visibility. in differnt light it becomes quite pronounced. ive basically used the Tamiya Smoke. I dare not make the shading more proponounce for fear it will be overdone.

Next up is to apply a satin top coat. i dont want to finish this in any sort of gloos. might be a mistake ...im still having a think about it, but I hope to have this model finished by the weekend.

How do you apply that light dust mike?
 
Michael, I have a Vallejo paint: DUST 1 and 2. Baring that a VERY thin Grey? or Light Brown? (kinda depends on the conditions where the plane was based) color air brushed over the upper surfaces. Think in terms of sun-faded Black. I took a 5ml bottle filled it with Thinner then stuck a paint brush in the paint and cleaned it in the 5ml bottle. Spray and wait, spray and wait, slowly build up til you get what you like. Same with the salt spray, Very thin off-White
 
You can also add a touch of the desired paint to your clear coat to simulate dust or fading. For oil stains, I usually simulate reality by using almost the same thing - artist oils heavily thinned in a suitable thinner. I do like what I see there Michael. You've mastered the first rule of weathering - go a little at a time until you're happy. I've seen many a model ruined with overdone weathering. Easier to add than remove....
 
guys i have a request to make. putting on one of the main decals tonite, i wrecked one of the wing decals. before I go and spend $20 buying a new set of decals, to replace that one decal i wrecked, i was wondering if anyone might have an RAAF blue and white decal, 3cm across with the width of the blue cirdle about 5mm. happy to buy or swap if anyone is interested or able to help.


Obviously time is running out so i need to get this problem solved quickly.
regards
 

Users who are viewing this thread

Back