**** DONE: 1/72 Supermarine Seagull V - Heavy Hitters II GB (1 Viewer)

Ad: This forum contains affiliate links to products on Amazon and eBay. More information in Terms and rules

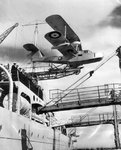
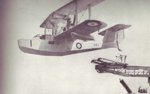
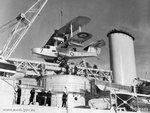
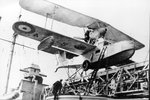
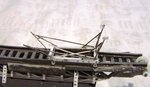
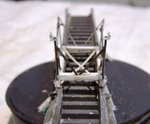
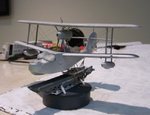
Michael, before you go ahead and make the beaching dolly, check references. I can't be 100% sure, but I think these were only fitted when bringing the aircraft onto land, via a beach or slipway.
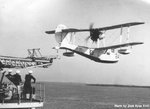
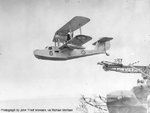
When onboard ship, loaded onto the catapult ramp, I believe the wheels were removed.
 
I have to respectfully disagree Terry. In amongst the material so generously supplied by the other members, plus some contemporary photos Ive seen myself, the undercarriage still attached (and sometimes even deployed....the ground crew appear to be working on one of the stuts in the shot ive seen).

Maybe they did remove the undercarriage on occasion, but there are exceptions to the rule if thats the case.

Ive made some good progress in the the fabrication of the trolley/dolly last night. Should be able to post some progress shots tonite.
 
Some of the shots I have of RAAF Walruses show the landing gear folded up into the lower wing when launched. Also note the two shots with wheels down whist on board the catapult ramp.
 

Attachments

  • A2-1 (2).jpg
    A2-1 (2).jpg
    59.6 KB · Views: 80
  • A2-1.jpg
    A2-1.jpg
    18.1 KB · Views: 89
  • A2-24 (2).jpg
    A2-24 (2).jpg
    32 KB · Views: 95
  • A2-6.jpg
    A2-6.jpg
    25.1 KB · Views: 95
  • 9sqnRAAF2 A2-7.jpg
    9sqnRAAF2 A2-7.jpg
    48.3 KB · Views: 97
  • A2-5.jpg
    A2-5.jpg
    113.7 KB · Views: 84
Yes thanks Wildcat....Ican use those shots as well. Terry still may have a point, however....maybe the undeercarriage was removed if the flight plan was to land on water. I can imagine that the undercart, even in the "up" position could cause problems of "drag" when landing on the water.

but there are enough exceptions to be able to build this model in a simulated ships catapult with the undercart attached....even a few shots with the undercarriage actually deployed (lowered) whilst sitting on the trolley.

Anyway, ive made substantialprogress in fabricating my trolley. ive used a mix of high tensile steel and styrene, to undertake this build. I have had to make some concessions in my build in the interest of achieving strength and simplifying the model from reality. Most obvious are the rather large feet ive attached to the support rods of the trolley. these are for the model to actually rest on when on display. Im intending not to glue the model to the trolley, just to sit it on it,so that i can choose to display it either on the trolley,or on its wheels, .

This was a hard scratch build and demanded i make careful and accurate measurements for each component. Using steel gives the trolley the strength it needs in orderto be functional, but it also meant I had to cut each piece as accurately as i could manage to produce a faithful copy of the real thing.

ive used a ton of glue to put all the bits together, which i know makes the build look untidy. Im pretty confident i can carefull sand and remove that reasonably well

The glue is still hardening as i post this, so i still dont yet know if the model will sit on this trolley with the right angles and deployment....but i was careful to dry fit the aircrafton the trolley at each stage of its construction. at this stage i think it will sit on the trolley at the right atttude....but thats all I can say.

Im vey happy to this stage....but let me know if you think its okay, or im just kidding myself...
 

Attachments

  • 102_2648.jpg
    102_2648.jpg
    57.5 KB · Views: 83
  • 102_2649.jpg
    102_2649.jpg
    47 KB · Views: 84
  • 102_2650.jpg
    102_2650.jpg
    59.5 KB · Views: 76
  • 102_2652.jpg
    102_2652.jpg
    66.4 KB · Views: 85
  • HMAS Perth catapult.jpg
    HMAS Perth catapult.jpg
    860.2 KB · Views: 107
here are the first shots of the model on the catapult array. I think that is about asgood asI could possibly hope for. An authentic look, no glue or fasteners of any kind. The trolley fits like a gloves.

I canfinish the cataplt...about all that is needed is the right paint after a bit of clean up. then I can finish off the model itself. im happy with the aircrafts silver colour....i think it looks pretty good....

Im very happy withthis result
 

Attachments

  • 102_2653.jpg
    102_2653.jpg
    53.3 KB · Views: 96
  • 102_2654.jpg
    102_2654.jpg
    54.8 KB · Views: 101
  • 102_2655.jpg
    102_2655.jpg
    50.7 KB · Views: 102
in the week we all had off, I made some further progress, and will post some shots soon. Ive attached the landing gear leags, but not the wheels as yet. ive cleaned up and painte the defensive weapons. Ive painted and cleaned up the bombs, but i may have to rpaint...I painted them black, but the Wlarus on display in Stockholm has white boms with some pin striuping and silver nose caps. Doesnt seem right, but then maybe it was to go with this vary unique colour scheme....

Ive applied most of the decals, but had a bit of a senior moment Im afraid. The registration codes shown in most of the contemporary photos show wuite small sized registration lettering. . a few show very arge lettering in greay silver finish. The large lettering requires that slightly smaller roundels for the underside of the wings. Okay, fair enough.

The kit has absolutely no instructions for the underside registration numbers in Australian colours...or rather, in pictures says that there were no registration numbers. That I know is wrong. Its either the big grey letters (and smaller roundels), or the smaller black lettering with the humungus roundels.

I decided that I would apply the big letters AND the big roundels, since this was the only combination provided with the kit. Thats what you are supposed to do for the Walrus Paint scheme 9which is based on the display at Hendon). Unfortunately, didnt work. The roundels and the big lettering are simply too big for the space i had. not that I even got the chance to test that theory. In my rush, i used water that was too hot. Im used to cludgy over thick Airfix type decals that drive like a four wheel drive. These are really fine, well make and exceptionally good decals that go on really well, with one exception....if you use water that is too hot, the decal lifts, scunches up into a tiny tight ball, and its game over. I eventually did get the big roundel unravelled from that mess, but it was too damaged and to my great disdain, simply would not fit onto the wing edges outboard of the numbers. maybe Ive put the numbers on wrong, but I dont think so.

Ther will be no issue for the big sized roundels on the upper wings, and, as I said, the decals otherwise have gone on really well. Im using tepid water now, and its working a treat. To finish the undersides, ive used slightly smaller roundels that I had spare from my Firefly....looks okay, but i do know they are are not quite right either.

Ive had some fun and games putting the metal parts on the exterior of the plane, specifically, the control arms for the tail assembly and the litle support that hold the rear hatch cover in the open position. They are all on, they are okay, but I struggle with this stuff, and they are not as good as the rest of the build.

Good news is that the undercart has gone in very nicely. Ive also decided as a finishing touch, once I get the top coat sealant on to protect the finishes and the decals, to fabricate the mooring lines that you see in most of the shots. one from the bow to the port side cockpit window, and another from the rear gunners position to just under the port side lower wing. I think I will make this "rope like i did with the Sea King...using fine fuse wire, painte the right colour and shaped to the right shape as per the photos.

The kit comes with two different canopy finishes, one with the pilots hatch open, and one fuly buttoned up. Since I am simulating the aircraft some time prior to launch, I though I would try and finish the cockpit with the hatch open....shows off the interior, which looks great, particlalary the compass (which I will try and capture in a photo if I can).

Have a question though. I am pretty sure the canopy glazing frames are finishes in overall silver the same as the rest of the aircraft. Ive started to do that, but its not too late to change if that is wrong...

So, I have three questions really, one of which cant be answered until I post some progress shots

1) Given the silver finishes, what colour should I paint the canopy supports
2) Given the silver finishes, what colour should the offensive ordinance be (ie the bombs....they are little 50 or 100 lb bombs rememeber)
3) Are the smaller roundels okay (cant bbe answered until I post photos)

Postscript

Are other people still having trouble accessing some parts of the forum.I cant use "My Replies" or "My Threads as yet"
 
Good stuff Michael. I've no idea about the markings (not my field), but the canopy frames would be bare metal, or, more likely, painted in 'Aluminium'.
Ordnance would normally be Dark Green, with red band or bands denoting type of bomb, a further coloured band relevant to casing/explosive ratio (yellow, light blue, or mid green), and black lettering describing the explosive and weight etc.
However, in the early war period, up to about mid to late 1941, bombs and depth charges were finished in a dull, pale yellow colour, often with mid or light grey fins, and depth charges could be this colour overall. This applied to all British and Commonwealth produced weapons, and was changed to Dark Green when it was realised that a bomb dump packed with hundreds of yellow things, was highly visible from the air, even when draped in camouflage netting!
Where US ordnance was utilised, the American colours, coding and lettering were retained, these being appropriate to the period in question, although, as far as I know, American-produced aerial ordnance was limited to heavy bomber use, in the late war period, as a 'stop gap' until UK production caught up with demand.
 

Users who are viewing this thread

Back